
I live in Squamish, so I hike in the Sea to Sky area a lot. And one of my favourite trails is Russet Lake in Garibaldi Provincial Park near Whistler. There are three different routes to get there (two of which are gorgeous), and you can camp or stay in a pretty luxurious backcountry hut at the lake.
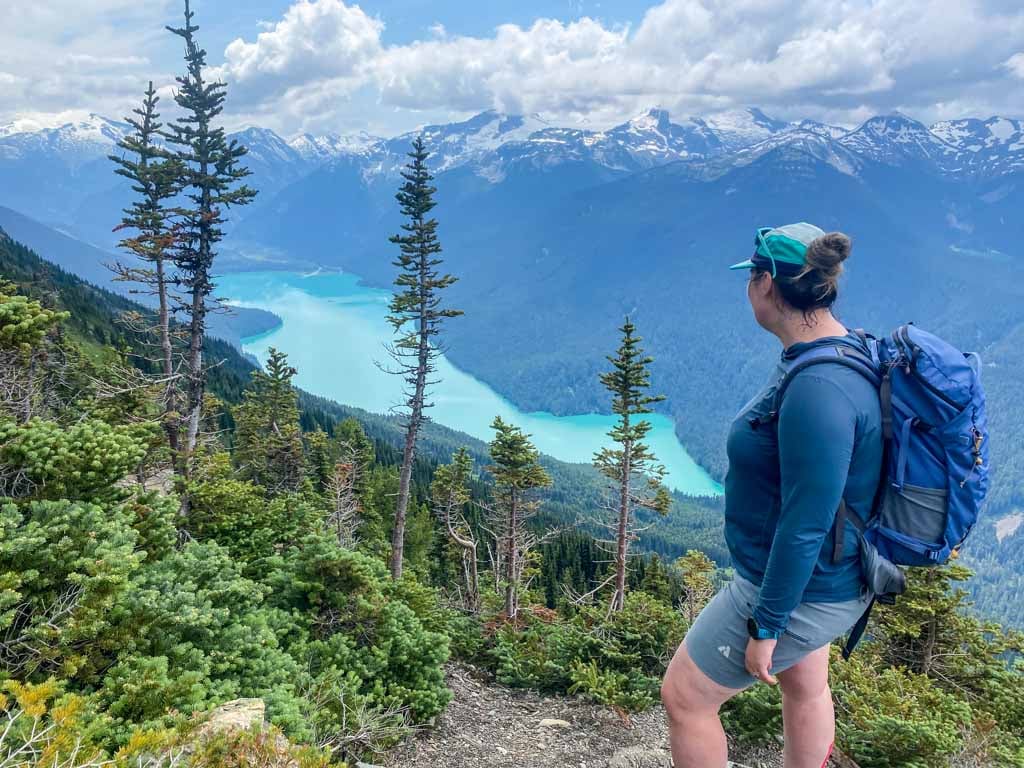
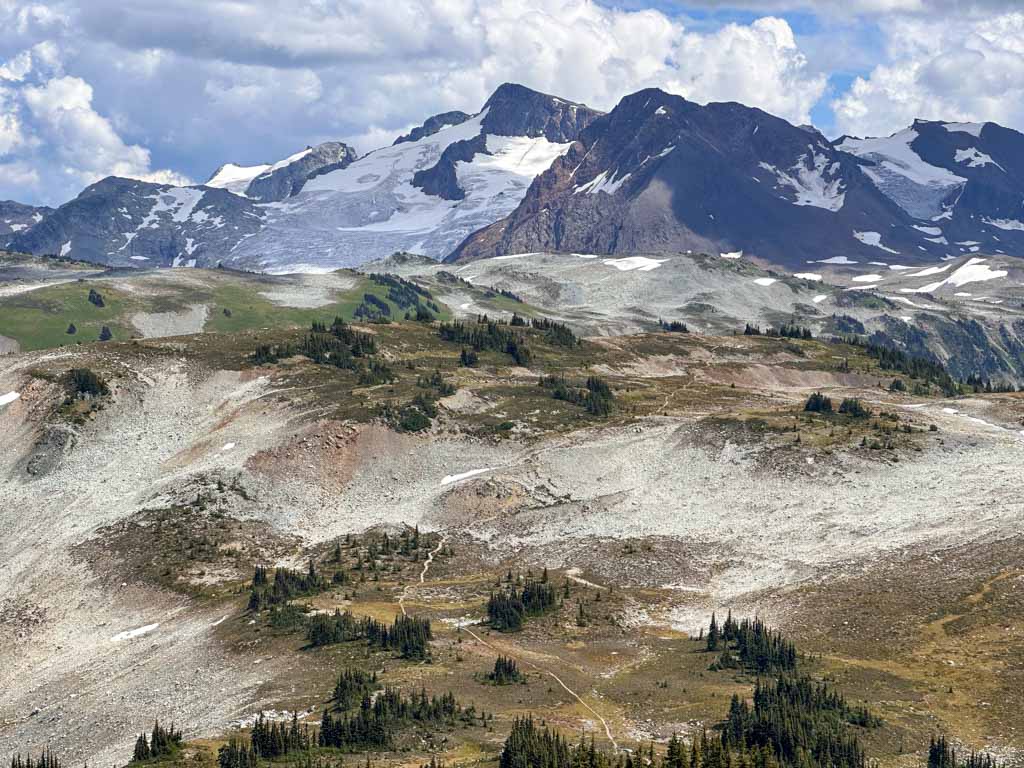
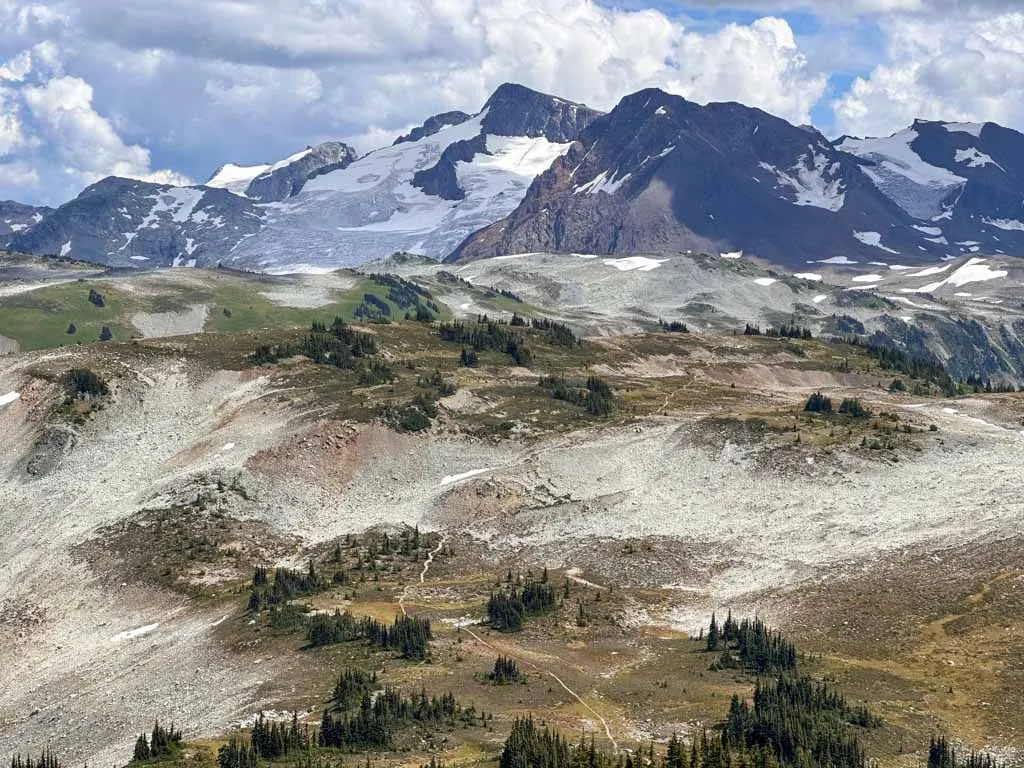
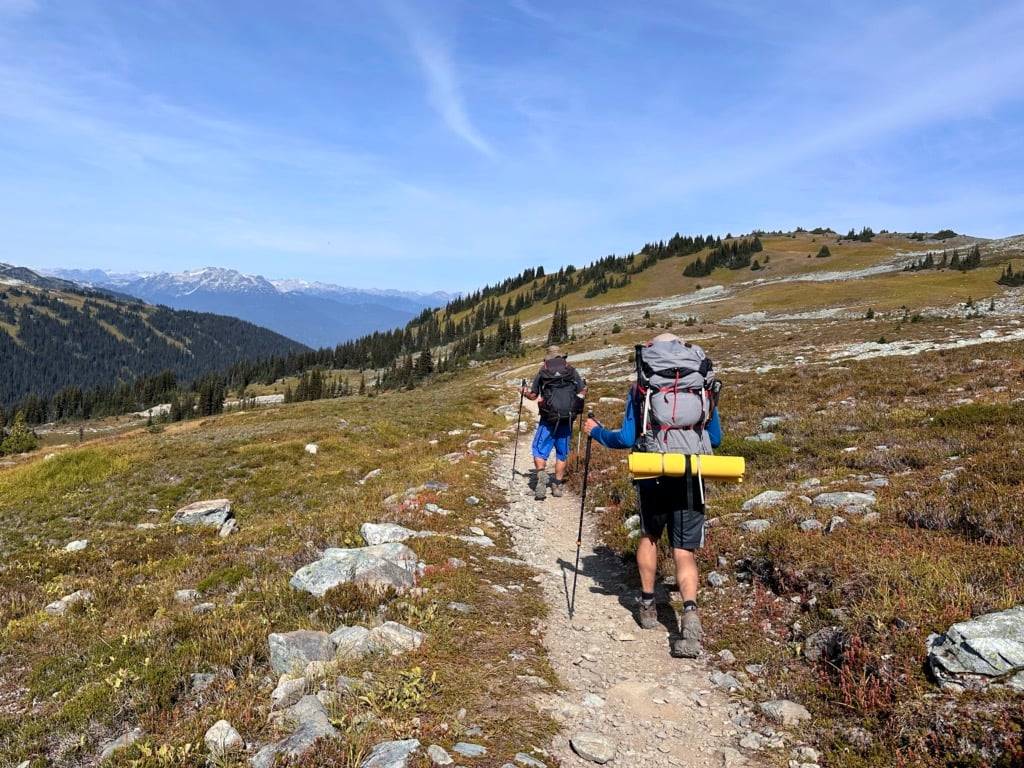
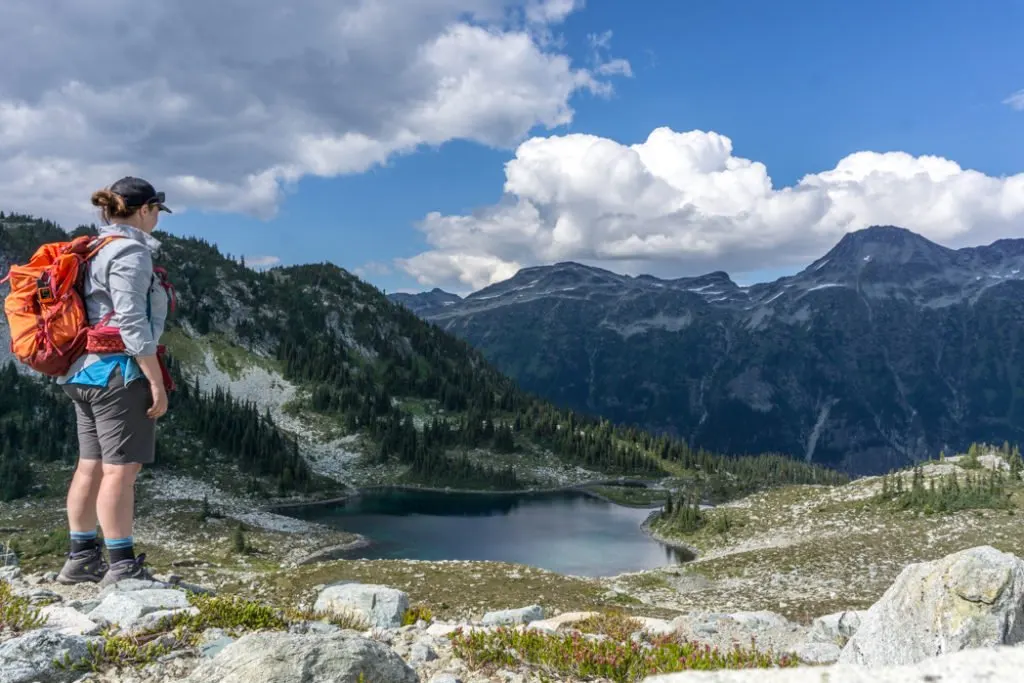
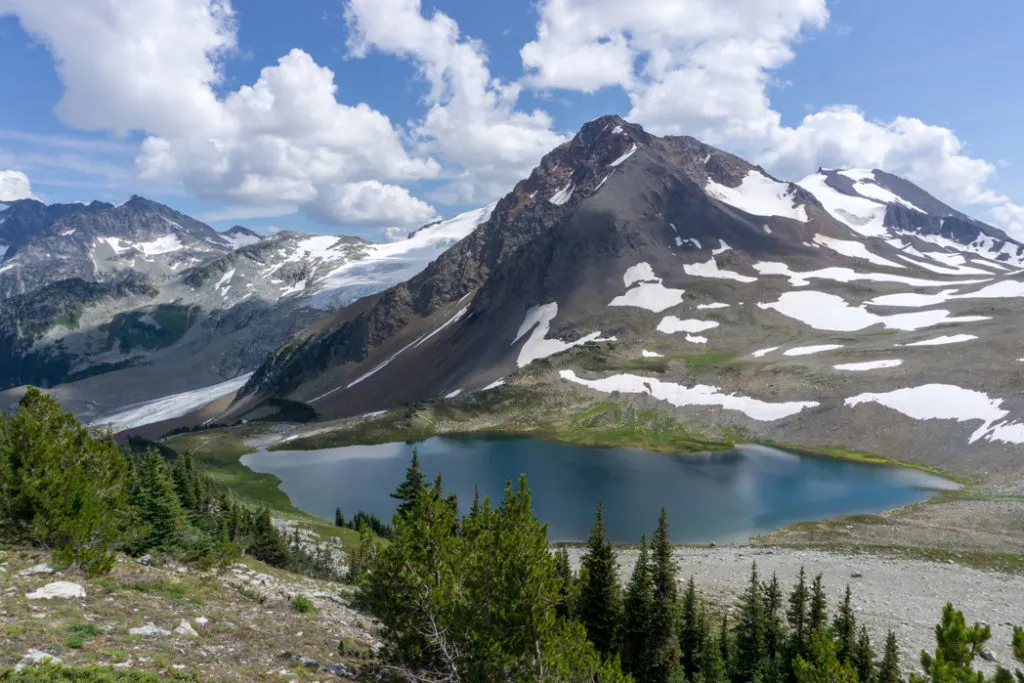
I’ve day hiked the various routes to Russet Lake several times each, and I’ve backpacked to the lake three times over the last 20 years. (The photos in this post are from various trips.) I keep coming back since it is one of my favourite areas – the mountain and glacier views are amazing (maybe the best in Garibaldi Park!) and access to the alpine is easy if you take the Whistler gondola.
I’m a hiking guidebook author and have backpacked all over BC, so I’ve put together a detailed Russet Lake hiking and backpacking guide for you. It includes:
- Quick facts about hiking to Russet Lake, including distances, how long it takes, best time to go, and more
- Map and elevation profile, plus a downloadable GPX file
- Detailed trail descriptions for each of the three options for hiking to Russet Lake plus tips for skiing and snowshoeing in winter
- Tips for which route to take and taking the gondola, including how to ride it for free
- Extending your trip – day hikes and scrambles from Russet Lake
- Camping and the hut – details on staying at the campground and Kees and Claire Hut, including reservations and fees
- How to get to the Russet Lake trailhead – including parking and bus info
- Russet Lake hiking tips – advice for bears, what to bring, food storage, weather, and more
This is a sensitive wilderness area. Learn how to Leave No Trace to keep the wilderness wild. Make sure you are prepared by bringing the 10 Essentials. Get ready for adventure with this checklist of things to do before every hike.
Hey there: Some of the links in this post are affiliate links, which means I earn a small commission at no cost to you. Thanks for your support. -Taryn

Russet Lake Quick Facts
Route Options: Russet Lake is located in Garibaldi Provincial Park in the mountains above Whistler, BC. You can get there via two different trails from the top of the Whistler Gondola or by the Singing Pass Trail from Whistler Village. I’ve got details on all three below.
Distance: 11.7 to 14.6 km one-way, depending on route choice
Elevation Gain: 665 to 1,450 m, depending on route choice
Difficulty: Moderate
Duration: 9 to 12 hours or overnight
Best Time to Go: Mid-July to mid-September to avoid snow and take advantage of Whistler Gondola’s summer service.
Reservations and Fees: Day hiking is free and does not require a day pass. You must make reservations with BC Parks to backcountry camp. If you camp, you must pay camping and reservation fees. More details in the camping section below.
Indigenous Context: This area is in the traditional territory of the Skwxwu7mesh (Squamish) and Lil’wat Nations. To learn more, see the info sign in the Elfin Lakes campground or visit the Squamish Lil’wat Cultural Centre.

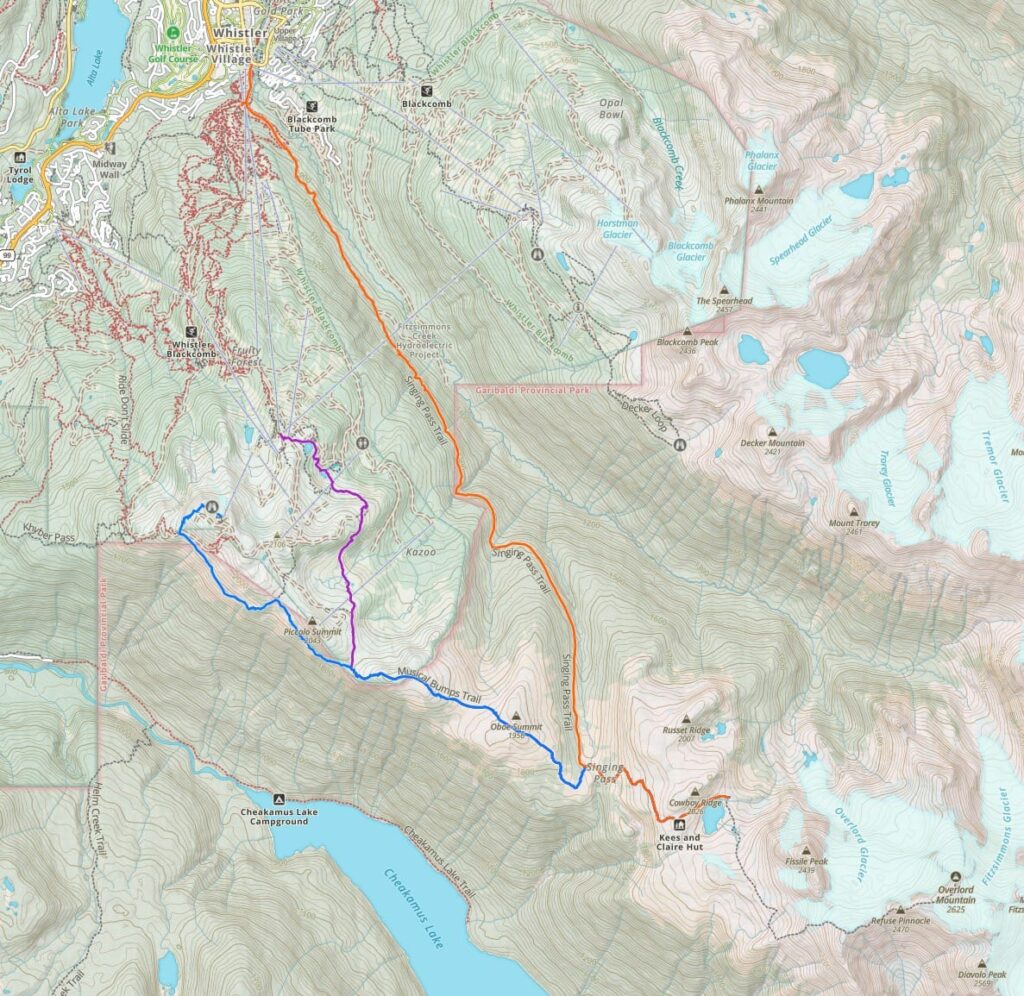
Russet Lake Trail Map and Elevation Profile
For the most part, the main trails to Russet Lake are well-marked and easy to follow. There are signs at all junctions.
I used the Gaia GPS app on my hikes. It is helpful to know where I am on the trail to figure out how much higher I have to climb and where the next viewpoint is. All Trails+ is also great.
I also made you a trail map using Gaia GPS. Click through to zoom in and explore. You can also save it to your routes in Gaia GPS or export the GPX file.

PS: Want to save 10% on a premium subscription to Gaia GPS (the app I use for all my hikes)? Use my link – the discount appears in cart.

Russet Lake Trail Options
There are three ways to hike to Russet Lake: the Singing Pass Trail, the High Note Trail from the top of the Peak Chair, and the High Note Trail from Whistler Roundhouse. You can also ski or snowshoe to Russet Lake in winter. Below, I’ve got details on each one.
Note: While I usually list distances as a round-trip, this time I‘ve listed distances one-way since this is a hike where you can take different routes there and back. I’ve also included elevation loss stats for the trip to Russet, which become elevation gain stats if you take that route back to the trailhead.
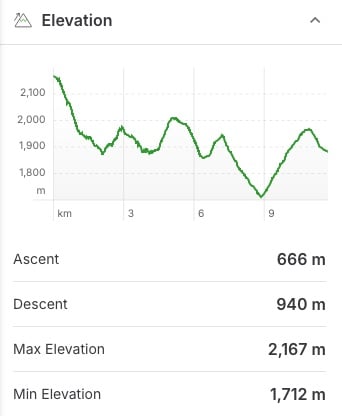
High Note Trail from the Top of the Peak Chair
Distance: 11.7 km one-way
Elevation Gain: 665 m
Elevation Loss: 940 m
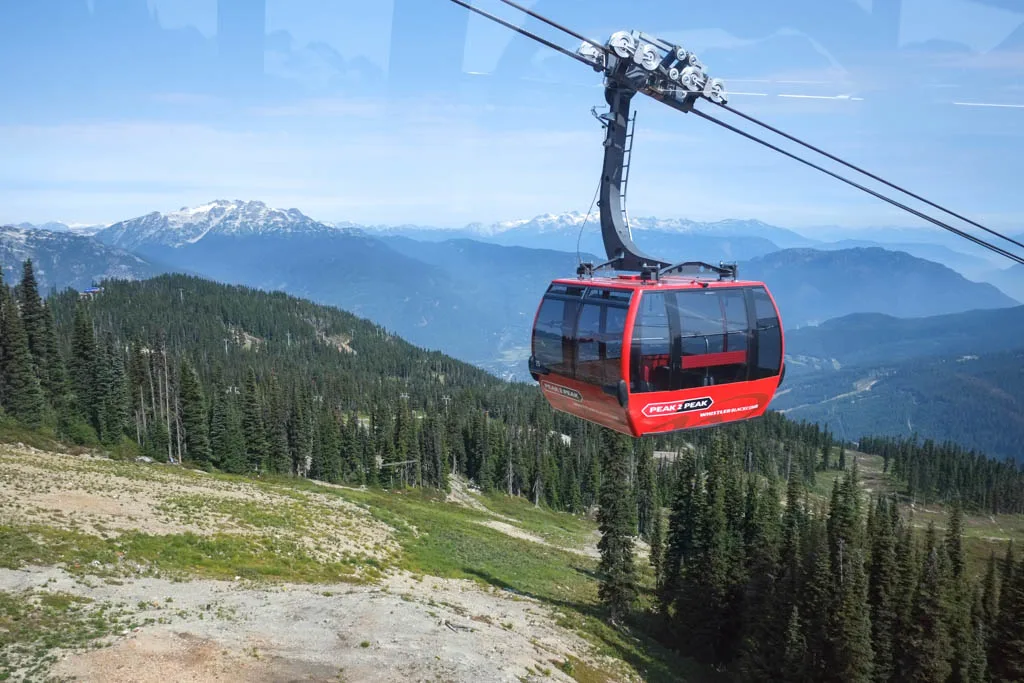
Practicalities: Requires taking the Whistler Gondola or the Blackcomb Gondola and the Peak 2 Peak Gondola, and then the Peak Chair.

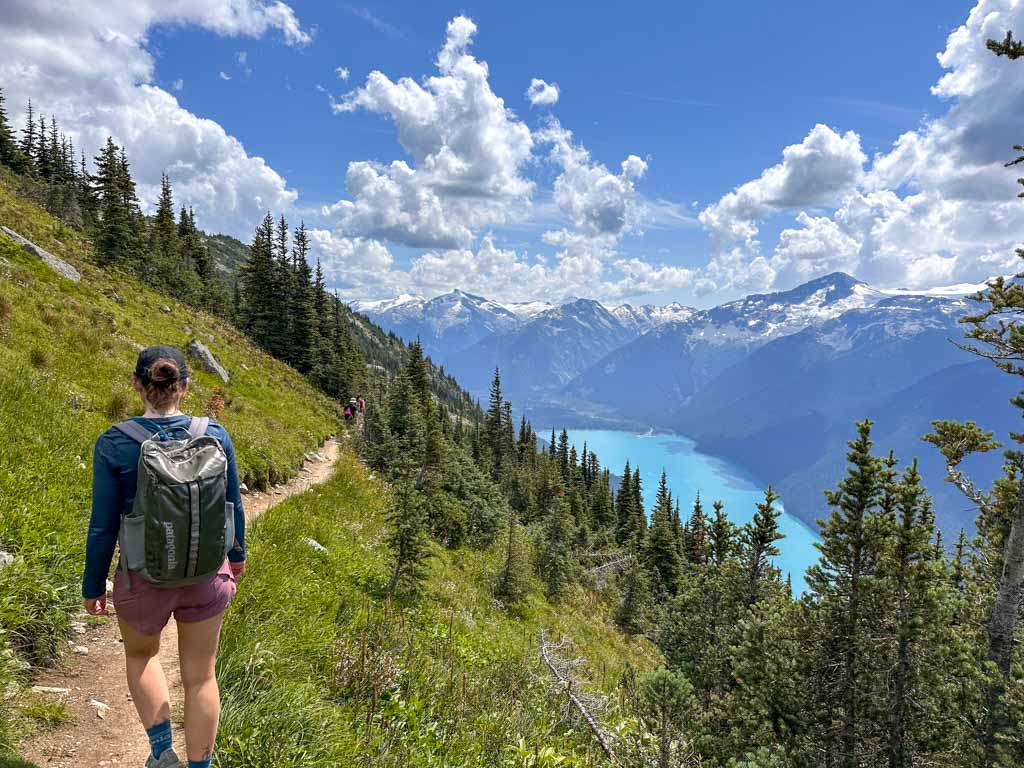
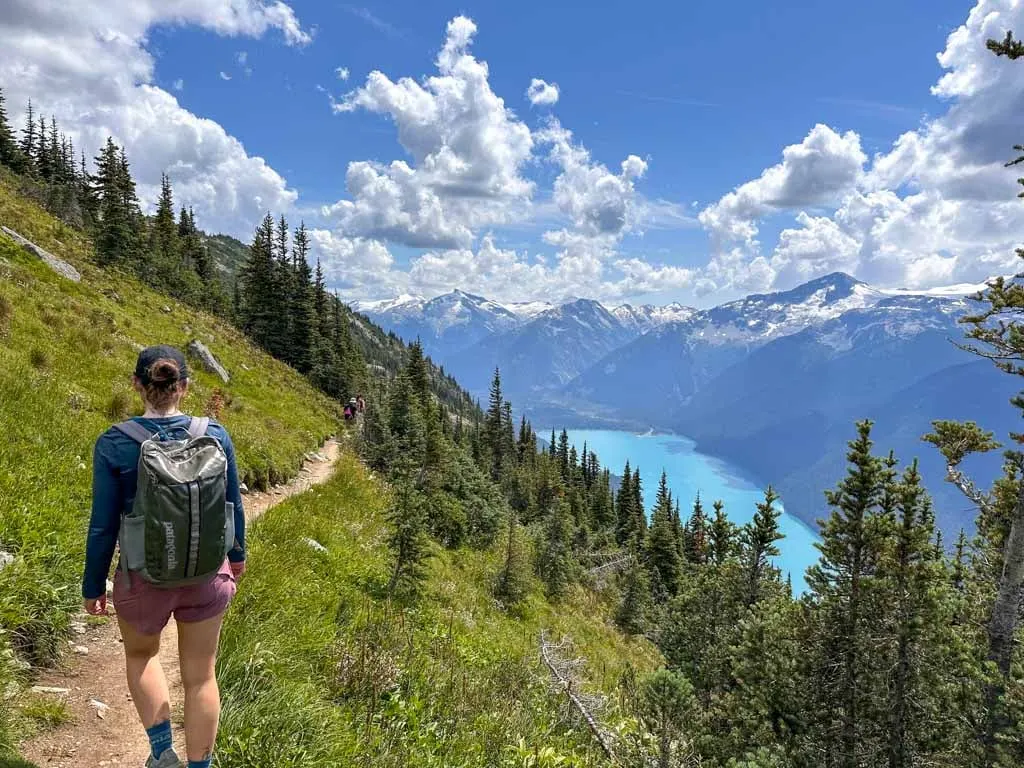
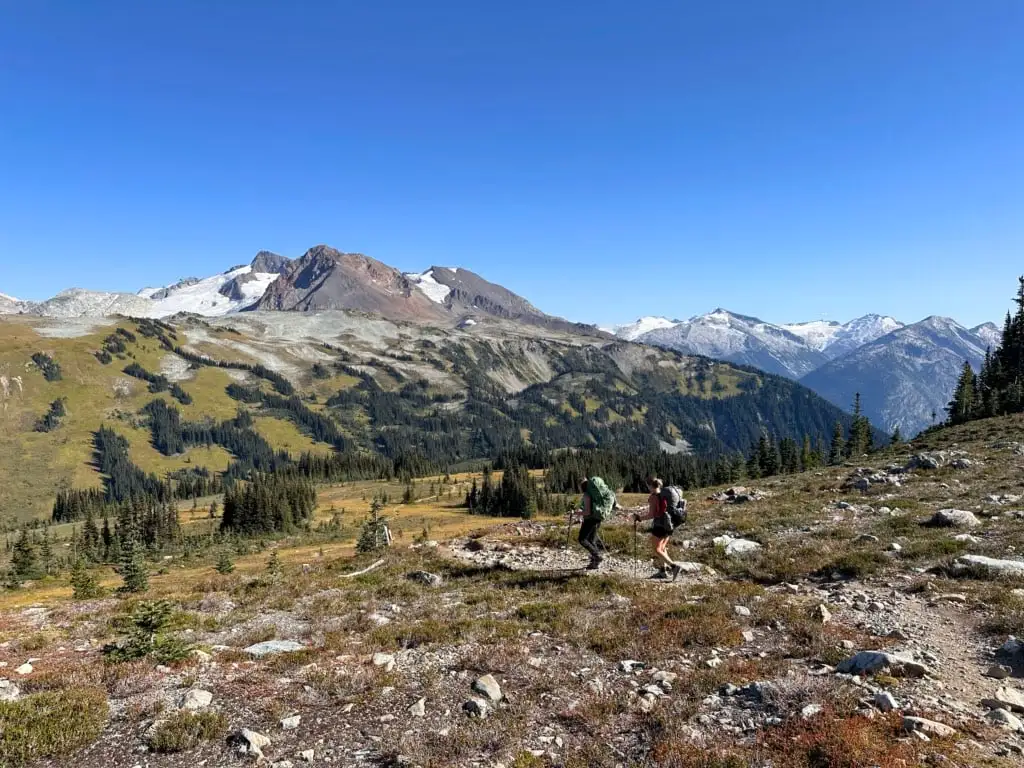
This is by far the most scenic route to Russet Lake and the route I recommend. You start by taking the Whistler Gondola up to the Roundhouse and then Peak Chair. (More gondola tips in the section below.)
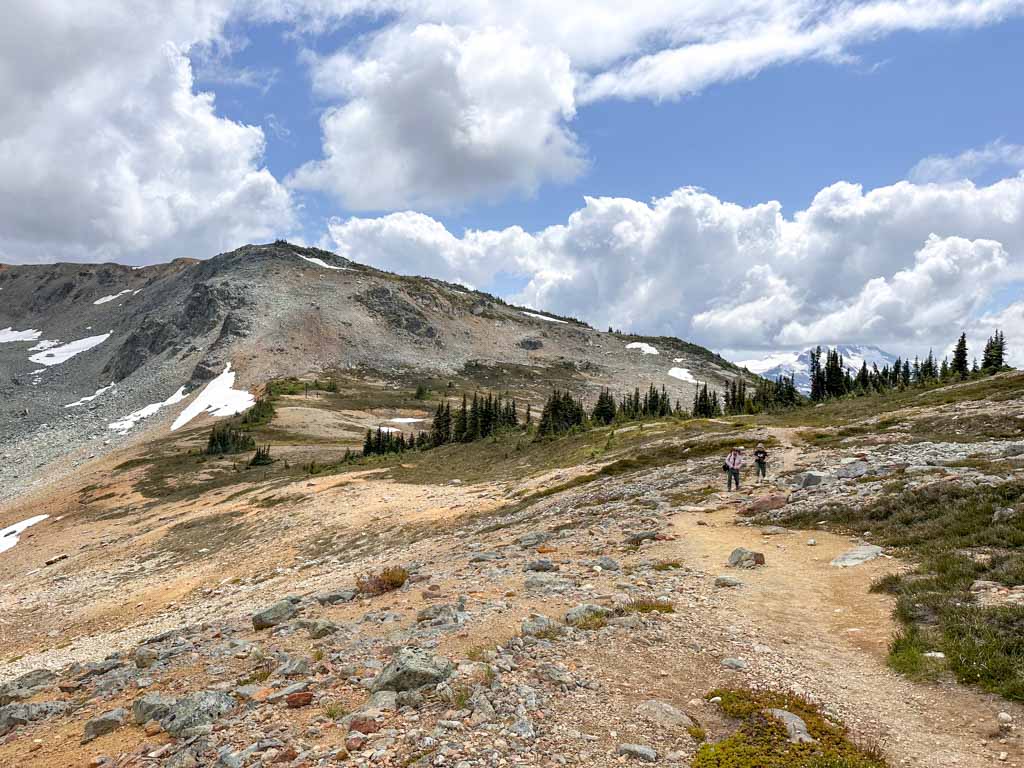
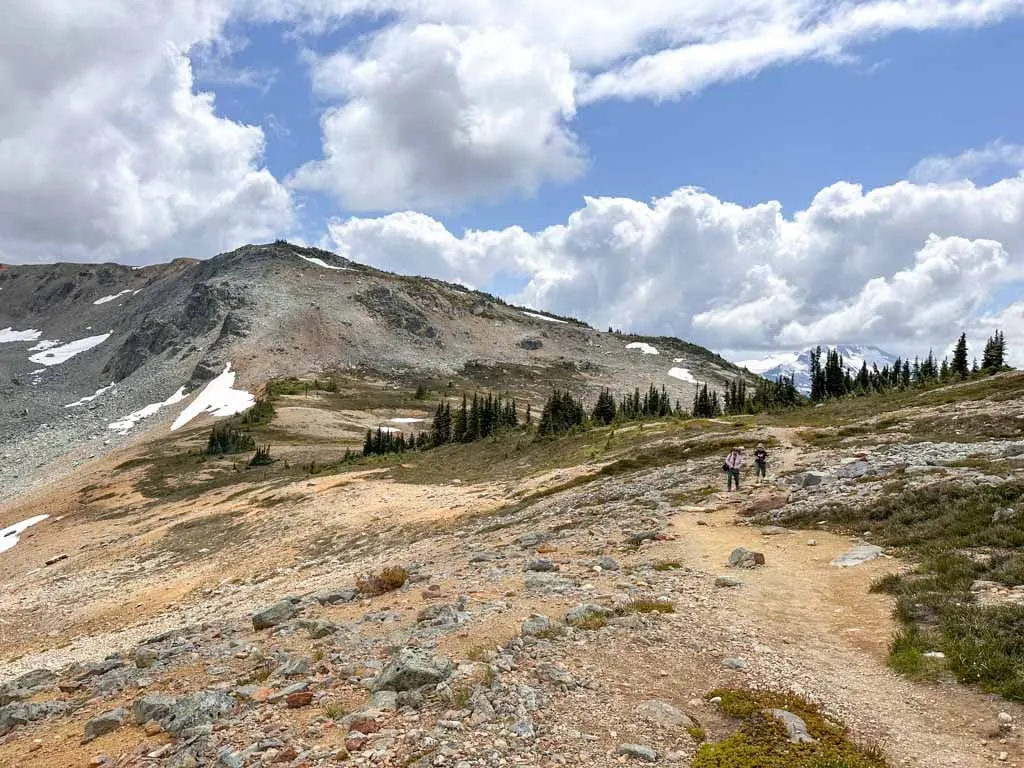
You’ll hike the High Note Trail to Flute Junction, then continue along the Musical Bumps to Singing Pass, then up Cowboy Ridge to Russet Lake.
As you can see in the elevation profile above, the route has some ups and downs, but in general, it is mostly downhill. There are no reliable water sources on this route, so pack all the water you will need for the day.
Key Locations
| KM | Elevation | Landmark |
|---|---|---|
| 0 km | 2,165 m | Top of Peak Chair |
| 2.9 km | 1,970 m | Junction with Half Note Trail |
| 3.7 km | 1,890 m | Cheakamus Lake Lookout |
| 4.5 km | 1,890 m | Flute Junction |
| 5.1 km | 2,010 m | Flute Summit |
| 7.2 km | 1,950 m | Oboe Summit |
| 8.7 km | 1,725 m | Singing Pass Junction |
| 10.9 km | 1,965 m | Kees and Claire Hut |
| 11.7 km | 1,885 m | Russet Lake Campground |
Route Description
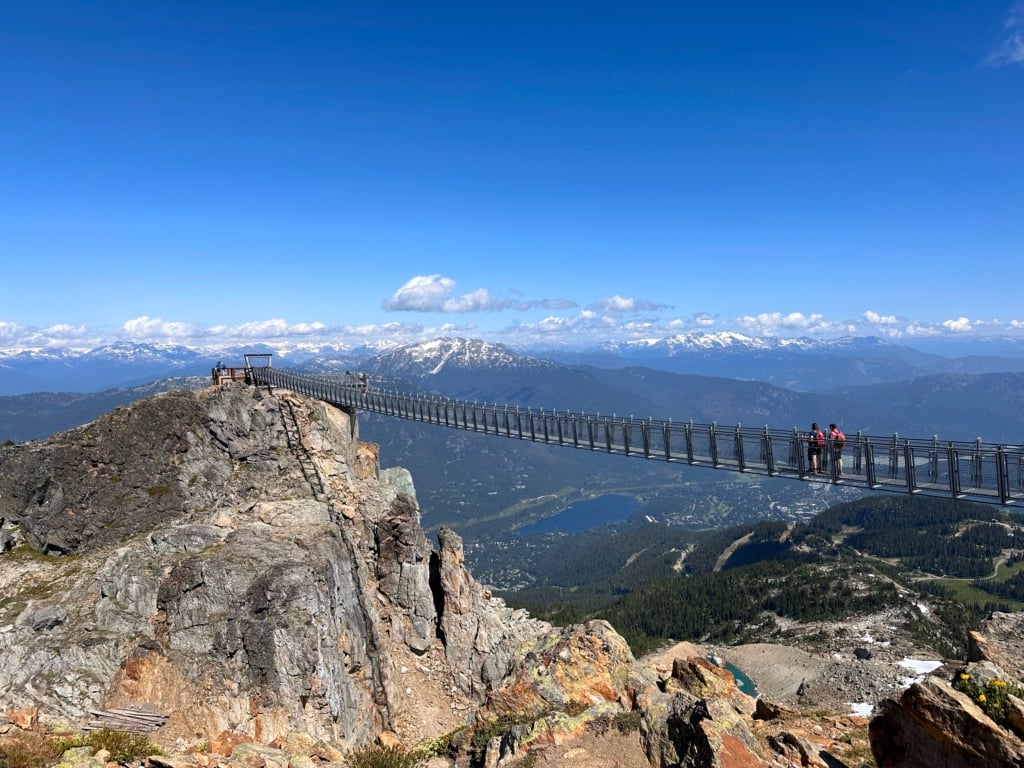
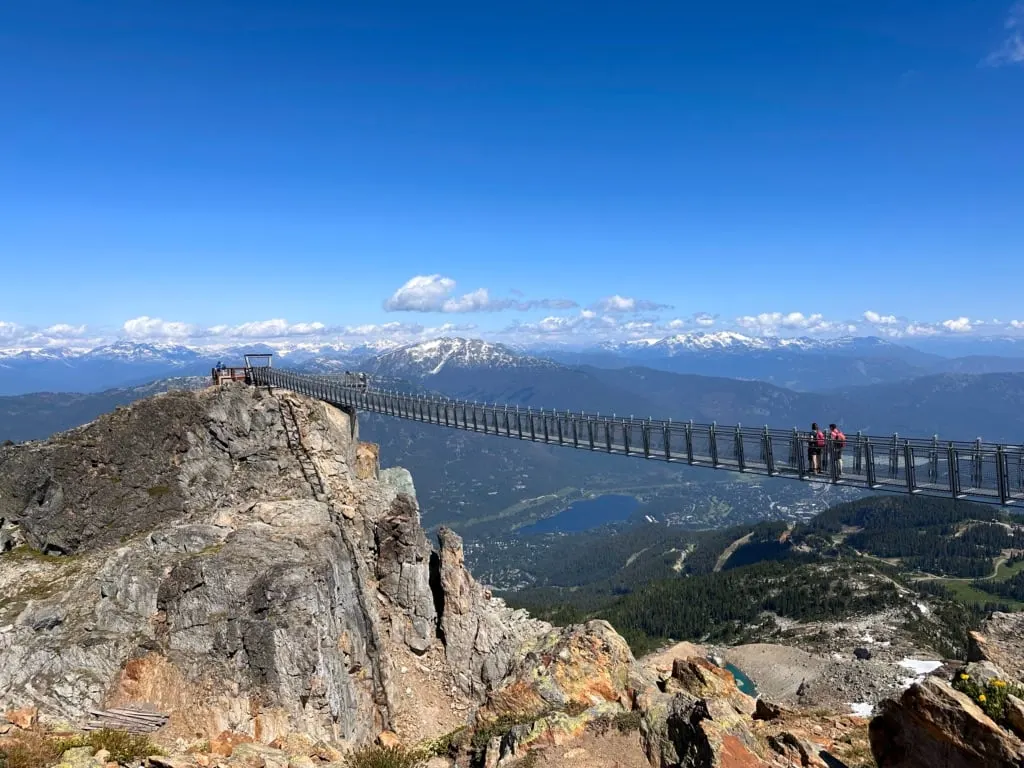
Ride the gondola and then the Peak Chair to the top of Whistler Mountain. Walk across the suspension bridge, then go left and down the stairs to the signed trailhead for the High Note Trail. My High Note Trail Guide has a more detailed description of this trail.
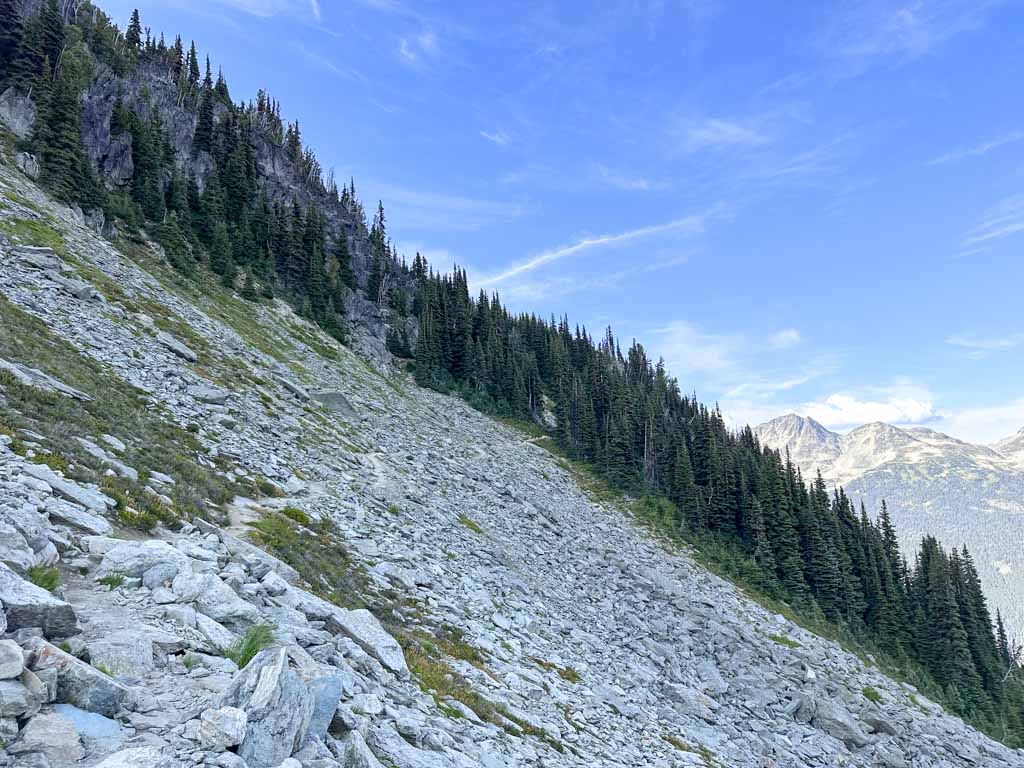
Follow the trail steeply downhill through a rocky section, then across a ski area access road. The trail follows the hillside through beautiful meadows with great views of Black Tusk Peak. Pass the junction with the Half Note Trail at 2.9 km and the Cheakamus Lake Lookout at 3.7 km.
At 4.5 km, arrive at Flute Junction. From here, you’ll go across the Musical Bumps: Flute and Oboe Summits. Go straight and gain 120 m up the hill to Flute Summit at 5.1 km. Be sure to detour south from the summit for the best views of Cheakamus Lake. Continue across the broad summit plateau and then down into a dip 160 m below Flute Summit.
On the other side, gain 150 m uphill to Oboe Summit at 7.2 km. The view from the ridge crest is gorgeous, but frustrating. You can see your trail dropping 225 m down into Singing Pass and then climbing up the other side.
Drop down off the summit and head downhill through meadows and clumps of trees to Singing Pass Junction at 8.7 km. Turn right and begin your ascent of Cowboy Ridge. The 240 m climb has a few switchbacks, so it is never very steep, but it feels tiring at the end of the day. There are great views the higher you climb.
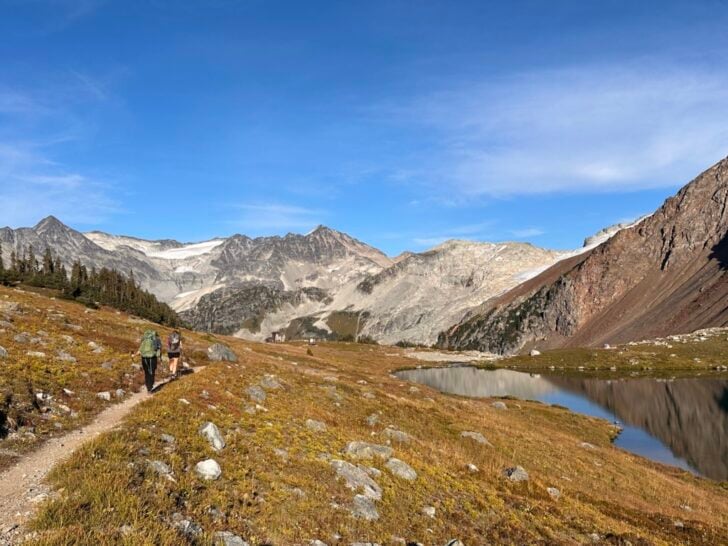
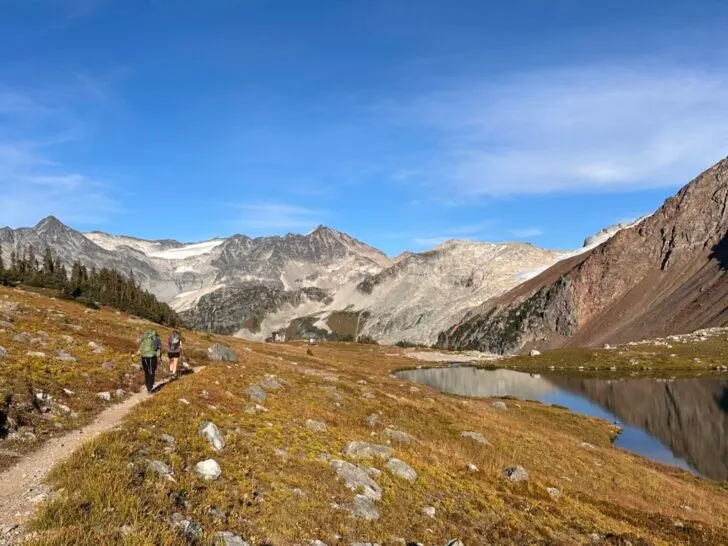
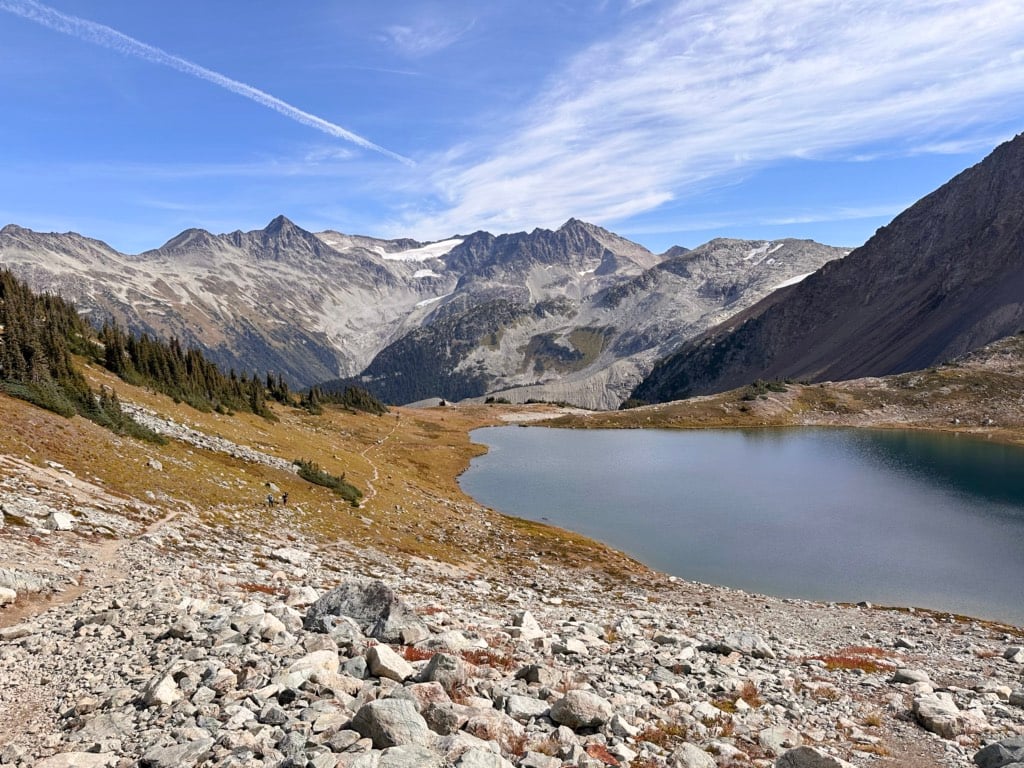
Reach Kees and Claire Hut at 10.9 km in very rocky terrain on the ridge crest. Follow the trail down through rocks and then meadow to the end of the trail at the Russet Lake campground on the north shore of the lake at 11.7 km.


Join the Backpacking in BC Facebook Group
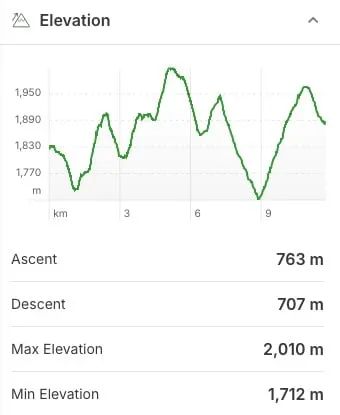
High Note Trail from Whistler Roundhouse
Distance: 11.7 km one-way
Elevation Gain: 765 m
Elevation Loss: 707 m
Practicalities: Requires taking the Whistler Gondola or the Blackcomb Gondola and the Peak 2 Peak Gondola. Does not include the Peak Chair.

This is another scenic option, but it isn’t quite as picturesque as the main part of the High Note Trail. You can use this option when the Peak Chair isn’t running. (It opens later/closes earlier than the gondola and doesn’t run at all in the fall.) I’ve also used this route when I’m with people who are afraid of heights and therefore don’t want to ride the Peak Chair.
From the Whistler Roundhouse, you’ll hike the bottom part of the High Note Trail in the reverse direction that most people take. Once you arrive at Flute Junction (and meet up with the High Note coming from Whistler Peak), you’ll follow the same route across Flute and Oboe Summits as the High Note Route from Whistler Peak.
While this route doesn’t have much more total elevation gain than the High Note Route from the Peak Chair, it does have a lot more ups and downs.

Key Locations
| KM | Elevation | Landmark |
|---|---|---|
| 0 km | 1,830 m | Whistler Roundhouse |
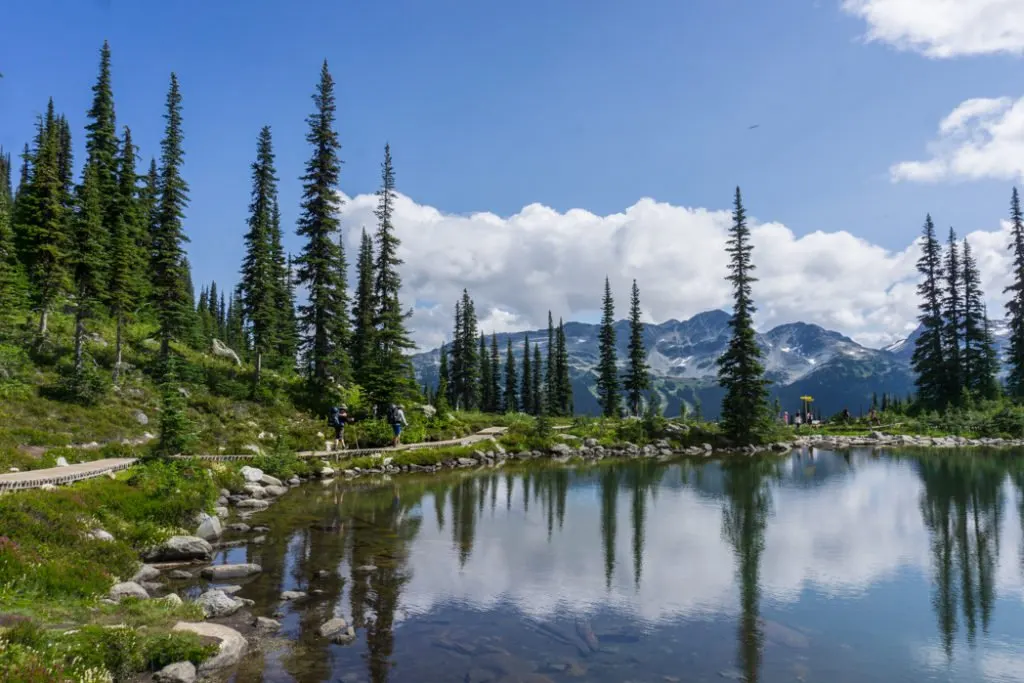
| 1 km | 1,740 m | Harmony Lake |
| 3.2 km | 1,810 m | Symphony Lake |
| 4.5 km | 1,890 m | Flute Junction |
| 5.1 km | 2,010 m | Flute Summit |
| 7.2 km | 1,950 m | Oboe Summit |
| 8.7 km | 1,725 m | Singing Pass Junction |
| 10.9 km | 1,965 m | Kees and Claire Hut |
| 11.7 km | 1,885 m | Russet Lake Campground |
Route Description
From the Whistler Roundhouse, follow the signs to Harmony Lake, 1 km away and 90 m lower. On the far side of the lake, head uphill, passing under a chairlift, to gain 160 m on a ridge crest.
Drop steeply down from the ridge, losing 90 m, to arrive at Symphony Lake at 3.2 km. This is the last reliable water source on this route, so fill up here just in case.
Head gently uphill, gaining 80 m to Flute Junction at 4.5 km. Turn left to begin the ascent of Flute Summit. From here, you can use the High Note Trail from Peak Chair description above since the route is the same.


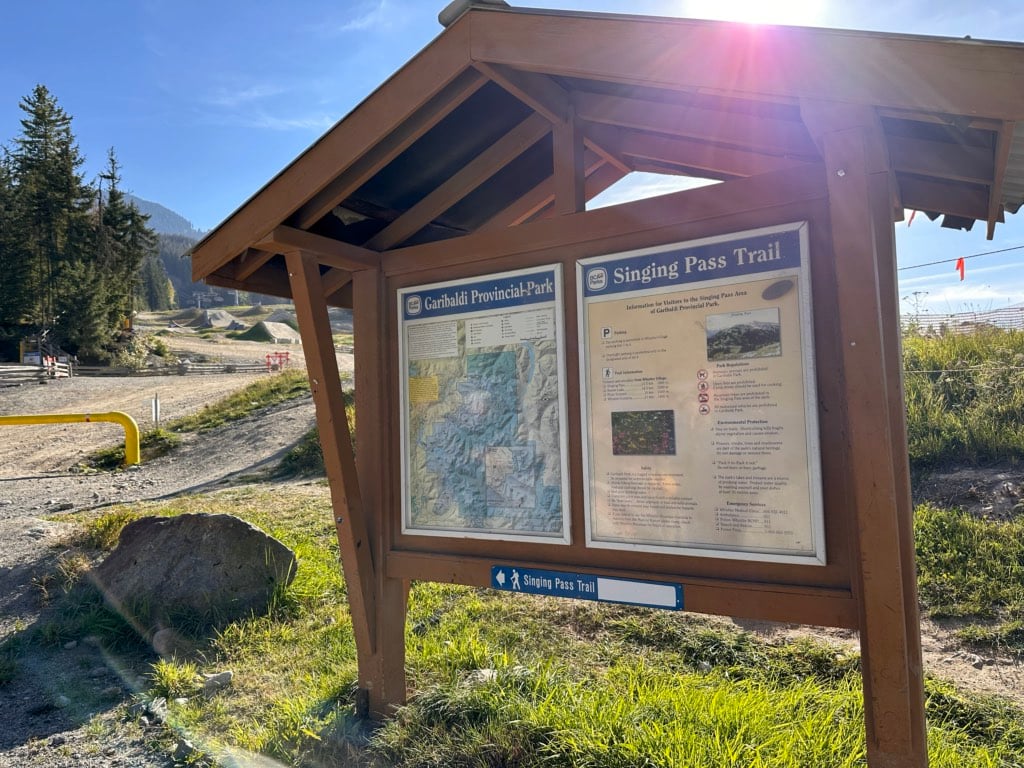
Singing Pass Trail
Distance: 14.8 km one-way
Elevation Gain: 1,446 m
Elevation Loss: 263 m
Practicalities: This is the only route to Russet Lake that does NOT require taking a gondola. You start right from Whistler Village.
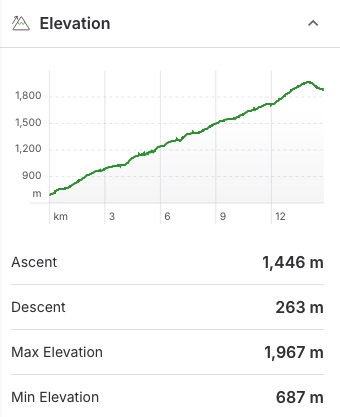
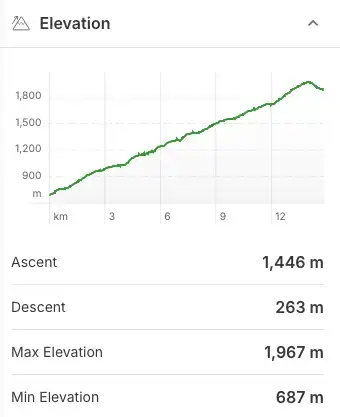
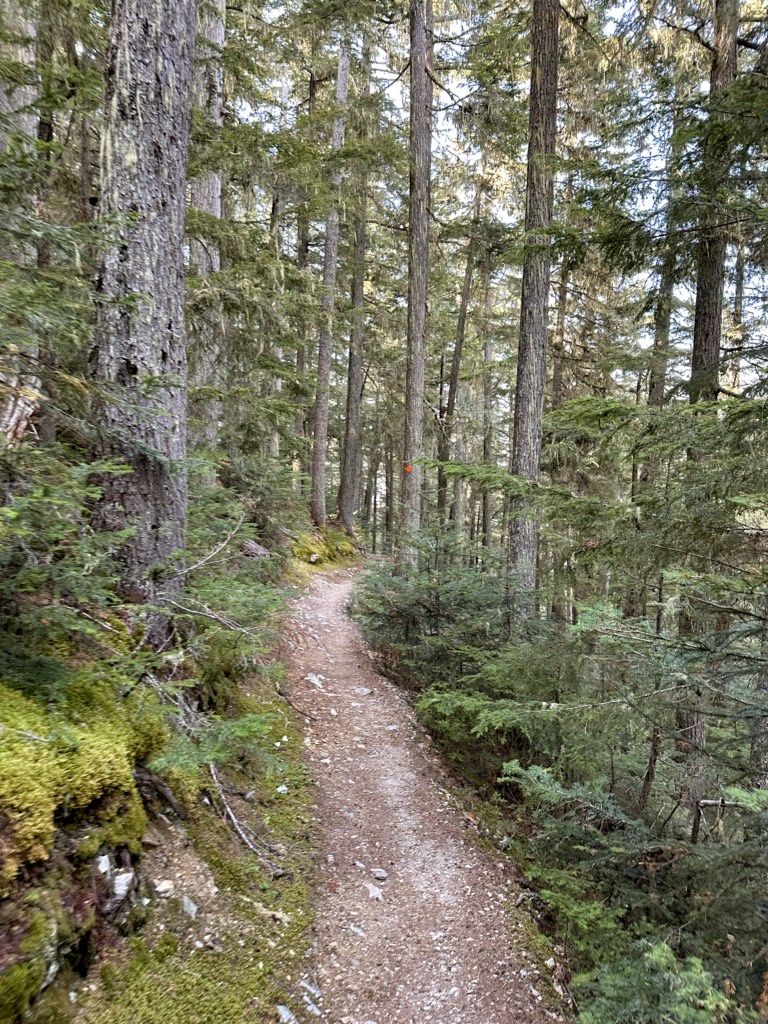
If the gondola isn’t running, you don’t have the budget for it, or you just like the idea of getting to Russet Lake under your own power, you can take the Singing Pass Trail. While it gains a LOT of elevation, it’s pretty gradual. It is entirely in the forest – you won’t get any views until you get to Cowboy Ridge.
The route starts in Whistler Village, crosses through the Mountain Bike Park, then follows an old road and then a trail uphill to Singing Pass Junction. From there, you take the same route up Cowboy Ridge as you would if you came from Whistler Mountain.
There are lots of water sources on this route, so you don’t have to worry about carrying much with you.

Key Locations
| KM | Elevation | Landmark |
|---|---|---|
| 0 km | 687 m | Whistler Village Trailhead |
| 1.5 km | 850 m | Leave Bike Park |
| 4.6 km | 1,120 m | Under Peak 2 Peak Gondola |
| 5.3 km | 1,165 m | Harmony Creek |
| 7.1 km | 1,315 m | Flute Creek |
| 8.2 km | 1,405 m | Oboe Creek |
| 11.9 km | 1,725 m | Singing Pass Junction |
| 14 km | 1,965 m | Kees and Claire Hut |
| 14.6 km | 1,885 m | Russet Lake Campground |
Singing Pass Trail Description
The trailhead is on Blackcomb Way in Whistler Village next to the Gondola bus stops. From the info sign, walk around the yellow gate into the Whistler Mountain Bike Park. Follow the access road up the hill through the bike park. Watch for service vehicles on the road.
When the road forks at the top of the open area, go left on a road into the forest. Watch out for a bike trail crossing the road. Follow the road gently uphill past a reservoir building with glimpses of bike trails on both sides of the road. Watch for another bike trail crossing the road at 1.5 km.
Past here, you’ll be walking on an old road that is overgrown and eroded in places. In places, there are wide bridges over creeks and ditches. These bridges help keep the route open for skiers in winter.
About 3.8 km from the start, pass through an area overgrown with alder. If you look carefully, there is an old outhouse on the left. Until the late 1990s, you could drive up this old road. You are now at the former trailhead and parking area.
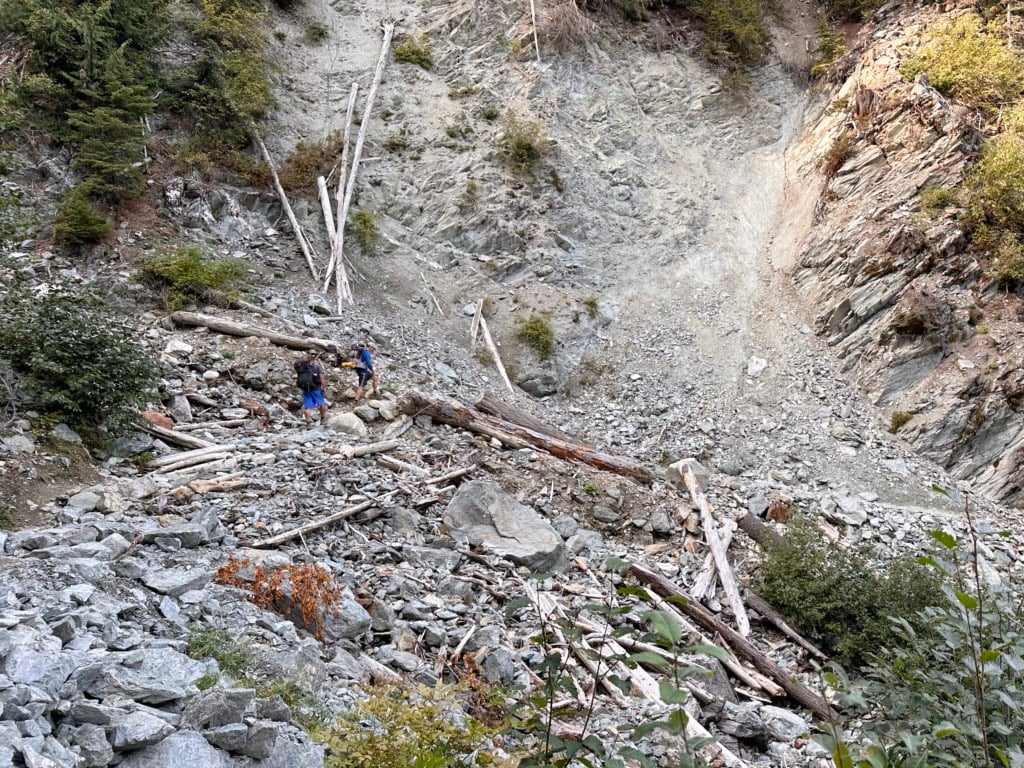
Continue the trail, passing under the Peak 2 Peak Gondola at 4.6 km. Cross Harmony Creek at 5.3 km. This area is the site of a huge washout and is unstable, so use caution, especially during times of snowmelt or heavy rain.
A few minutes later, cross an unnamed creek in a steep gully and then pass a sign welcoming you to Garibaldi Provincial Park. Cross Flute Creek on a sturdy metal bridge at 7.1 km. At 8.2 km, cross Oboe Creek on a deteriorating Bridge. This crossing can also be difficult at higher water.
Past here, the vegetation begins to change and transition to more alpine species like Mountain Hemlock and Subalpine Fir. You can also hear Melody Creek downhill to your left.
As you approach Singing Pass junction at 11.9 km, the trees start to thin out and patches of meadow start to appear. From Singing Pass junction, turn left and follow the directions above for the final ascent of Cowboy Ridge.


Skiing and Snowshoeing to Russet Lake in Winter
Russet Lake is a popular spot for backcountry skiing in winter. It is part of the Spearhead Traverse, a multi-day backcountry ski trip between Blackcomb and Whistler Mountains. As well, many people ski or snowshoe to the Kees and Clair Hut in the winter.
If you’re coming to Russet Lake in winter, you need to have avalanche training and experience since both routes to the lake travel through avalanche terrain.
Skiers can pay to take the Whistler Gondola and lifts, ski across the Musical Bumps to Singing Pass, and then head up Cowboy Ridge to Russet Lake. The Spearhead Huts site has advice on which chairlifts and routes to take through the ski resort. Snowshoers are not allowed on the lifts or in the resort, so they can’t take this route.
The other option in the winter is to come in via the Singing Pass Trail from Whistler Village. This route is open to both skiers and snowshoers. Depending on snow levels, you may have to hike the bottom section of the trail. Skiers should use caution if descending this way because there are lots of tight turns with drop-offs as well as narrow bridges.
Whistler Gondola Tips and Route Choice
If you have the cash for it, the Whistler Gondola has by far the best views in the Whistler area and is a great way to start your hike to Russet Lake.
If you’re splashing out on the gondola, you should get your money’s worth. I recommend riding the Blackcomb Gondola first, then the Peak 2 Peak Gondola to the Whistler Roundhouse. That way, you can get the most views before you start hiking to Russet Lake.
I do recommend taking the Peak Chair up to Whistler Peak to enjoy the Suspension Bridge and views from there. (And because the High Note Trail has the best views.) However, it’s not a great option for people who are afraid of heights since it is an open chair (your legs dangle) and it goes over a cliff. (More details on that in my High Note Trail Guide.
If the price of the gondola is too steep for you, you can ride the gondola for free! There is a bit of a catch, though: you have to hike up the Singing Pass Trail for free, then up across the Musical Bumps and along the High Note to the Peak Chair or to the Whistler Roundhouse.
From there, you can go down the Peak Chair and the Peak 2 Peak, Whistler, and Blackcomb gondolas for free – as of 2025, they don’t check for tickets for downloading – only for uploading! I’ve heard this policy may change next year, but it’s been free to download every year as long as I’ve been hiking here (over 20 years).

Extending Your Trip: Hikes From Russet Lake
There are no official trails starting from Russet Lake. However, if you are comfortable with scrambling and off-trail travel, you have a few options for exploring from the hut or campground.
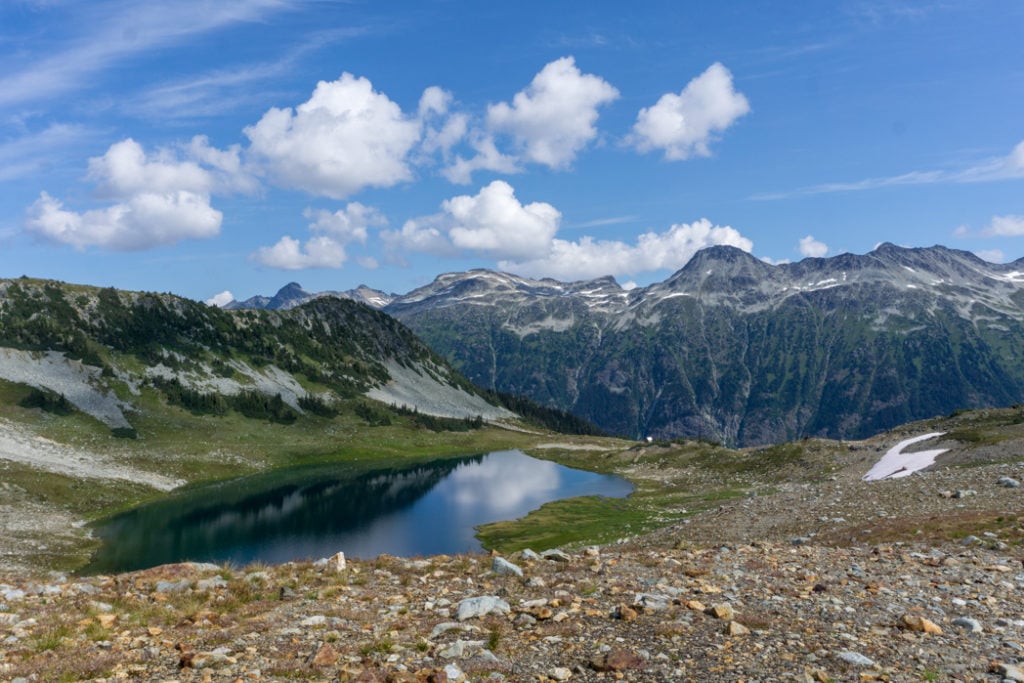
Adit Lakes
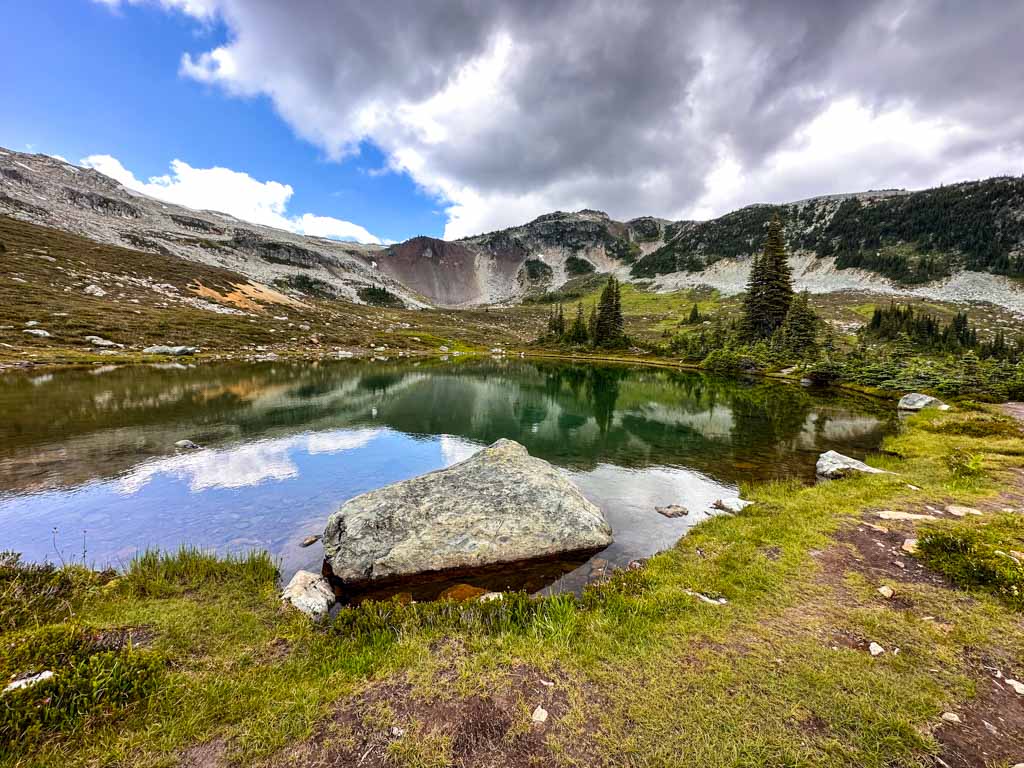
An informal cairned route leads from the campground to the Adit Lakes to the north, nestled in a rocky bowl. From the outhouse, pick up a faint trail across the bottom of the scree slope. Watch for cairns as the trail contours along the side of the ridge before arriving at the lakes. It’s about 1 km each way.

Cowboy Ridge
The gentle ridge above the lake makes for easy off-trail travel and exploring. The easiest place to gain the ridge crest is near Kees and Claire Hut. There are great views from the top as well as lots of wildflowers and curious marmots. If you’re feeling adventurous, you can also head over to Russet Ridge to the north.

Whirlwind Peak and Overlord Peak Scrambles
While Gaia GPS and AllTrails show a trail from the campground to Whirlwind Peak and beyond to Overlord Peak, there is no trail. In places, there is a cairned route. However, you must be comfortable with route finding and exposure on steep slopes if you choose these routes. Unless you are an experienced scrambler, you may find these routes too challenging and scary.
It’s 6.5 km round-trip to Whirlwind with 600 m of elevation gain. Add another 4 km and 500 m of elevation gain if you continue to Overlord.

Join the Backpacking in BC Facebook Group
Where to Stay at Russet Lake: Camping and Hut
Russet Lake Backcountry Campground
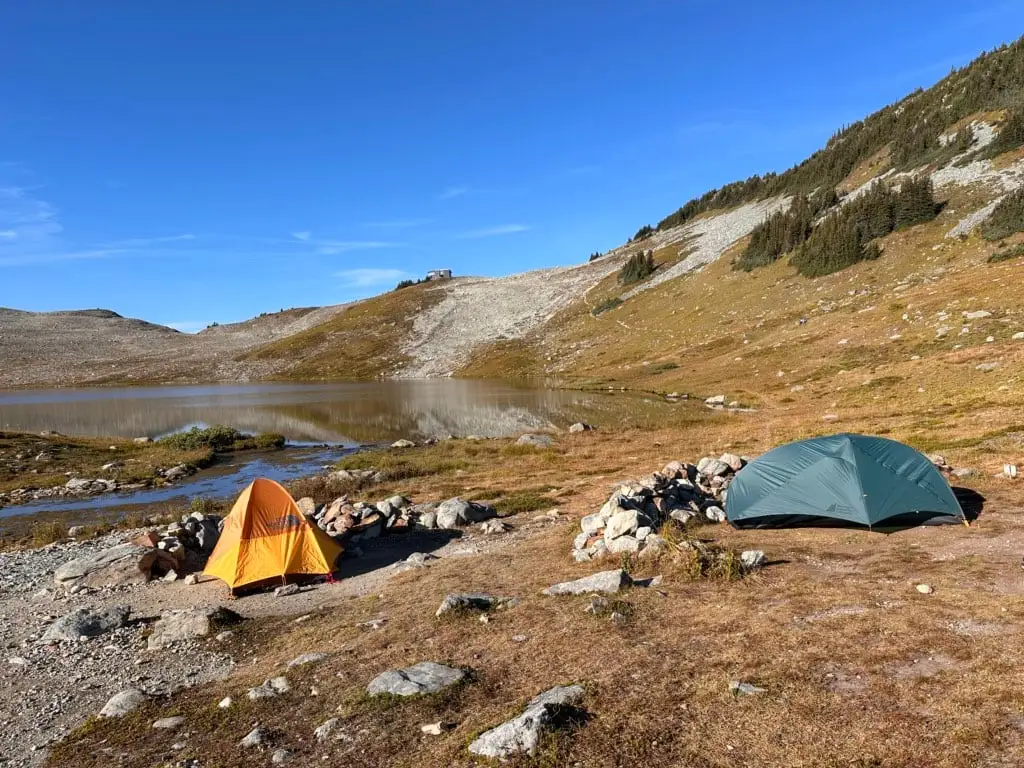
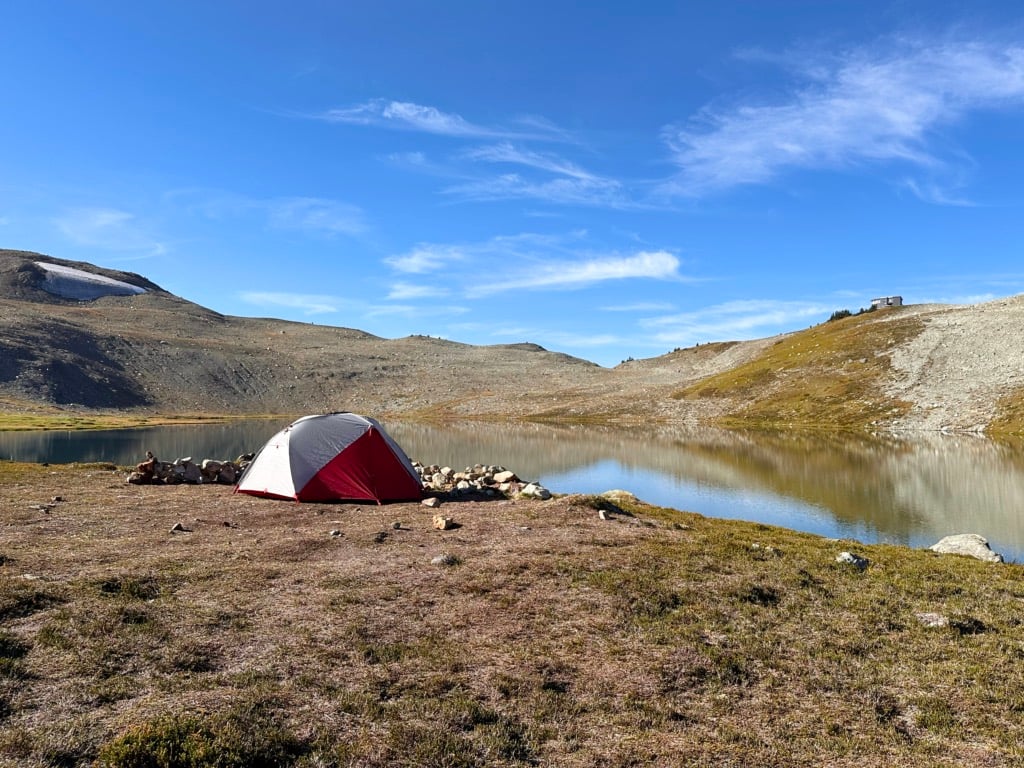
The Russet Lake campground has 20 tent pads spread out around the creek on the north side of Russet Lake.
The tent pads are simple clearings in the grass and gravel with low rock walls to block the wind. Each campsite has a metal post with a number on it. Many are a bit lumpy or slanted.
While BC Parks policy permits up to 2 tents per pad, this won’t be easy or possible at many of the Russet Lake campsites. In most cases, the second tent will be on a very lumpy, rocky, or slanted area or won’t fit at all.
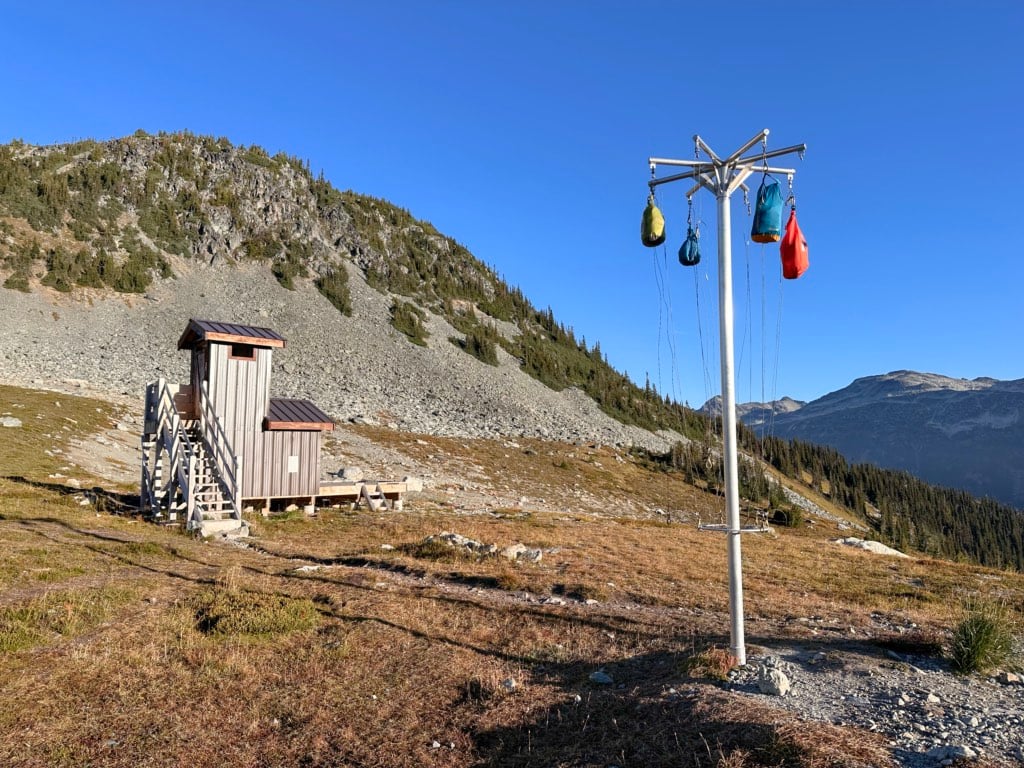
There is a urine-diversion outhouse next to the campground. Store your food on the food storage poles, which have cables and pulleys. Collect drinking water from the lake or the stream. Avoid the algae-choked parts of the stream.
Fires are never allowed in Garibaldi Park. This is a fragile alpine ecosystem, and fire scars can take decades to regrow.


Camping Reservations and Fees
Since Garibaldi Park has some of the most popular backcountry campgrounds in BC, advance reservations are required. Camping costs $25 per person per night plus a $6 reservation fee for each tent pad.
Reservations open three months before your trip. That means if you want to camp on August 1, you can reserve starting on April 1.
See my tips for booking backcountry camping for pointers on how to navigate the site. Be ready to book as soon as reservations open because popular dates will sell out in minutes.
Your booking can include up to 3 tent pads on the same reservation. Keep in mind that you are allowed to have up to two tents and four people per pad.
If you didn’t get a reservation, keep checking back as people cancel and spots open up, especially within a week or two of their trip. A more efficient way is to sign up for a camping cancellation notification app like Campnab or Schnerp. Read my guide to camping cancellation apps to find out how they work and which one I recommend.

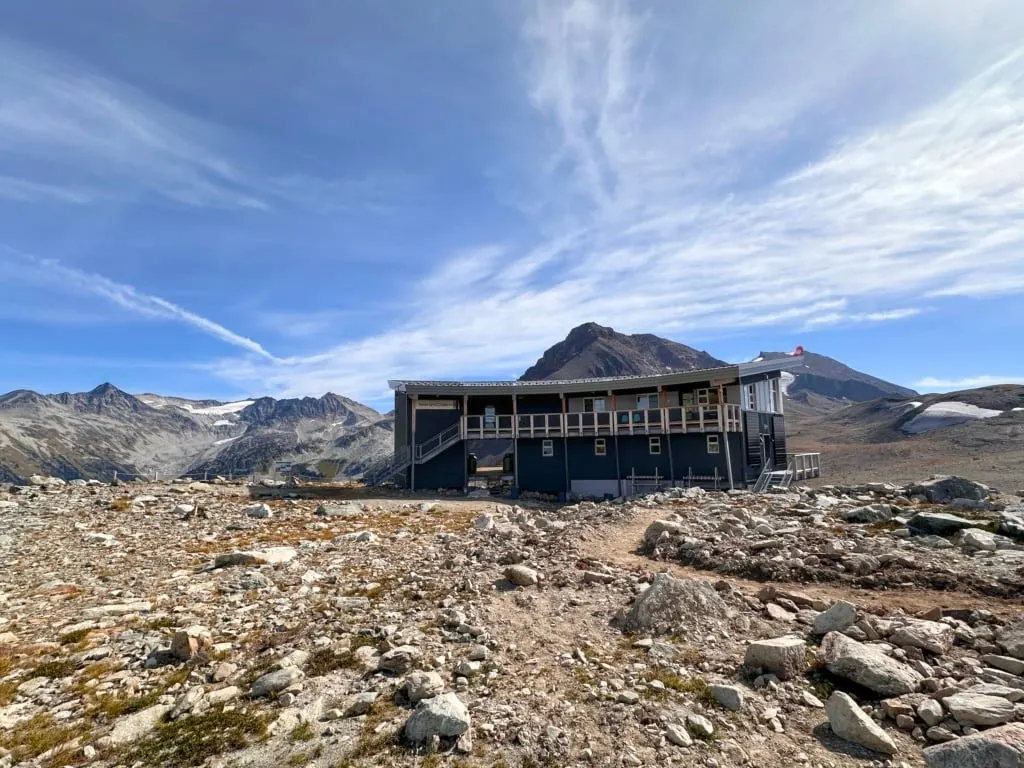
Kees and Claire Hut at Russet Lake
Opened in 2019, the Kees and Claire Hut is a large, modern, and frankly, kinda fancy, backcountry hut. It sits at the top of Cowboy Ridge above Russet Lake. A group of local mountaineering clubs run the hut as part of the Spearhead Hut Society.
The hut has 38 bunks spread across 6 rooms. Cooking and eating supplies and sleeping mats are provided. The hut also has LED lighting and urine-diversion toilets. While the hut has heaters, it is kept cold at night, so you will need a 3-season sleeping bag.
Reservations are required at Kees and Claire Hut. Hut reservations open 60 days before the first day of your trip. Bunks cost $60/night. If you are a member of BCMC, ACC Vancouver, or ACC Whistler, you can book 90 days in advance and use a promo code to get a discount.

How to Get to Russet Lake Trailhead
The Russet Lake Trailhead is in the heart of Whistler Village, right next to the gondola. It’s easy to get to by car or on the bus.
Driving Directions
From Vancouver, drive Highway 1, then Highway 99 north to Whistler. The drive takes about 1.5 hours. Once in Whistler, take the Lorimer Way exit to get to the parking lot. (More on parking below.) Here are Google Maps driving directions.
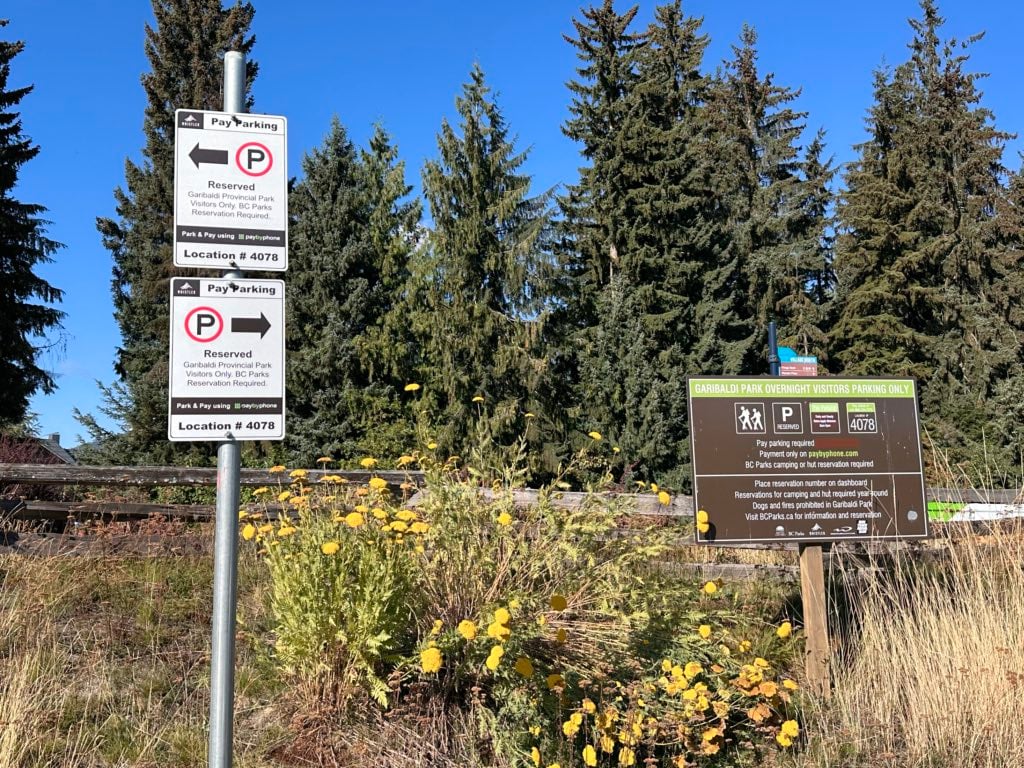
Russet Lake Parking
If you are doing a day hike, you can park in any of the parking lots. Day Lot 1 is the most convenient, but I usually park in Day Lot 4 since it is cheaper. There is no free parking in Whistler Village. Here is more info about locations and rates for parking in Whistler.
If you are staying overnight at the campground or hut, there is a special area of Day Lot 4 you need to park in. You must display your hut or camping reservation number on your dash and pay for each day you will be parked using Lot #4078 in the Pay by Phone app. Here is more info about overnight parking.

Getting to Russet Lake By Bus
Russet Lake is one of the best car-free backpacking trips in BC. You can get to Whistler from Vancouver using the Epic Rides or YVR Skylynx buses. They drop you off at Gateway Bus Loop in Whistler. From there, it’s a 5-minute walk through the village to the gondola and trailhead.
Tips for Hiking to Russet Lake
Check gondola hours and trail status: Check to make sure that the gondola and chairlifts are open and the alpine trail conditions, if you plan to come in from Whistler Mountain.
Food Storage: The campground has a pole with pulleys for food storage. Bring a waterproof bag to store your food in case it rains overnight. I always keep my food in a lightweight dry bag. The pulleys have clips, but some are broken – carry a carabiner as a backup.
Mosquitos and Black Flies: Bugs can be bad on the trail in July and early August. Bring bug spray and a head net.
Bears: This is black bear country. Bring bear spray, make noise while hiking, and store your food securely. See my bear safety tips for more info.
Dogs: Not allowed in Garibaldi Park.
Fires: Not allowed in Garibaldi Park.
Check the weather before you go: The high mountains are notorious for fickle weather. Rainstorms can blow in at any time. Expect overnight lows near freezing on some summer days. City weather forecasts are useless in the mountains. Use an algorithmic spot forecast for Russet Lake like Spotwx. (Read my guide to weather apps for hikers for more tips.)
Bring a rain jacket and warm clothing just in case. It can be much colder and rainier in the mountains than in the city. If you are staying overnight, you will need to bring typical backpacking gear. Use my backpacking checklist to make sure you have everything you need.
Wear trail running shoes or hiking boots. The trail is rocky and loose in places. Regular running shoes don’t have enough grip or ankle support.
Bring water and snacks. It is not safe to drink the water from the lakes without boiling, filtering, or treating it because you never know if people or animals have pooped or died upstream. Gross! (I use a Katadyn BeFree.)
Bring the 10 Essentials. These are key safety items you should have on every hike.

Final Thoughts
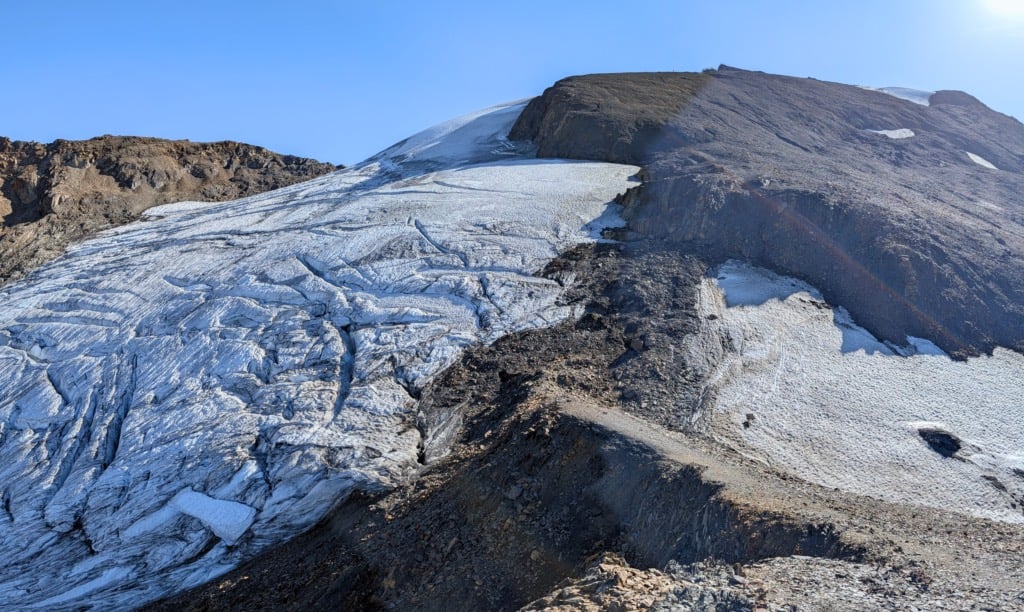
The Garibaldi Lake, Elfin Lakes, and Cheakamus Lake areas of Garibaldi Provincial Park get lots of attention (rightly so), which means that many people miss out on visiting Russet Lake. Honestly, I think the glacier views from the High Note Trail and Musical Bumps on the way to Russet Lake are actually even better than the views at Garibaldi and Elfin.
While Russet Lake does get booked up on weekends, it’s easier to book than Garibaldi Lake. And you are almost guaranteed to see adorable marmots near the lake. These furry guys are my favourite! I love watching them munch on alpine plants or take naps on the rocks.
If you’ve got questions about visiting Russet Lake, ask me in the comments. I’m happy to help.
READ NEXT:
- High Note Trail in Whistler (By a Season’s Pass Holder)
- Visiting Whistler, BC in Summer (By a Local)
- The Best Hikes in Whistler: A Guide to All the Trails
- 30 Best Backpacking Trips in BC


- Best Sun Hoodies for Hiking - June 3, 2026
- Lower Stein Valley Trail Hiking and Backpacking Guide - May 27, 2026
- The Best Things to Do in Vernon, BC - May 21, 2026