


When I started backpacking during university, I didn’t have much money and was appalled at how much packaged backpacking meals cost. So I decided to learn how to make them myself. In this post, I’ll teach everything I know about dehydrating food for backpacking.
I’ve backpacked a lot over the last two decades (and I’ve even written two backpacking guidebooks), so I‘ve made countless home-dehydrated backpacking meals. I’ve had some great successes, some spectacular failures, and a few that were just ok. (Although everything tastes better after a long day on the trail!)
I know that dehydrating your own food can seem intimidating, but I promise it’s pretty straightforward. The equipment you need to get started isn’t that expensive either. And oh the things you can make!
In this guide to backpacking food I’ll cover:
- Dehydrating Pros and Cons
- How Does Dehydrating Work?
- What Kinds of Foods Can You Dehydrate?
- What Equipment Do You Need? (Ovens vs. Dehydrators)
- How to Prep for Dehydrating
- Dehydrating Tips and Tricks
- How to Dehydrate Different Types of Foods
- How to Store Dehydrated Food
- How Long Does Dehydrated Food Last
- How to Pack Dehydrated Food for Trips
- How to Rehydrate Food on the Trail
Hey there: Some of the links in this post are affiliate links, which means I earn a small commission at no cost to you. Thanks for your support. -Taryn
Dehydrating Your Own Backpacking Food Pros and Cons:
You might be wondering, “Is dehydrating my own backpacking food worth it?” Home-dehydrating has lots of benefits, but a few downsides.
Dehydrating Pros
- You get to choose exactly what goes into your meals. That means you can always eat things you like.
- It’s way cheaper than commercially packaged backpacking food.
- You can create lots of different meal options by dehydrating ingredients and then combining them in a variety of ways.
- You control the nutrition and ingredients. This is really helpful if you have food allergies or sensitivities. Or if you are trying to keep to a particular diet such as keto, gluten-free, vegan, etc.
- Dehydrating lets you preserve perishable foods that you wouldn’t otherwise be able to bring backpacking.
- Dehydrated food weighs less and packs smaller than regular food.
- It cooks faster and uses less fuel than regular food. For example, regular rice and noodles need to simmer to rehydrate. But if you dehydrate them, you can just add boiling water and let them sit.
Dehydrating Cons
- It takes a long time. You will need to plan your meals days or even weeks in advance. And most foods take at least 6 hours to dehydrate
- Buying a dehydrator is an investment. (Although you can use your oven – more details on that below.)
- Most dehydrators aren’t very big, so you can’t dehydrate a lot of food at once – you have to work in batches. That means it takes even longer.
- Rehydrating food can require a fair amount of water, which can be an issue when you are dry camping.
- Food safety and storage are very important and can be tricky to get right. It can be hard to tell if you’ve gotten all the moisture out of food. You can’t always be sure the fat content is low enough to keep it from going rancid. You also have to be careful with storage so the food stays airtight and doesn’t go bad. But while it’s tricky, it’s not impossible. I’ve got tips and tricks throughout this article to keep you safe.
- Compared to freeze-dried food (which is only really available commercially since freeze-driers are so expensive and specialized), dehydrated food takes longer to rehydrate and doesn’t stay fresh as long.
READ NEXT: How to Choose the Best Backpacking Meals
How Does Dehydrating Work? How Does it Preserve Food?
When you dehydrate food, you remove its moisture. This creates an environment where bacteria, mold, and yeast can’t grow, and therefore, preserves the food.
Many cultures have traditionally dehydrated food by laying it on racks or mats and letting the sun and wind do the dehydration. Modern dehydrators replicate this process in a controlled way by using low heat and a fan.
Dehydration doesn’t remove fat, so it only works on foods that can be preserved by removing moisture. I’ve got lots of tips on what kinds of food you can dehydrate below. But in general, keep in mind that high-fat foods won’t dehydrate well, and any fat in the food is prone to becoming rancid.

What Kinds of Food Can You Dehydrate? What Foods Don’t Dehydrate Well?
When you first get into dehydrating, you might be tempted to dehydrate all your favourite foods. But that will lead to disappointment and possibly food waste since some foods don’t dehyrdate effectively or aren’t food safe when dehydrated.
The best foods to dehydrate are:
- fruits (except high-fat ones like avocados and olives)
- veggies and herbs
- grains like rice
- beans and lentils
- pasta and noodles
- low-fat meats
Foods to avoid dehydrating are:
- Anything fatty or oily. This includes nuts and nut butter. Fats don’t dehydrate and will go rancid.
- Dairy. The low temperatures used for dehydration aren’t enough to curb bacteria growth. Buying commercially dried dairy such as milk powder, butter powder, or cheese powder is easier and safer. Some people (including me) have successfully dehydrated non-fat yogurt, but it isn’t officially recommended and in my experience, you have to eat it within a week or two.
- Eggs. These aren’t safe for the same reasons as dairy. You can buy OvaEasy egg crystals online and even in some grocery stores.
- Coconut milk. It is too high in fat. Thankfully, it’s easy to buy powdered coconut milk.
What Equipment Do You Need? (Ovens vs. Dehydrators)
The easiest way to dehydrate backpacking food at home is to use a dehydrator. But you can also use your oven. I’ve got details on both below.
Using an Oven to Dehydrate Backpacking Food
If you don’t want to invest in a dehydrator, you can use your oven. You can simply place cut-up food on parchment paper-lined baking trays and put them in the oven. For a little more airflow, put chunkier items (think sliced fruits and veggies rather than runny things like stews) on a cooling rack, then put the rack on a baking tray.
You’ll want to run your oven at the lowest possible setting. That’s usually around 170°F (77°C). I recommend using a basic oven thermometer to check. Most oven thermostats are inaccurate, especially at low temps.
The ideal temperatures for dehydrating are 120 to 165°F (49 to 74°C) depending on the type of food you are dehydrating. (More info on ideal temps is in the section on dehydrating different types of foods below.)
You can also leave the oven door ajar a little bit to bring the temp down. Just be careful if you’ve got kids or pets around who could accidentally burn themselves if they encounter the open oven.
You don’t want your oven to be too hot – it will cook the outside of the food and form a crust, which won’t let the inside dehydrate. This is called case hardening and leads to spoiled food.
If your oven has a convection setting, use that. It’s basically a built-in fan and will speed up your dehydrating time.
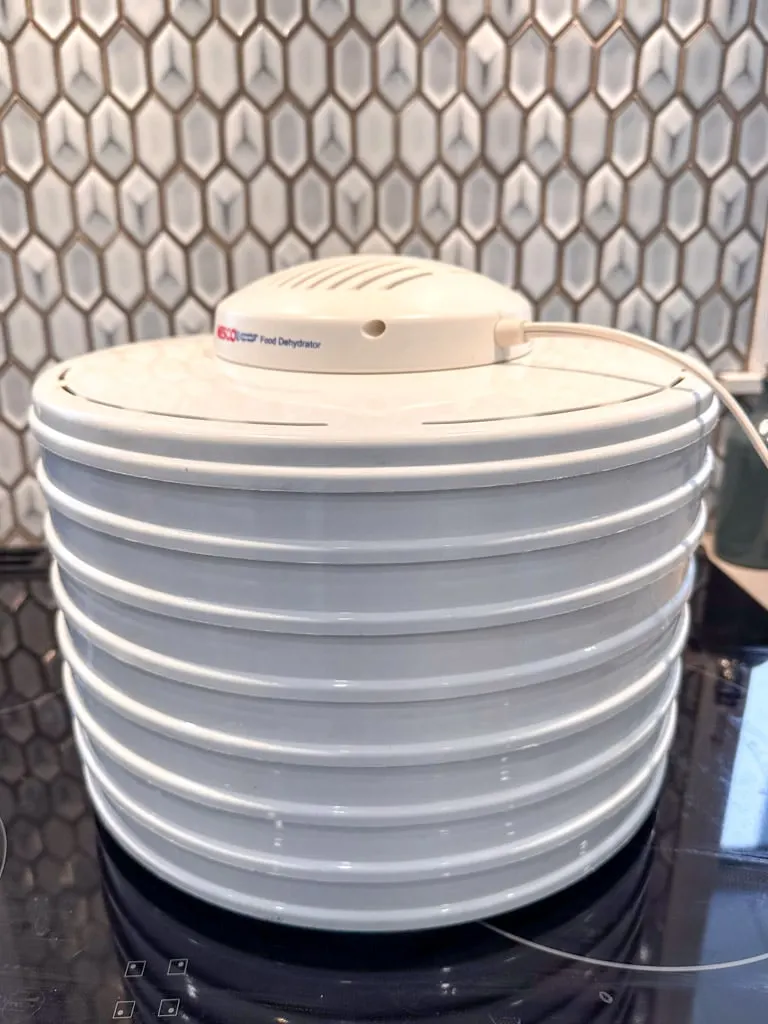
Choosing a Dehydrator
Compared to most kitchen appliances, dehydrators are actually really simple. A dehydrator is just an enclosed space with trays, a low-temperature heating element, and a fan. The heating element/fan combo is quite similar to a hair dryer.
Dehydrators are also not that expensive. I’ve been using a super basic Nesco dehydrator for about 20 years and it’s been fine.

Here are my tips for choosing a food dehydrator:
Temperature Adjustment: Meats need to dry at higher temperatures for food safety, but those same temps can scorch veggies (more on that below). Get a dehydrator with temperature adjustment.
Fan Location (Front-loading vs. Stackable): I like stackable dehydrators since you can add or remove trays depending on how much you are dehydrating. And you can even buy and add more trays than your dehydrator came with. But the fan on stackable units is in the middle, which is less efficient and uneven since it blows the air vertically. The solution is periodically reorder the trays. I don’t mind doing this because I want to check on the doneness of the food anyway. Front-loading box-style dehydrators have a fixed amount of trays, but their fans are at the back, which creates more efficient horizontal airflow.
Timer: More expensive models come with a timer so you can set it to shut off at a pre-set time. This is helpful if you want to turn it off when you sleeping or out of the house. (Leaving it running too long can over-dehydrate and make the food hard to rehydrate. It also negatively affects taste.) My low-budget hack for a dehydrator without a timer is to use an outlet timer. You can get one for a few dollars at the hardware store.
Capacity: With stackable models, you can buy a smaller capacity dehydrator now, and then buy more trays later. (Nesco still makes compatible add-on trays for my super-old dehydrator.) But most stackable models are circular and have less capacity per tray than square trays. Front-loading dehydrators use square trays, but you can’t add more of them.
Plastic vs. Metal Trays: Plastic trays are cheaper and these days most are made without BPA. But they can be harder to clean and some aren’t dishwasher safe. Metal dehydrators cost more, but they’re more durable and easier to clean. You can also put metal trays in the dishwasher.
Inserts: Dehydrator base models come with mesh or slatted trays but you may want to purchase inserts to make clean-up easier or to dehydrate liquids like stews. You can get fine mesh screens, silicone mats, and plastic fruit leather trays, depending on the model.
Dehydrators I Recommend
I recommend the budget-priced Nesco Snackmaster FD-75A. I’ve had an older version of this for more than 20 years and I haven’t felt the need to upgrade. It has temperature control and it’s stackable so you can add more trails. The only downside: it’s loud. At full price, it’s about $90 USD, but you can often find it on sale.
If you want to upgrade to a more efficient front-loading dehydrator with metal trays, the Cosori Premium dehydrator gets consistently good reviews. People also say it’s quiet. It’s about $160 USD at full price, but it also goes on sale a lot.
How to Prep for Dehydrating
To set yourself up for success, there are a few things you need to do before you start dehydrating to make sure your food dehydrates well and is safe to eat.
To start with, make sure everything is clean and sanitized. That includes your cutting boards, counters, knives, and of course your hands.
Next, make sure everything is cut to the same size. That helps it dry evenly. I like to use a mandoline slicer for fruits and veggies. Get one with julienne attachments so you can make matchsticks. I also sometimes use a spiralizer to make veggie ribbons or noodles.
You may also want to pre-treat some fruits with ascorbic acid or citrus juice to prevent browning. You should also blanche or steam some veggies to help them keep their colour and flavour. It also helps them dehydrate better. More details on pre-treating in the sections about dehydrating fruit and vegetables below.

Dehydrating Tips and Tricks
I’ve got specific instructions for different types of food below, but here are my top tips for dehydrating backpacking food. These apply to anything that can be dehydrated:
- Shuffle the order of your trays from top to bottom every few hours. This gives every tray a chance to cuddle up with the fan and helps food dry more evening. For front-loading, box-style dehydrators which have the fan at the back, give your trays a 1/2 turn as well.
- Line your trays with parchment paper, silicone mats or fruit leather trays to prevent sticking and to contain liquids. Pro tip: use a piece of cardboard to make a template that matches your trays. That way you can trace the template onto parchment and cut it to the exact size you need. This is especially helpful for round dehydrators
- Flip the food part way through. This helps dry the bottom better. You can also remove the parchment paper, silicone sheets, or fruit leather tray at this point to improve airflow.
- Rearrange things. As food dries, it shrinks. Rearrange the food to space things out evenly. Break up any chunks that got stuck together.
- Don’t overload your trays. It will take forever to dry. This is especially important for blended or liquid foods.
- If you wouldn’t eat it together, don’t dehydrate it together. The smells can transfer. You don’t want your apples to taste faintly like garlic!
- Dehydrate stinky things outside, in the garage, or a room with the door closed. The smell of onions or garlic gets into everything. You can also run your dehydrator underneath your hood fan if it vents externally.
- Dial back the spice. It intensifies when you dehydrate things. One time I brought a batch of dehydrated chili backpacking. It was fine at home fresh, but once dehydrated it was so spicy that we couldn’t eat it!
- Make notes about what you dehydrated. That will help you figure out how to portion it later for the trail. For example, write down how many cups of stew you dehydrated or how many individual apples.


How to Dehydrate Different Types of Foods
The process of dehydrating depends on what kind of food you are preserving. Below I’ve got tips for dehydrating fruit, veggies, beans, rice, pasta, meat, sauces, and complete meals.
How to Dehydrate Fruit
Fruit is the gateway food for beginners to dehydrating. It’s really easy to prepare and you can eat it right out of the dehydrator.
If you want to prevent browning, you can pre-treat fruit by soaking it in powdered ascorbic acid (vitamin C). I’ve never used this method, so here is some info on the correct way to pretreat with ascorbic acid. An easier way to pre-treat is to soak the fruit in citrus juice (e.g. lemon, lime) for a few minutes. This will make your fruit taste a bit citrusy though.
Fruit dehydrates best when it is sliced thinly. But you can also cut it up into small chunks. Small berries, cherries, grapes, etc. can be left whole if you blanche them and then put them in an ice bath to break the outer skin. But they take a really long time to dehydrate, so I usually just buy commercially dehydrated versions.
To dehydrate fruit, arrange the slices or chunks in a single layer in the dehydrator. Make sure they don’t overlap and they have enough space around them so air can circulate. As they dry, they will shrink.
You can also dehydrate pureed fruit to make fruit leathers. This is my favourite way to eat dehydrated fruit because so many flavour combos are possible. Plus it gives me all the childhood nostalgia feels. Just make sure your blend is at least half high-pectin fruit (e.g. apples, blueberries, peaches, pears, pineapple, etc.) for the best consistency. Low pectin fruit makes crunchy leather.
The best temperature to dry fruit is 135°F (57°C). If you dehydrate it too hot, it will get crunchy on the outside, stay soft (and unpreserved) on the inside, and spoil easily. (This is called case hardening.) Dehydration times can vary a lot between types of fruit and even varieties within types. Expect to take between 6 and 24 hours.
Check for doneness regularly by touching the fruit to make sure it is not sticky or moist. It should feel like leather. You can also cut a few pieces in half and squeeze them to check if they are done.
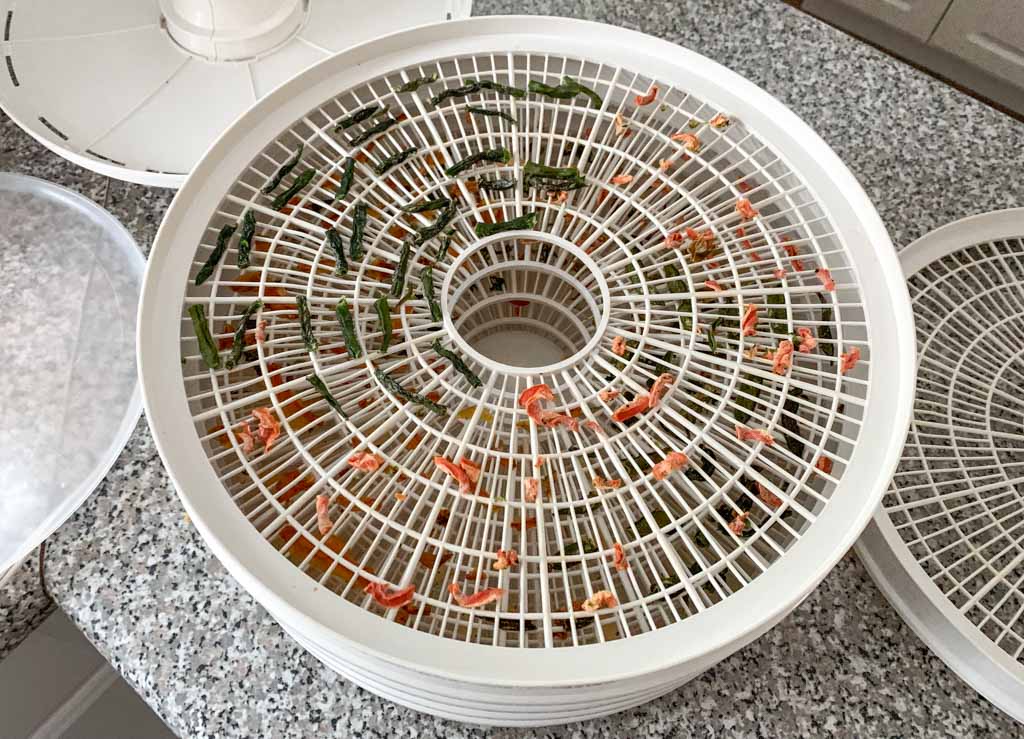
How to Dehydrate Vegetables and Herbs
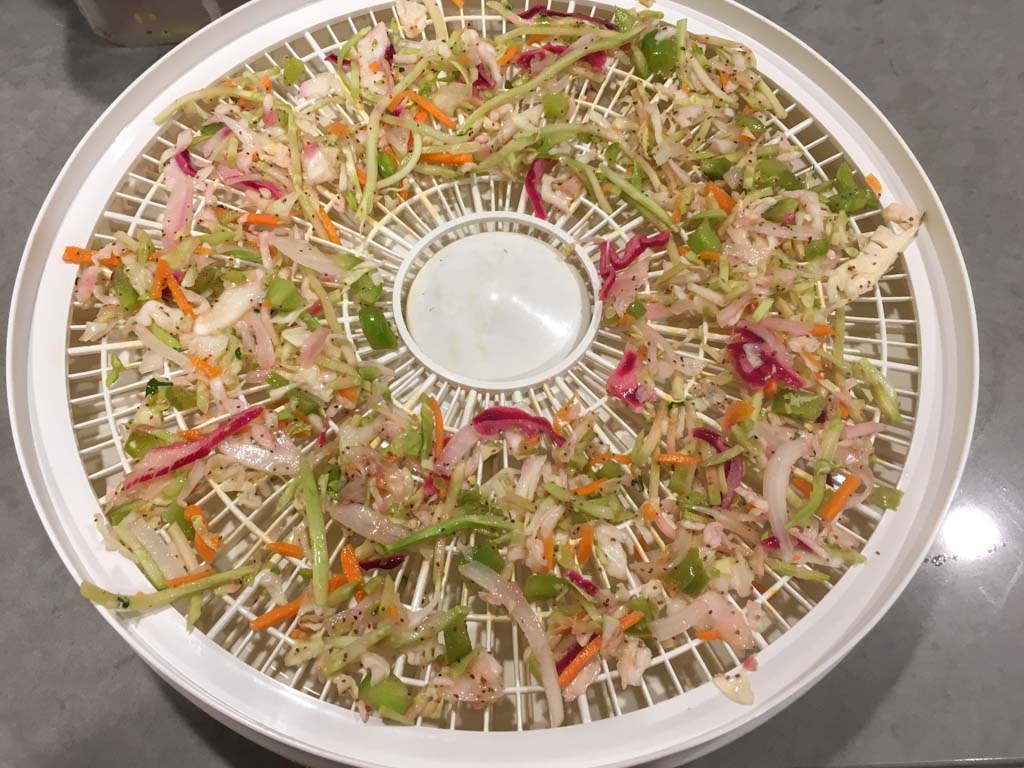
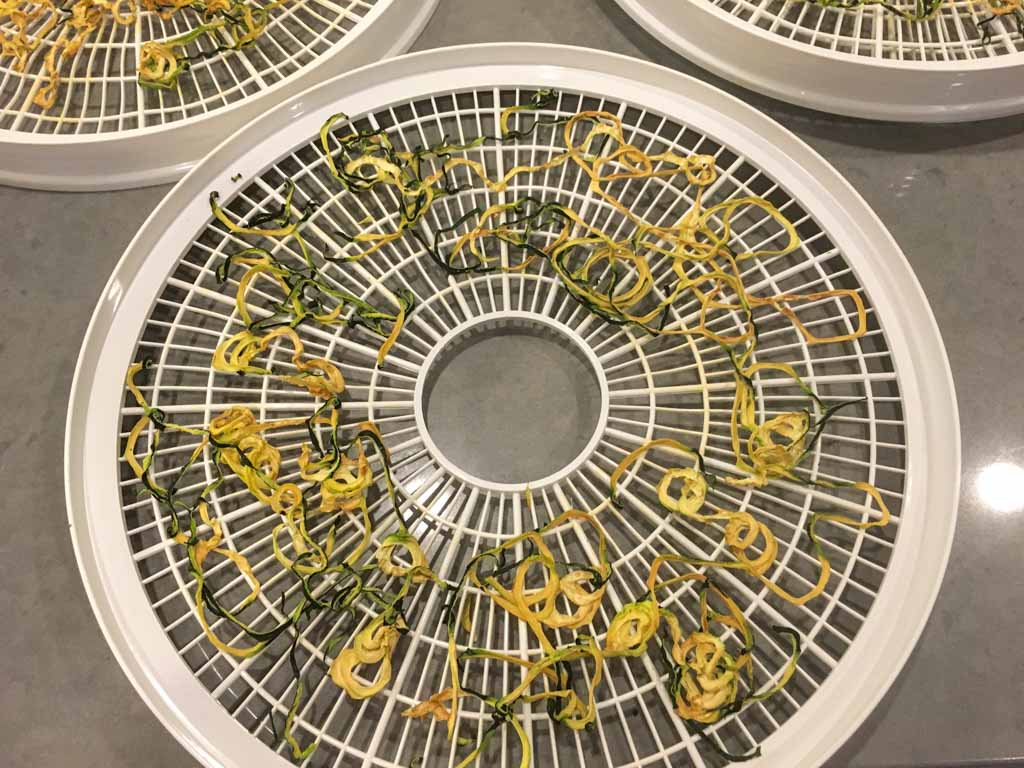
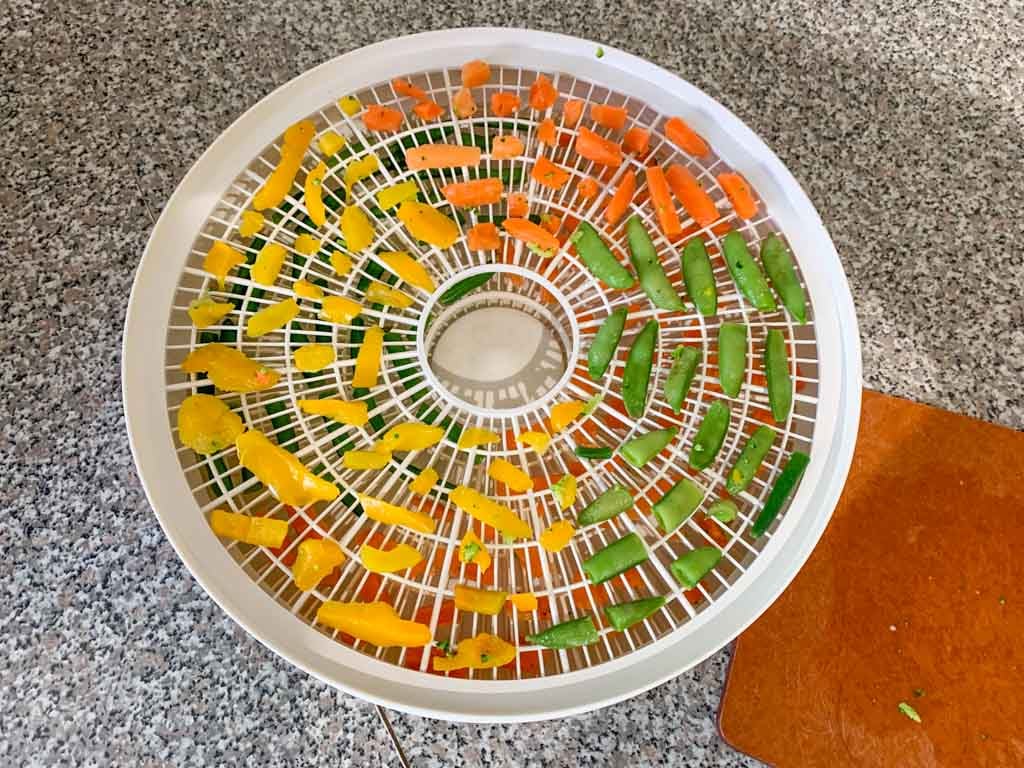
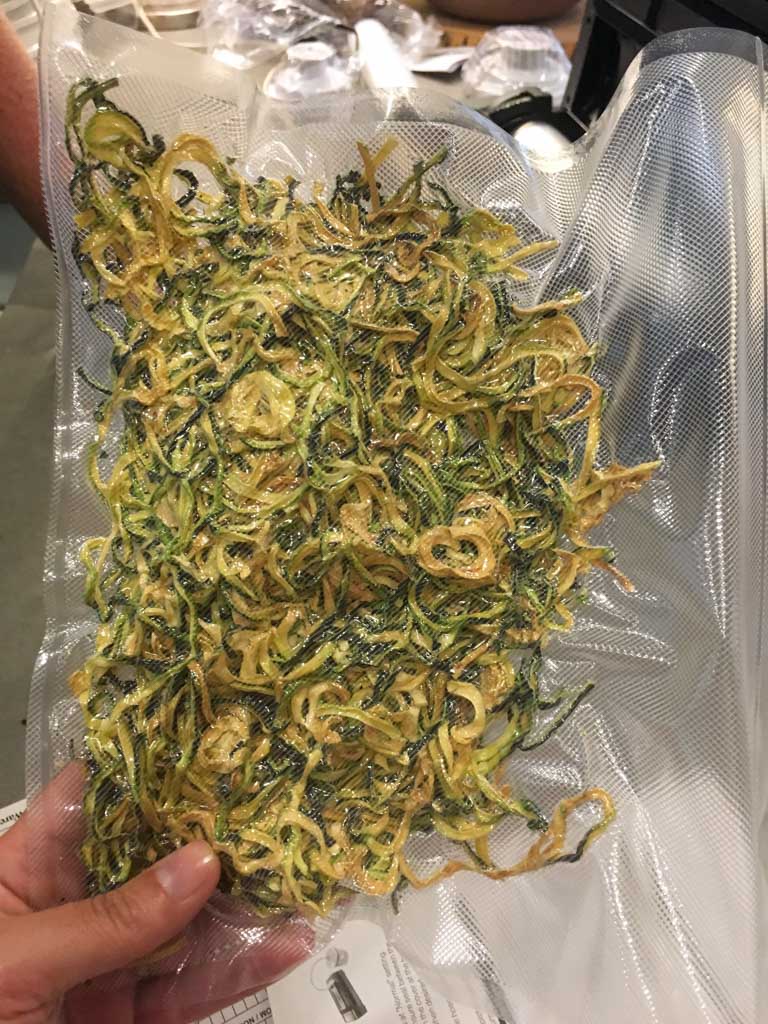
Dehydrated veggies are great for adding to commercial backpacking meals or making your own. I also dehydrate zucchini noodles for a big dose of veggies on the trail.
If you wouldn’t eat a veggie raw, don’t dehydrate it raw. Steam it or blanche it first. I often use frozen mixed veggies since they are already blanched! Just thaw them first. Depending on the brand, you may want to cut bigger chunks down a bit.
Slice veggies thin or cut them up into small pieces, then spread them out onto dehydrator trays with space a bit of space around them for airflow.
The best temperature to dry veggies is 125°F (52°C). Just like with fruit, if you dehydrate too hot, the vegetables will case harden. Typical drying times for veggies also vary. Between 4 and 12 hours is typical.
The process for drying herbs is the same as for veggies. But they do better if dehydrated at 90 to 100°F (32° to 38C). They only take 1 to 3 hours to dry.


How to Dehydrate Beans and Legumes
I’m not a huge bean person (they don’t agree with me) but I have made dehydrated bean chilli a few times. I’ve also dehydrated refried beans to make delicious backcountry burritos.
In general, canned beans work best for dehydration and rehydration. But you can also use beans cooked at home in a pressure cooker. (Rehydration is really important with beans because if they are under-rehydrated when you eat them, they cause wicked bloating. Trust me.)
Spread beans onto dehydration trays and dehydrate at 125°F (52°C) for 6 to 12 hours. The beans will be hard when they are done – you shouldn’t be able to squish them at all. Sometimes beans crack open while dehydrating, but that just makes them dry faster.
If you are dehydrating refried beans, spread it evenly onto a thin layer on parchment paper. You can also use a silicone insert or fruit leather tray if you have one. Dehydrate at 145°F (63°C) for 8 to 10 hours. About halfway through the beans will be crusty enough to flip over for more even drying. It should be crumbly with no moist spots when it’s done.
How to Dehydrate Rice and Grains
I never dehydrate rice on its own because it’s easier to just buy Instant Rice, which is pre-cooked commercially dehydrated rice. (Make sure you get the dry, just-add-water kind, not the kind that has broth in liquid form and needs to go in the microwave.)
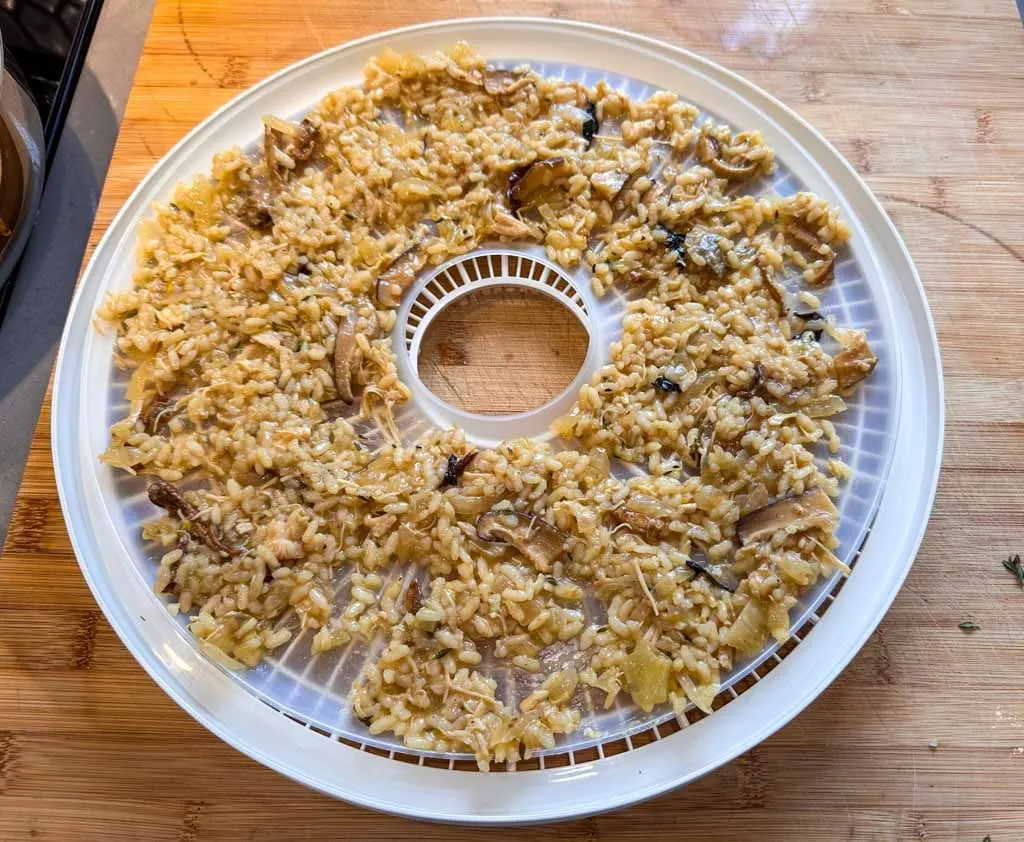
But I do make risotto, and dehydrate that. It’s delicious.
To prep rice and other grains like quinoa or barley for the dehydrator, cook it in water or broth without fat. Some people say you should undercook it a little and it will rehydrate better. But I haven’t noticed a big difference either way.
Dehydrate rice and other grains at 145°F (63°C) for 6 to 12 hours until it is hard and dry with no moisture. Be careful with temperature when dehydrating rice. A type of bacteria called Bacillus cereus can grow in rice that isn’t above hot enough during dehydration. The FDA recommends keeping rice at temps above 135°F (57°C) to kill the bacteria and avoid food poisoning.
How to Dehydrate Pasta
I don’t really bother dehydrating pasta since the weight of dehydrated pasta is about the same as the weight of uncooked pasta. However, it can take up to 12 minutes to cook pasta, but you can rehydrate dehydrated pasta just by putting it in boiling water. That can be a huge fuel savings.
Choose pasta shapes that are thin and will dry well. Small shapes like orzo, macaroni, rotini, and fusilli dry easily. You can also use thinner noodles like spaghetti and capellini – but they don’t pack as easily and tend to poke holes in storage bags.
Cook the pasta until it is al dente according to the directions on the package. Drain it and spread it evenly on dehydrator trays. Try to flatten out any kinks or overlaps as they won’t dry well.
Dehydrate pasta at 135°F (57°C) for 6 to 12 hours until it is totally dry. It should be brittle and snap easily. If it bends, it’s not done yet.
How to Dehydrate Meat
Meat can be intimidating to dehydrate. But if you follow a few guidelines, it’s not that hard. The general rules are to use the leanest meat possible, cook it all the way through, then dehydrate it. Blot with a paper towel before you dehydrate and every few hours as you are dehydrating to get any remaining fat.
Below, I’ve got directions for dehydrating beef, chicken, and turkey. I don’t have instructions for dehydrating fish because I’ve never tried it – I always buy it. If you want dried fish, Asian grocery stores have an incredible selection.
I also don’t have instructions for making jerky here since that’s a whole other process. There are lots of methods out there and it would take too long to summarize them all.
How to Dehydrate Beef
Use extra lean ground beef. You can add any spices you want at this point. In the past, I just cooked the beef alone, but I recently read that if you add a little bit of bread crumbs to the meat, it rehydrates better. I haven’t tried this yet, but I’ll report back when I do. (Without the breadcrumbs, dehydrated beef takes a very long to rehydrate and can be kind of gravelly.)
Cook until it reaches 160°F (71°C). Make sure to push it around as it cooks to break it into the smallest pieces possible – this helps it dehydrate. Once it’s cooked, you can blot it with a paper towel to remove fat. Some people also like to rinse it with hot water, but I haven’t tried that.
Dehydrate at 145°F (63°C) for 6-12 hours until it is a hard, dry gravel.
How to Dehydrate Turkey
The instructions for dehydrating lean ground turkey are exactly the same as cooking beef. The only difference is that you need to cook the turkey to 165°F (74°C) to be food-safe.
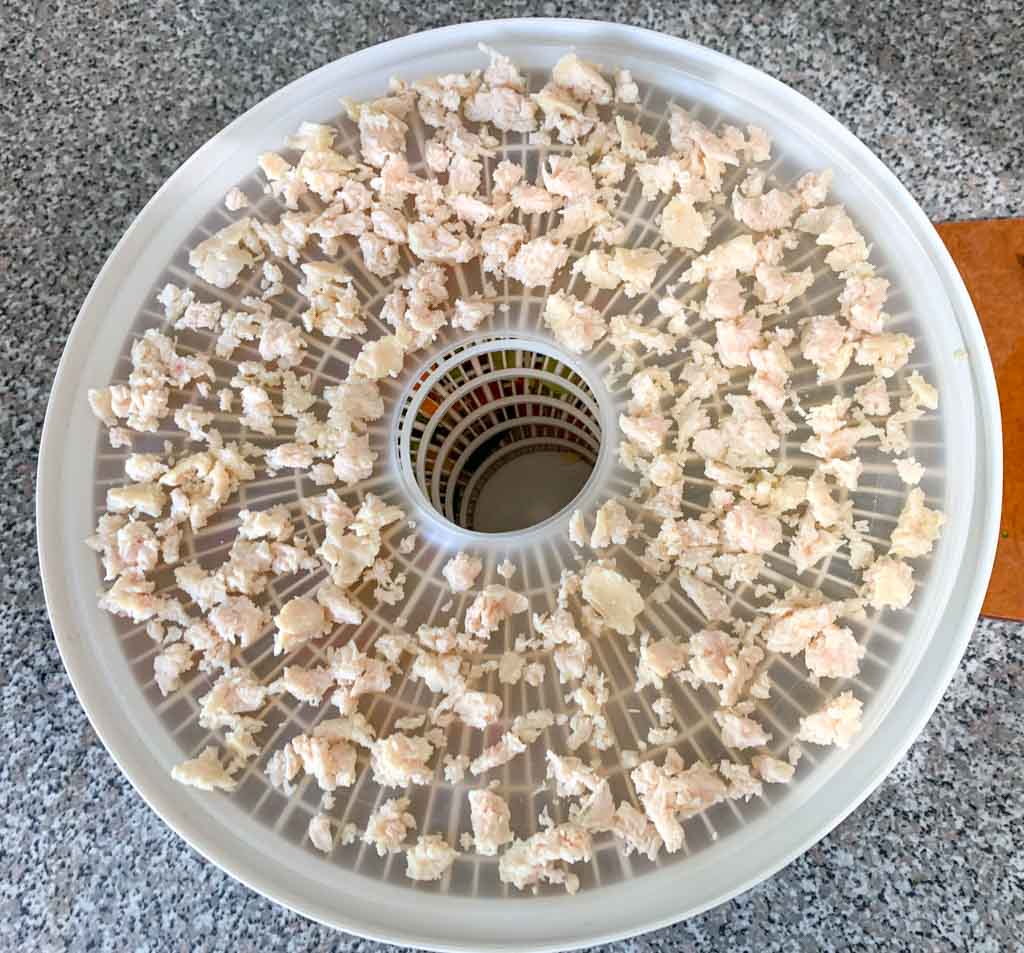
How to Dehydrate Chicken
Even though chicken isn’t my favourite meat, it’s the one I dehydrate the most often. That’s because it is the easiest to dehydrate!
The best chicken to dehydrate is pressure-cooked chicken breast. You can do it yourself, but I don’t bother. Instead, I just buy canned chicken, which is…. pressure-cooked chicken breast! All you have to do is rinse it and blot for moisture. You may also want to use a fork to pull apart any larger chunks.
Then you dehydrate at 145°F (63°C) for 6-12 hours until it is hard. Pull apart a piece or two to make sure it is dry in the middle. It will change colour from pinkish white to golden when it’s done.
Keep in mind that some canned chicken can be a bit salty. Rinsing it before dehydrating helps get rid of some of the salt. But I usually dial back the salt in any recipe I’m adding home-dehydrated chicken to since I know the chicken will be salty.

How to Dehydrate Sauces
One of my go-to dehydrated items is pasta sauce. You can also dehydrate all kinds of other sauces like salsa and hummus. But you have to remember the number one rule for dehydration – low fat! Fatty, oily or cheesy sauces won’t dehydrate properly and will spoil. Read the ingredients list on store-bought sauces carefully.
If your sauce has any chunks of veggies in it, make sure they are cut up super small. You can also run it through the food processor to achieve a smoother consistency. This will speed up dehydration and rehydration times.
Spread the sauce in a thin layer on parchment paper, silicone mats, or fruit leather trays. Dehydrate at 125°F (52°C) for 8 to 10 hours. About 2/3 of the way through, the sauce will be solid enough to lift. Flip it over for even drying.
Some sauces (especially tomato-based ones) turn into fruit leather consistency when they are done, while others (like hummus) become more of a crumble. For crumbly sauces, you can run them through a food processor or blender after they are dry to give them a uniform powdery consistency and help them rehydrate better.
How to Dehydrate Complete Meals
You can dehydrate ingredients separately and combine them to make meals. Or you can make a one-pot meal like a stew or this delicious mushroom risotto and dehydrate it all together. I prefer to dehydrate complete meals because it lets the flavours mingle. I also tend to make a big pot of something, eat a portion for dinner, then dehydrate the rest.
However, some people prefer to dehydrate individual ingredients because it gives you the flexibility to make lots of different dishes. Dehydrating separately also ensures that each ingredient is dehydrated at the optimum temperature.
If you dehydrate a complete meal, make sure any chunks are small and uniform in size. One of the tricks I use is to take 1/4 to 1/2 of the meal and run it through a food processor or blender until it is smooth, then mix it back with the rest of the meal. This gives you the same taste while improving dehydrating and rehydrating times. The texture will be a bit smoother than if you didn’t blend it, but you will still have some food chunks to remind you that you’re eating stew, not slurry!
If your meal is runny, use parchment paper, silicone mats, or fruit leather trays. Consider what is in the meal, and dehydrate at the highest temperature required for safety. So if it contains meat or rice, dehydrate at 145°F (63°C). This is technically too hot for the other ingredients in the meal so you will need to watch closely to make sure they aren’t getting scorched or case hardened.
When the meal gets hard enough, you can flip it over for even drying. Drying times for complete meals vary a lot based on their moisture content. Expect at least 8 to 12 hours.

How to Store Dehydrated Food
You just spent lots of time getting the moisture out of your food by dehydrating it, so you need to store it properly to keep the moisture out and keep it fresh.
Here are some dehydrated food storage tips:
- Make sure your hands and all your equipment are clean before handling dehydrated food.
- Allow the food to cool before storing.
- Condition your fruit because it’s hard to tell if they are fully dried. This means storing it at room temperature in a sealed glass jar for about a week to check for moisture. If you see moisture, it needs more time in the dehydrator.
- If you see mold on your dehydrated food at any point, throw it out!
- Store dehydrated food in a cool, dark place.
- If you want, pop a desiccant pack or oxygen absorber in with your food. This helps keep moisture at bay.
- Label your food. Be sure to include the date and serving info along with what you’re storing.
What to Store Dehydrated Food In
You have a few container options for storing dehydrated food. No matter what you choose, it must be airtight.
Ziploc bags or reusable silicone bags: You can use Ziploc freezer bags or reusable silicone bags for short-term storage, but they aren’t really airtight. If you use this method, store your food in the freezer just in case.
Air-tight jars: Canning jars are a great way to store dehydrated food at home since they are airtight. You can also use Glasslock containers.
Vacuum sealed: My preferred way of storing dehydrated meals is to use a vacuum sealer. (I have this Nesco Deluxe model.) You can seal individual meals into their own plastic pouch, ready for the trail. (Tip: double bag sharp items like pasta – they will poke through the bag.) Food lasts a long time this way. You can also get a jar attachment for your vacuum sealer to store larger quantities of ingredients at home.
Mylar bags: You can also purchase mylar bags, add an oxygen absorber, and then heat-seal shut. You can eat right out of them on the trail if you buy heat-safe ones. I’ve never tried these because the price per bag is fairly high.


How Long Does Dehydrated Food Last?
You’ll find lots of different info out there about how long dehydrated food lasts. A lot depends on how well it was stored and dehydrated. Properly dehydrated and vacuum-sealed food will last the longest. In general, dehydrated food can last up to a year, but some foods are best consumed earlier.
Here’s how long different types of dehydrated foods last according to health agencies and academic studies:
- Meat lasts 1 to 2 months. It can last 6 months if vacuum-sealed and stored in the freezer.
- Fruit leathers are good for 1 month at room temperature or 1 year in the freezer.
- Fruits are good for about 6 months.
- Veggies, grains, beans, rice, and pasta are good for about 1 year.
- Sauces and meals are good for the shelf life of their most perishable ingredient.
The above numbers are probably conservative since they don’t want to risk people getting sick. Lots of people report that their dehydrated food was good years after they dehydrated it. That can be true, but it’s not what’s officially recommended.
Check food carefully for any signs of spoilage. And even if old food looks ok, it might not taste as good and it may have lost some of its nutrient value. In general, my advice is “your body, your choice“. You get to decide when something is too old to eat!
How to Pack Dehydrated Food for Trips
You’ll need to portion out your dehydrated food to bring it on a trip. Some people like to carry a little pantry of dehydrated items, and then choose what to use each night to make dinner. But I prefer planning out my meals so I’m carrying only what I know I will eat.
If you’re making meals with separate dehydrated ingredients, you can use the notes you made before dehydrating to portion things out. I like to use a simple kitchen scale to divide up food evenly. For example, if I dehydrated 8 cups of stew and I know I want 2 cups per portion, then I’ll weigh the entire dehydrated meal and divide it into four portions. Each of those portions should rehydrate into 2 cups of stew.
While Ziploc freezer bags and reusable silicone bags aren’t great for long-term storage, they are great for packing dehydrated food on the trail. That’s what I usually use. If I dehydrate a complete meal, I usually pre-portion it into vacuum-sealed pouches.

How to Rehydrate Food on the Trail
There are lots of formulas online for how much water to add to rehydrate food. I’ve never really paid much attention to any of them. I just add enough water to cover the food. For some dishes that I know I want to be soupier, I add more water, and I add less to others. You can always add more water but you can’t subtract so be conservative!
There are a few ways to rehydrate food. My preferred method is presoak and simmer. I add my dehydrated food to the pot, cover with filtered water, and let sit for at least 30 minutes or longer if I have time. When it’s time to eat, I put the pot on the stove. If you don’t care about conserving fuel, you can simmer on the stove while stirring until the food is ready.
Otherwise, you can take the food off the stove, and let it rest for about 10 minutes until it is fully rehydrated. A pot cozy (or just wrapping it in a fleece) can help hold in heat.
You can also add boiling water directly to your meals, let sit for 15 or 20 minutes, and then eat. Stir halfway through. You can use this method with a pot, bowl, or mug and maybe a cozy to help keep the food hot. You can also use mylar bags for this.
A friend saves a couple of mylar bags from old commercial meals. She dumps her home-dehydrated meal out of a Ziploc into the reused mylar bag to rehydrate and eat. Then she washes out the bag to use again with another homemade meal.
Whew! You made it to the end! Thanks for reading my giant guide to dehydrating food for backpacking. Now you’re ready to start drying your own meals. Send me your recipe recommendations in the comments!
READ NEXT:
- The Best (and Worst) Backpacking Meals Reviewed
- How to Choose the Best Backpacking Meals
- Grocery Store Backpacking Meals for Cheap
- Dehydrated Mushroom Risotto For Backpacking
- Beyond Oatmeal: 6 Hot Backpacking Breakfasts
- Backcountry Chocolate Fondue Recipe


- Best Sun Hoodies for Hiking - June 3, 2026
- Lower Stein Valley Trail Hiking and Backpacking Guide - May 27, 2026
- The Best Things to Do in Vernon, BC - May 21, 2026
Richard Giles
Monday 13th of April 2026
Hi Taryn,
We do your pre-hydration of dehydrated meals one better.
In the morning, as we are getting ready to leave camp, we add water to our supper meal which is in double ziploc bags. At noon we check the consistency and if it requires more water, we add it.
By the time we get to camp, the meal is totally rehydrated and only requires a few minutes of simmering to reheat it. Worked great on our 2 hikes of the WTC in 2012 & 2016.
Taryn Eyton
Monday 13th of April 2026
I haven't bothered to soak all day since I don't want to carry the extra water weight - I know it's pretty negligible, but I'd rather not carry it. I'm usually in camp for a few hours before dinner relaxing anyway so it's not a big deal to pre-soak my dinner then. Some people take it even further and skip the re-heating. They just cold soak their meals all day and eat them as is - no simmering. Personally, I like a hot meal so cold soaking isn't for me.
J
Wednesday 28th of January 2026
Amazing guide.