

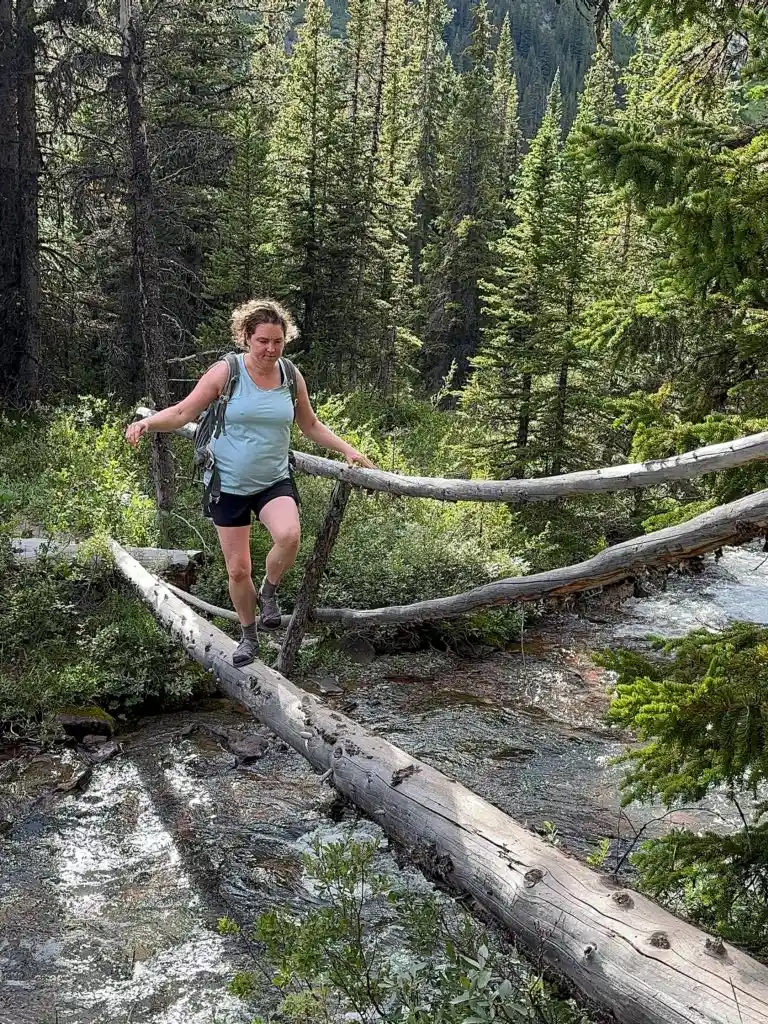
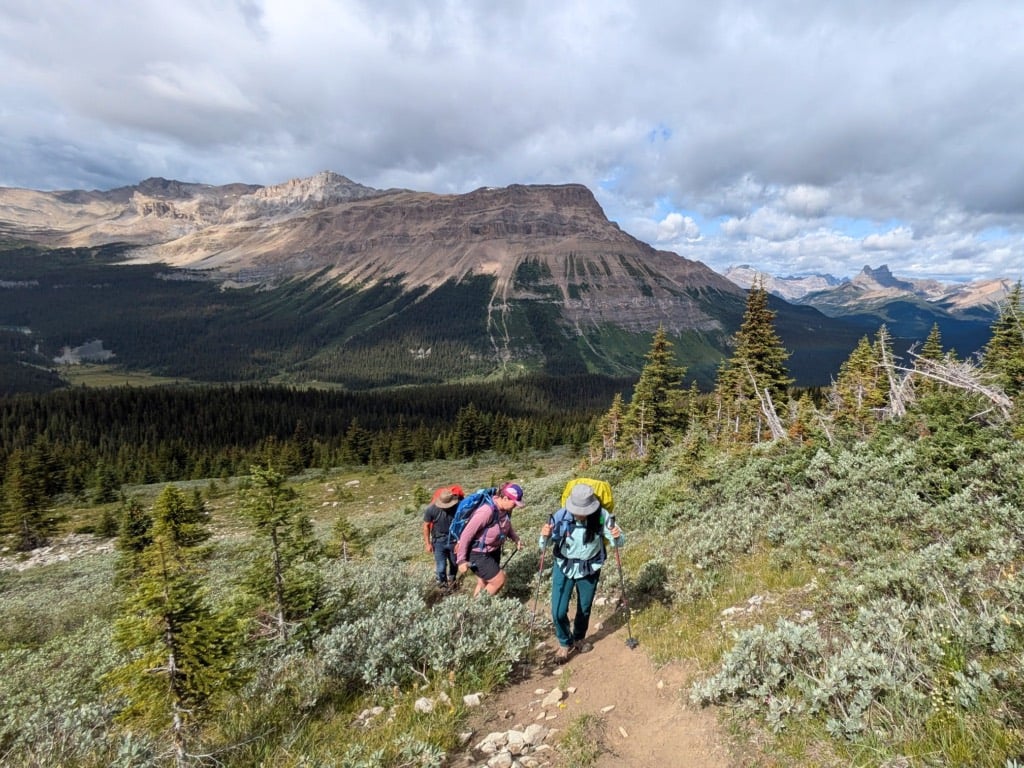
After lots of backpacking trips in the Canadian Rockies, I think I have a new favourite! The Skoki Loop has some truly stunning scenery with high mountain passes, huge alpine lakes, and easy peaks to scramble. And it’s also only a moderate hike, so you don’t have to be a hardcore hiker.
I spent four days hiking the Skoki Loop in Banff National Park near Lake Louise, and I was blown away – I didn’t expect to like the area this much! I went in August, so the wildflowers were in bloom, but I think I’d also like to go in the fall to see all the larches turn gold.
I’m a hiking guidebook author and have backpacked all over BC and the Canadian Rockies, so I’ve put together a detailed Skoki Loop hiking and backpacking guide for you. It includes:
- Quick facts about the Skoki Loop, including distance, how long it takes, best time to go, and more
- Map and elevation profile, plus a downloadable GPX file
- Detailed trail description, broken down into sections with distances and elevation gain
- Side trips and alternative routes so you can see the best scenery
- Skoki Loop itinerary options, from 2 to 4 days
- Camping and where to stay – details on every campground plus the Skoki Lodge
- Reservations and fees – key dates plus booking tips
- How to get to the Skoki Loop – including parking and bus info
- Skoki Loop hiking tips – advice for bears, food storage, weather, and more
This is a sensitive wilderness area. Learn how to Leave No Trace to keep the wilderness wild. Make sure you are prepared by bringing the 10 Essentials. Get ready for adventure with this checklist of things to do before every hike.
Hey there: Some of the links in this post are affiliate links, which means I earn a small commission at no cost to you. Thanks for your support. -Taryn
Skoki Loop Quick Facts
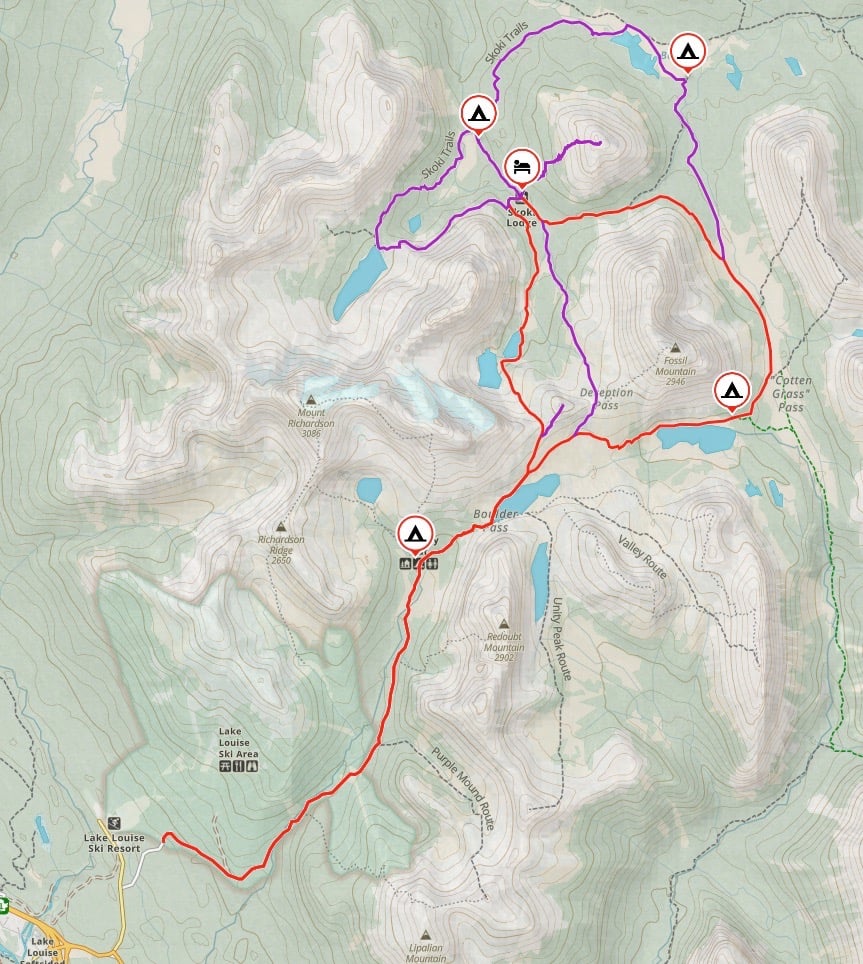
Route Overview: The Skoki Loop is a long day hike or multi-day backpacking route that makes a lollipop-shaped loop through the backcountry near Lake Louise. It goes over three passes and visits gorgeous alpine lakes.
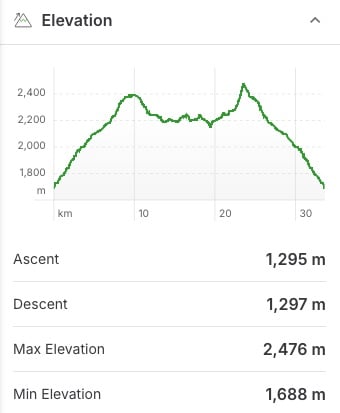
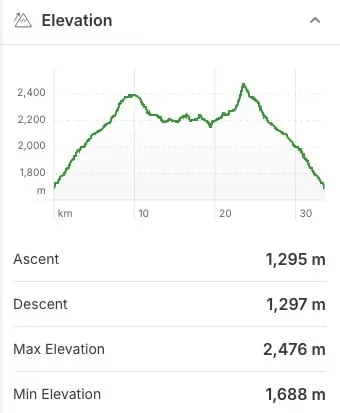
Distance: 33.5 km
Elevation Gain: 1,295 m
Difficulty: Moderate
Duration: 3 days
Best Time to Go: Mid-July to mid-September when the trail is snow-free. Early to mid-August is wildflower season, and September is larch season.
Reservations and Fees: You must make reservations to camp. You must also pay National Park entry fees, backcountry camping fees, and a reservation fee. More details below.
Indigenous Context: The Skoki area is in the traditional territory of the Tsuut’ina, Blackfoot/Niitsítapi, Stoney Nakoda, Ktunaxa, and Métis. The government forced Indigenous people to leave when Banff National Park was created in 1885. Today, the park works with several Indigenous groups to facilitate access for traditional, ceremonial, and cultural activities, including harvesting.

Skoki Loop Trail Maps and Elevation Profile
For the most part, the main trails on the Skoki Loop are well-marked and easy to follow. There are signs at most junctions. However, there are a few unofficial trails and easy scrambling routes that aren’t marked with signs and aren’t on the Lake Louise and Yoho Map from Gem Trek. (Otherwise, it’s a great map!)
I used the Gaia GPS app on my hike. It was helpful to know where I was on the trail to figure out how much higher I had to climb and where the next campsite or landmark was. All Trails+ is also great.
I also made you a trail map using Gaia GPS. Click through to zoom in and explore. You can also save it to your routes in Gaia GPS or export the GPX file.
PS: Want to save 10% on a premium subscription to Gaia GPS (the app I use for all my hikes)? Use my link – the discount appears in cart.
Join the Backpacking in BC Facebook Group
Skoki Loop Trail Description
If you look online, you’ll find several different versions of the Skoki Loop. I’ve chosen to describe the most popular and most scenic version here. It goes from the trailhead to Baker Lake, then around Fossil Mountain to the Skoki Lodge. To complete the loop, you’ll hike from Skoki Lodge over Packer’s Pass, then rejoin the main path to the trailhead.
You might find other Skoki Loop descriptions that include Deception Pass or go around Skoki Mountain via Red Deer Lakes. I don’t recommend those routes since they aren’t as beautiful. But I do have details on them in the alternative routes section below.
Read on for my detailed description of the Skoki Loop hike.
Key Locations
| KM | Elevation | Landmark |
|---|---|---|
| 0 km | 1,690 m | Trailhead/Parking |
| 3.9 km | 2,020 m | Leave ski area |
| 7 km | 2,205 m | Halfway Hut/Hidden Lake Jct |
| 8.5 km | 2,350 m | Boulder Pass/Ptarmigan Lake |
| 9.3 km | 2,385 m | Packer’s Pass Jct |
| 10.3 km | 2,385 m | Deception Pass Jct South |
| 12.8 km | 2,340 m | Baker Lake Camp |
| 15.7 km | 2,220 m | Red Deer Lakes Jct |
| 18.2 km | 2,230 m | Jones Pass |
| 18.8 km | 2,200 m | Deception Pass Jct North |
| 19.3 km | 2,170 m | Skoki Lodge/Merlin Meadows Jct |
| 19.5 km | 2,165 m | Merlin Lake Jct |
| 21.7 km | 2,265 m | Myosotis Lake |
| 22.4 km | 2,280 m | Zigadenus Lake |
| 23.5 km | 2,475 m | Packer’s Pass |
| 24.2 km | 2,385 m | Packer’s Pass Jct |
| 25 km | 2,350 m | Boulder Pass/Ptarmigan Lake |
| 26.5 km | 2,205 m | Halfway Hut/Hidden Lake Jct |
| 29.6 km | 2,020 m | Re-enter ski area |
| 33.5 km | 1,690 m | Trailhead/Parking |
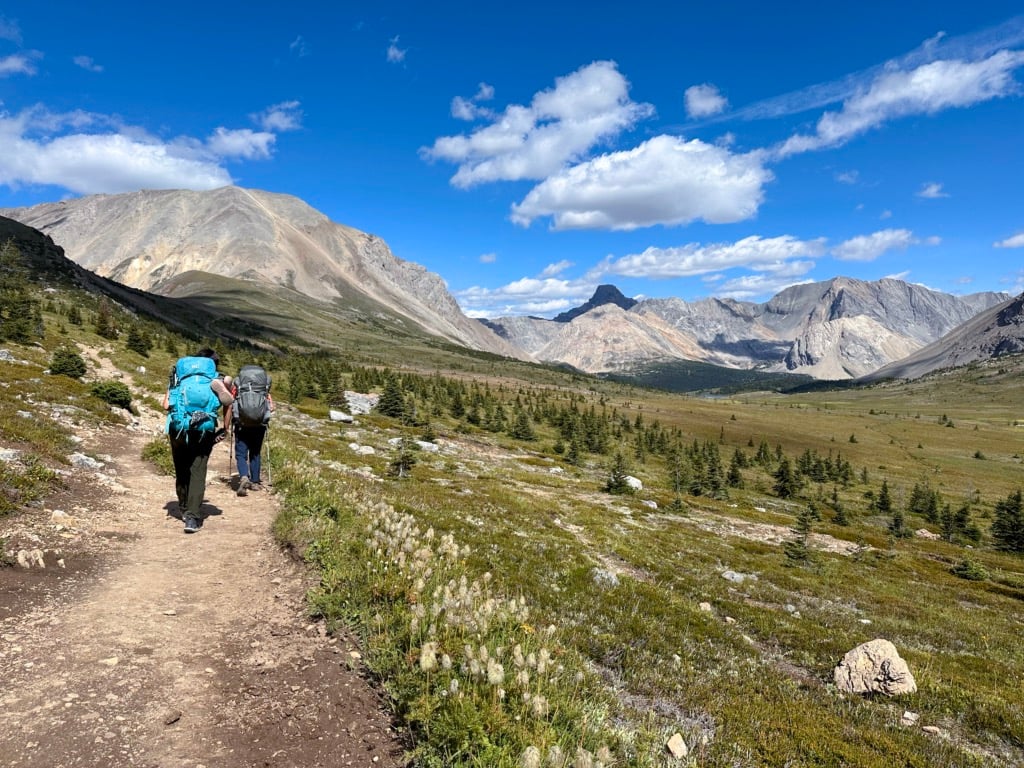
Trailhead to Halfway Hut/Hidden Lake Camp
Distance: 7 km
Elevation Gain: 540 m
Elevation Loss: 30 m
From the parking area, walk past the info signs and gate onto the wide gravel road. This road is part of the Lake Louise Ski Area and is closed to public vehicles and bikes. However, you will see vehicles from the ski area, Skoki Lodge, and guided tour companies. Unfortunately, none of them will give you a ride!
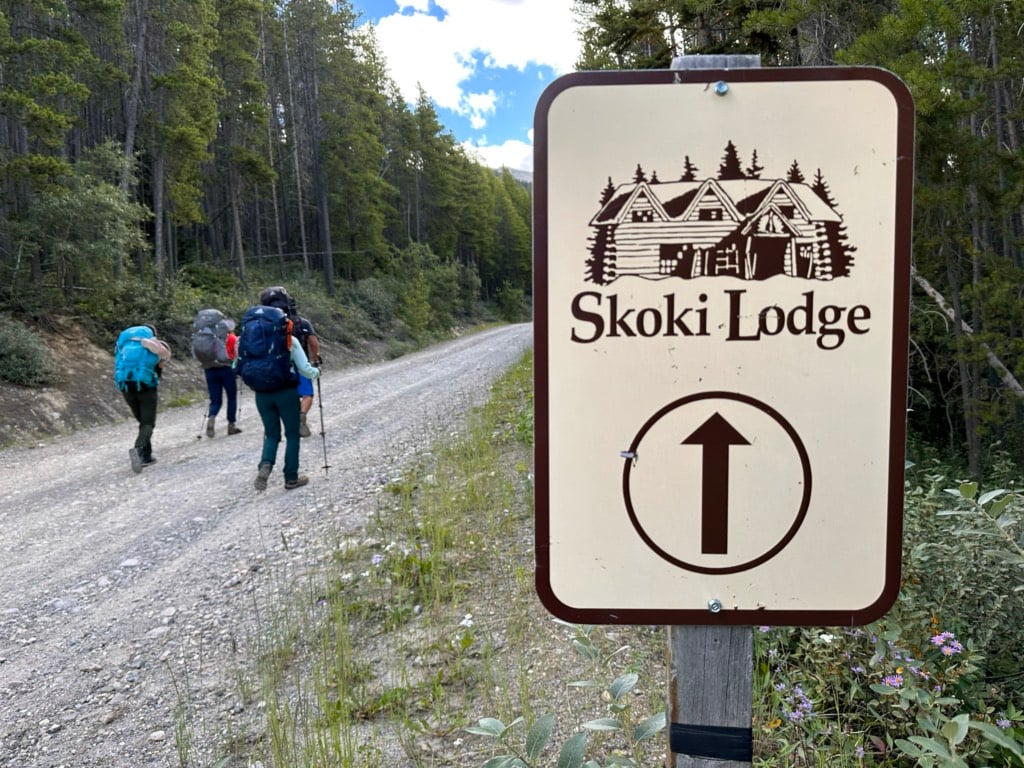

Continue up the road, which is steep in places. Ignore a left fork at 1.2 km. Cross a bridge at 2.4 km. At 3.6 km, reach a parking area and info kiosk just after passing under a ski lift. This is as far as the Skoki Lodge and guided tour companies can go.
Stay on the road for a few more minutes as you cross a ski run and the road curves uphill to the right. The road turns into a trail 3.9 km from the trailhead as it heads steeply uphill.
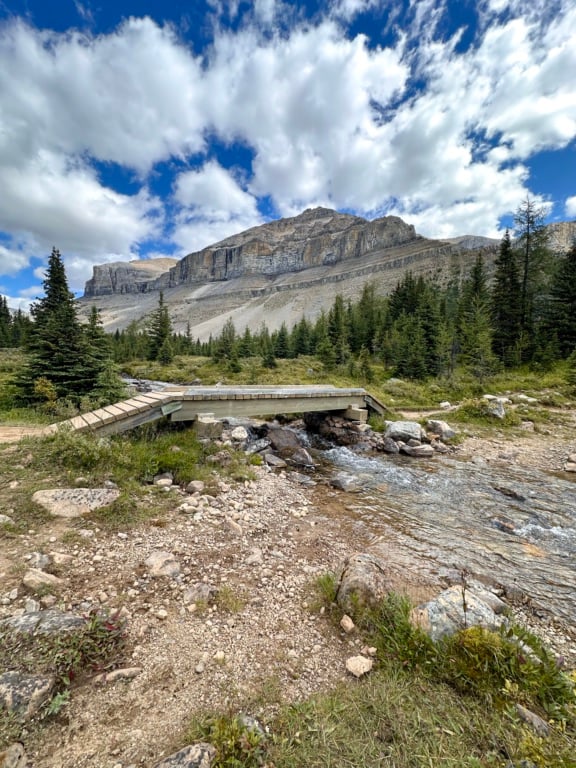
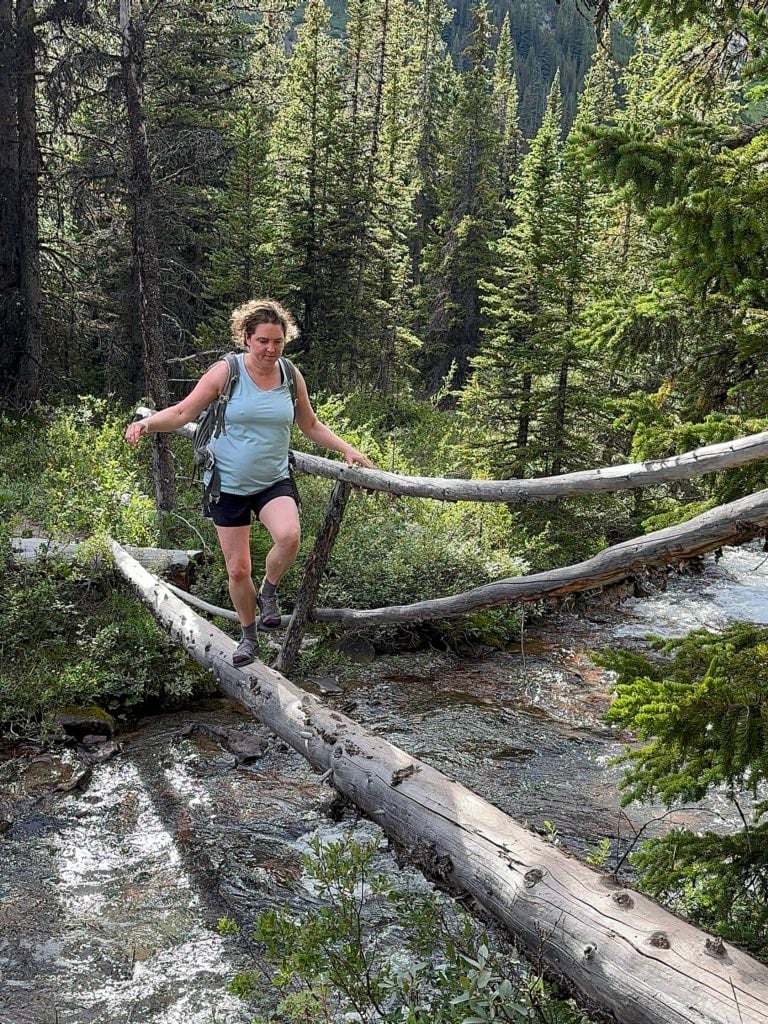
Follow the trail across another ski run and back into the trees. The trail stays in the forest for the next few kilometres while continuing to climb gradually. Cross creeks on small bridges at 4.3 km, 5.7 km, and 6.5 km.

Cross a creek at 7 km. On the other side, a side trail straight up the hill goes to Halfway Hut. The main trail to Hidden Lake Camp goes left.
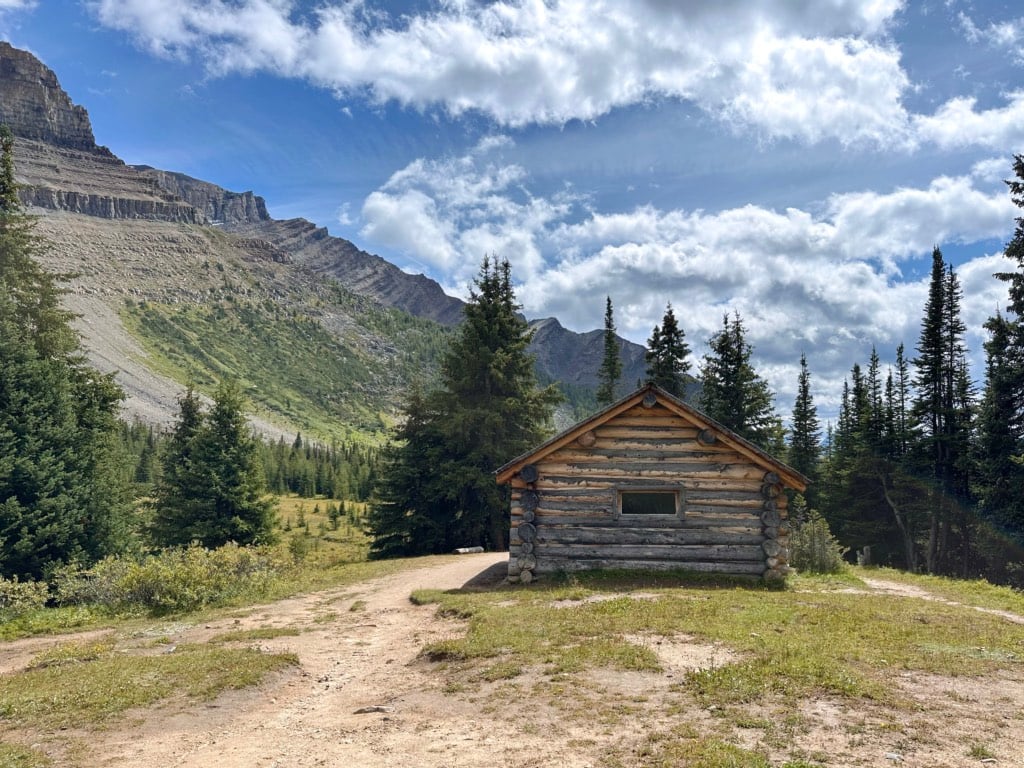
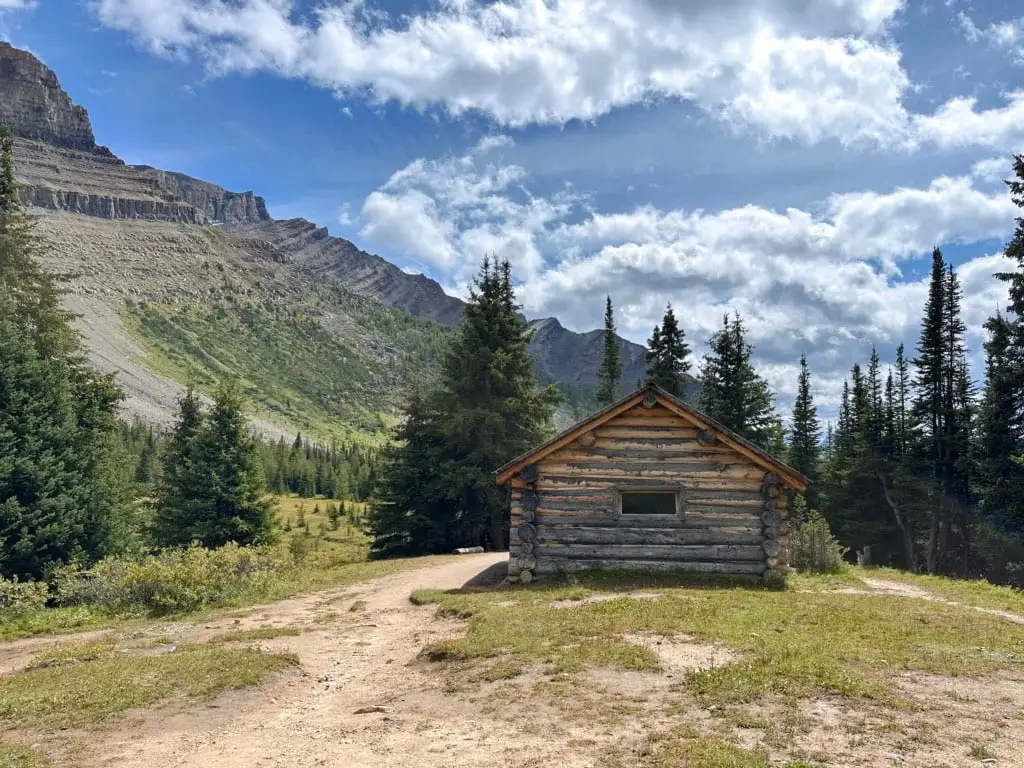
Halfway Hut is a historic log cabin, originally constructed as a stopping point along the winter ski route between Lake Louise and Skoki Lodge. Today, it’s a good place to stop for lunch, especially if it’s raining. There is an outhouse here, too.
The junction with the trail to Hidden Lake and Hidden Lake Campground is 100 metres away along the main trail. Hidden Lake Campground is another 100 meters along the side trail.
Halfway Hut/Hidden Lake Camp to Baker Lake Camp
Distance: 5.8 km
Elevation Gain: 235 m
Elevation Loss: 195 m
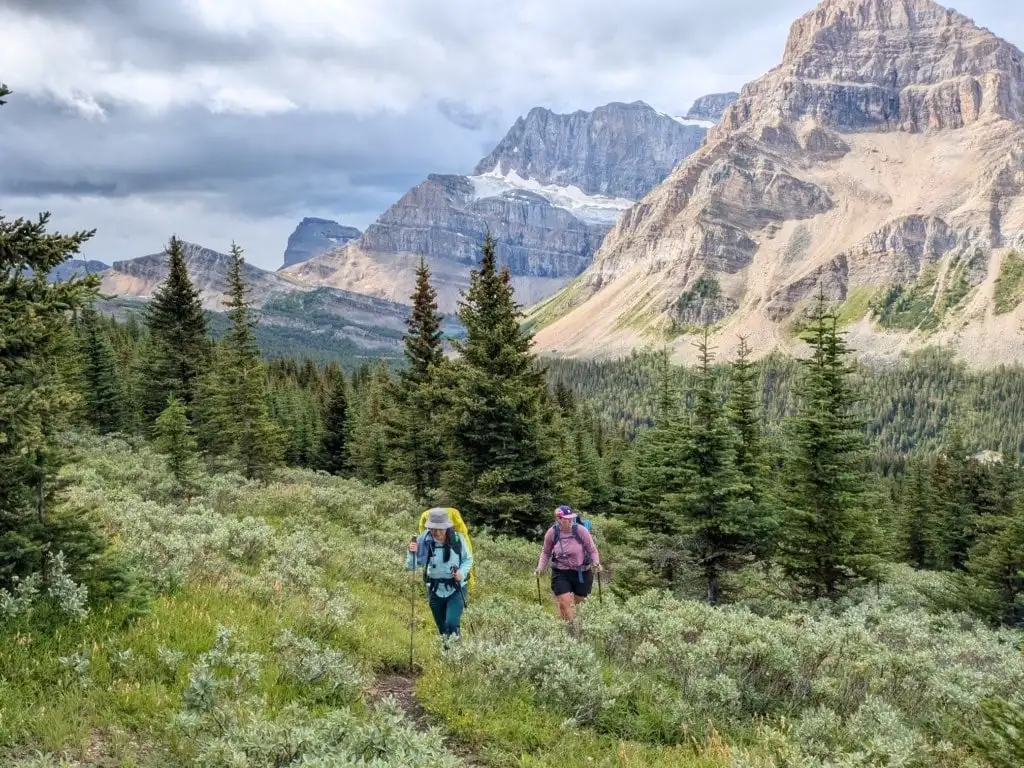
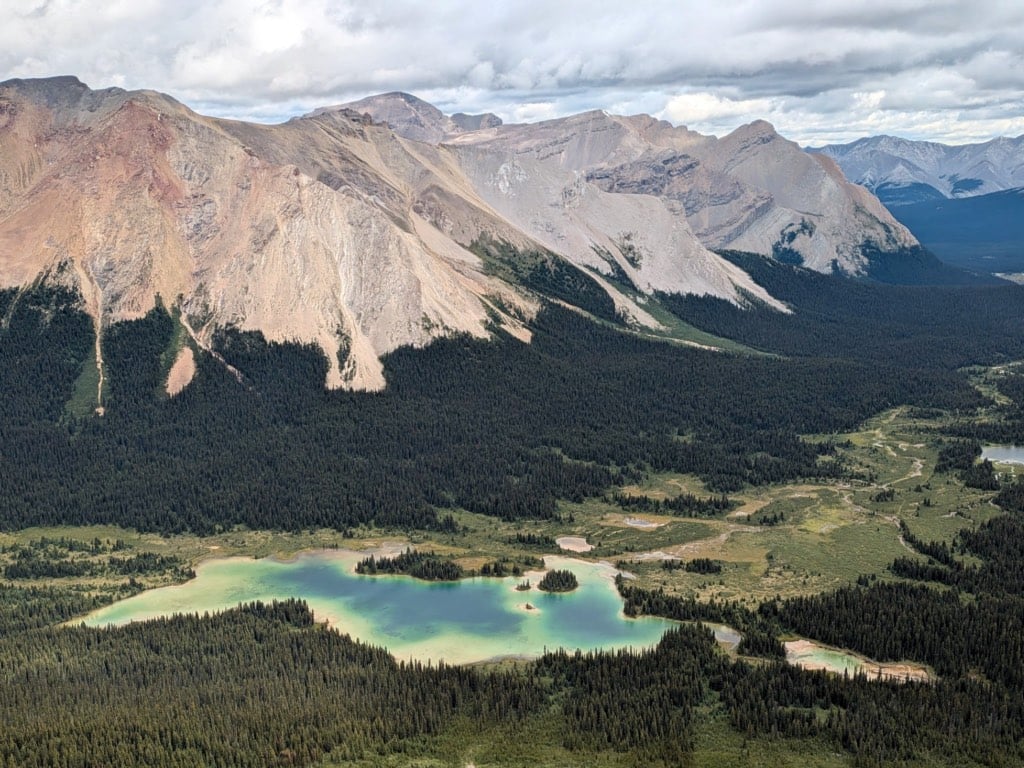
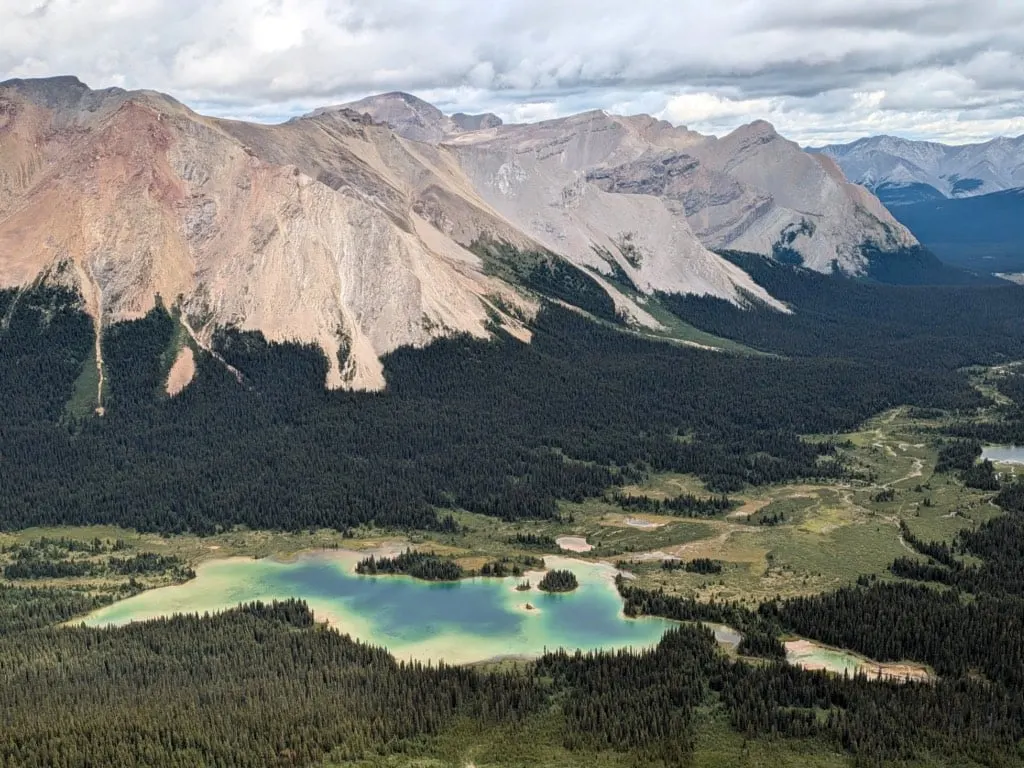
Past the Hidden Lake junction, the forest starts to thin out, and you’ll start to get glimpses of alpine meadows. The vegetation also starts to change, and alpine larch trees become more numerous.
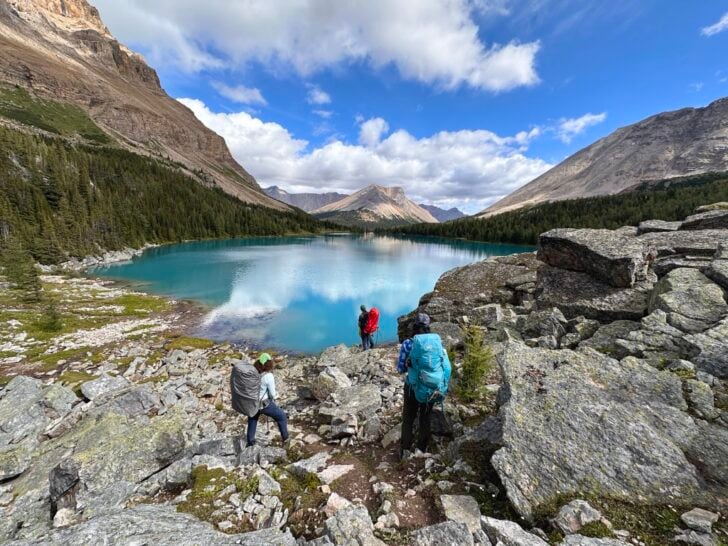
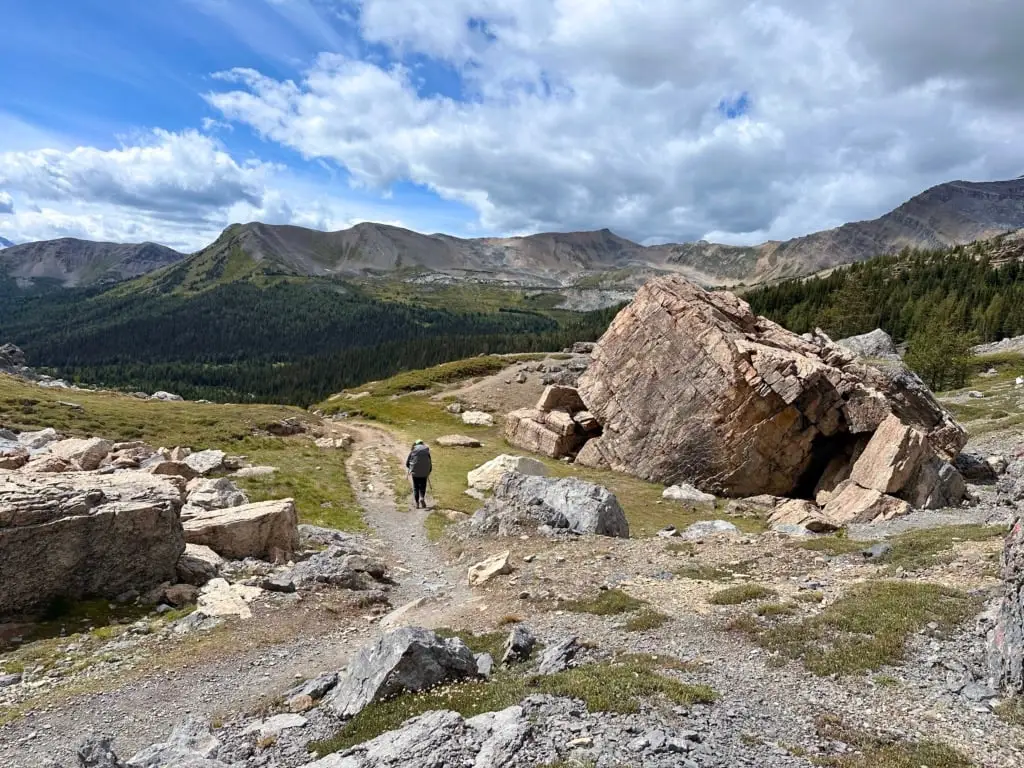
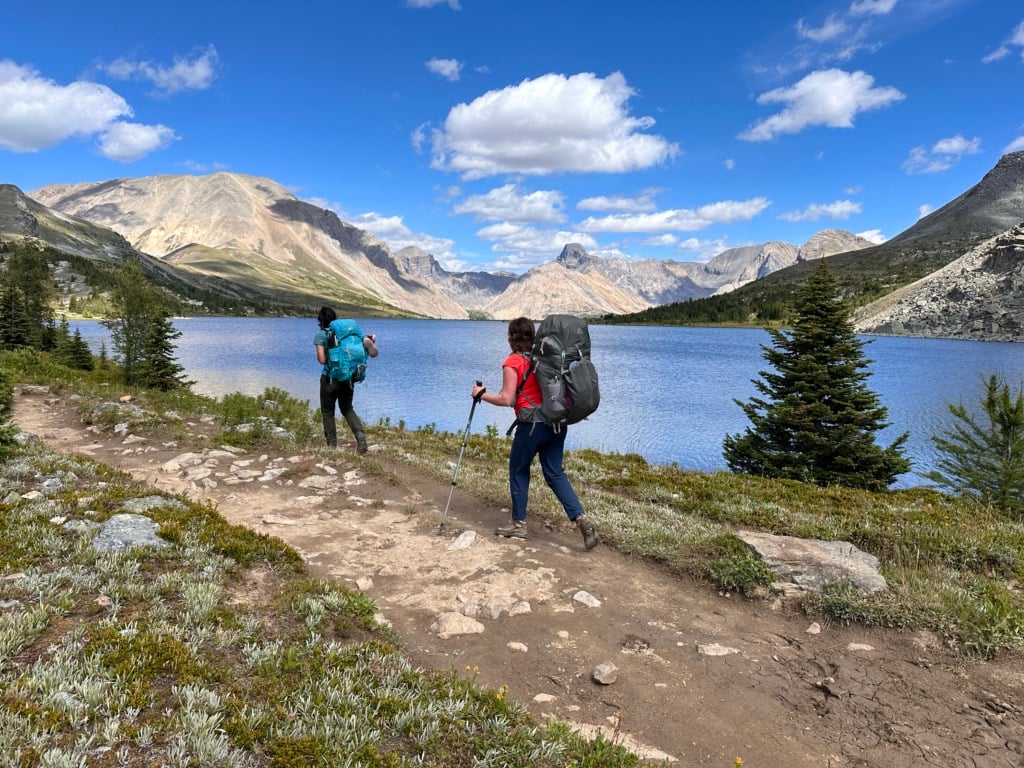
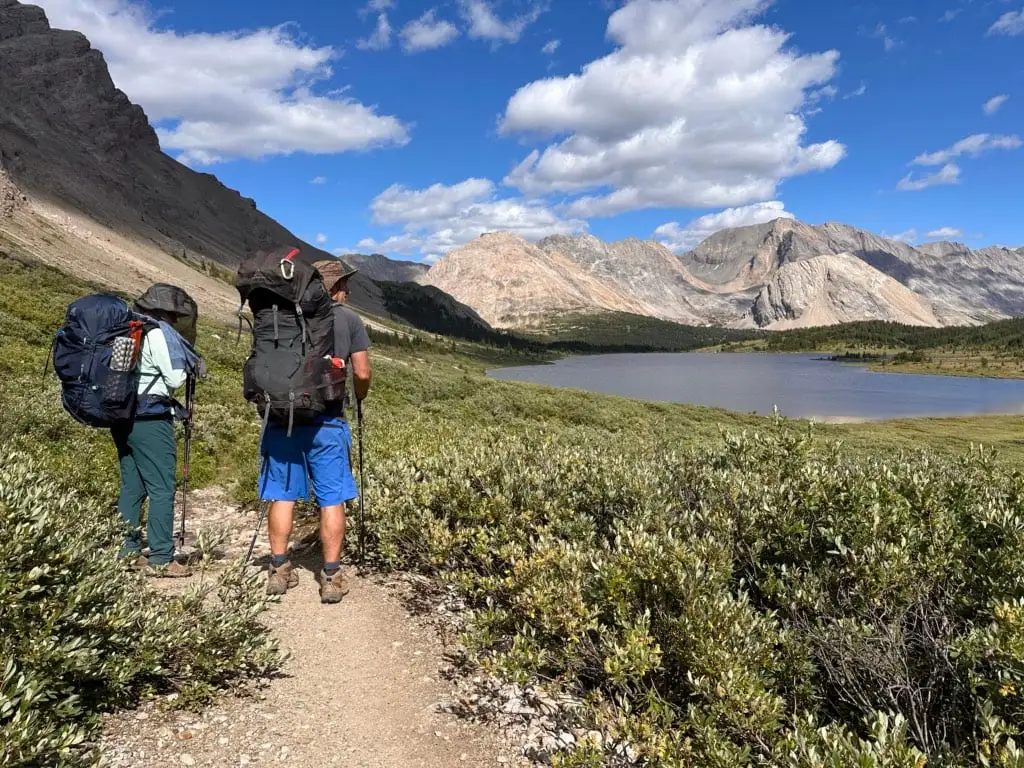
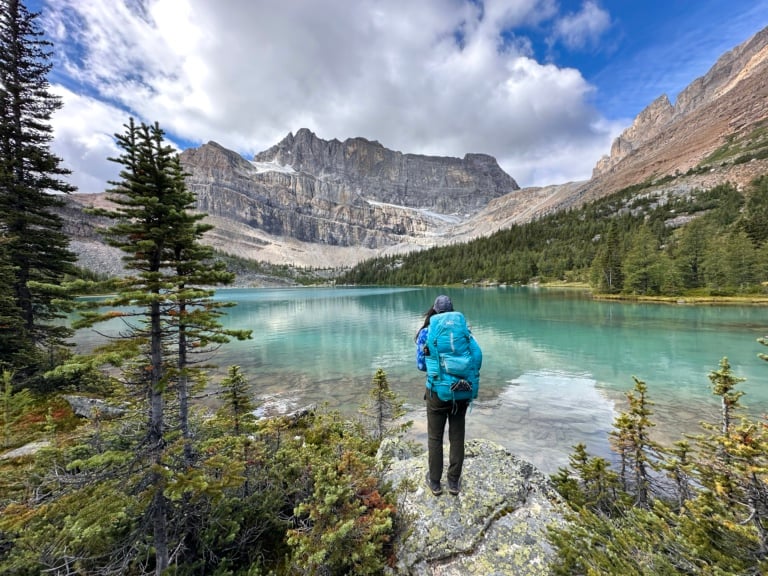
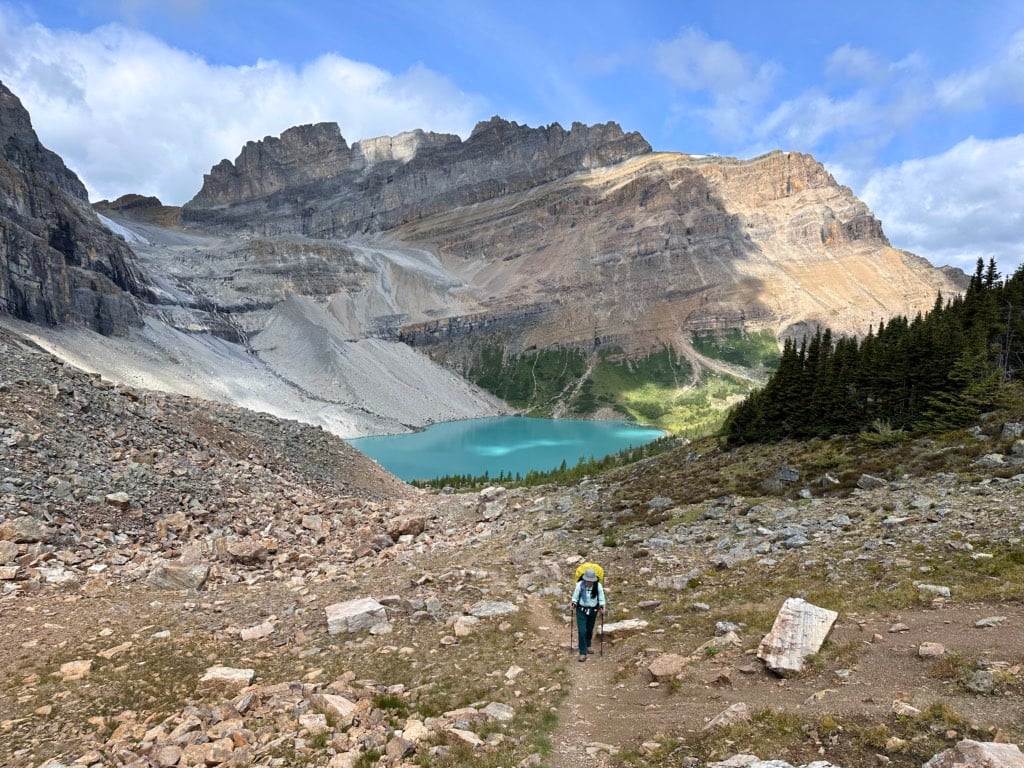
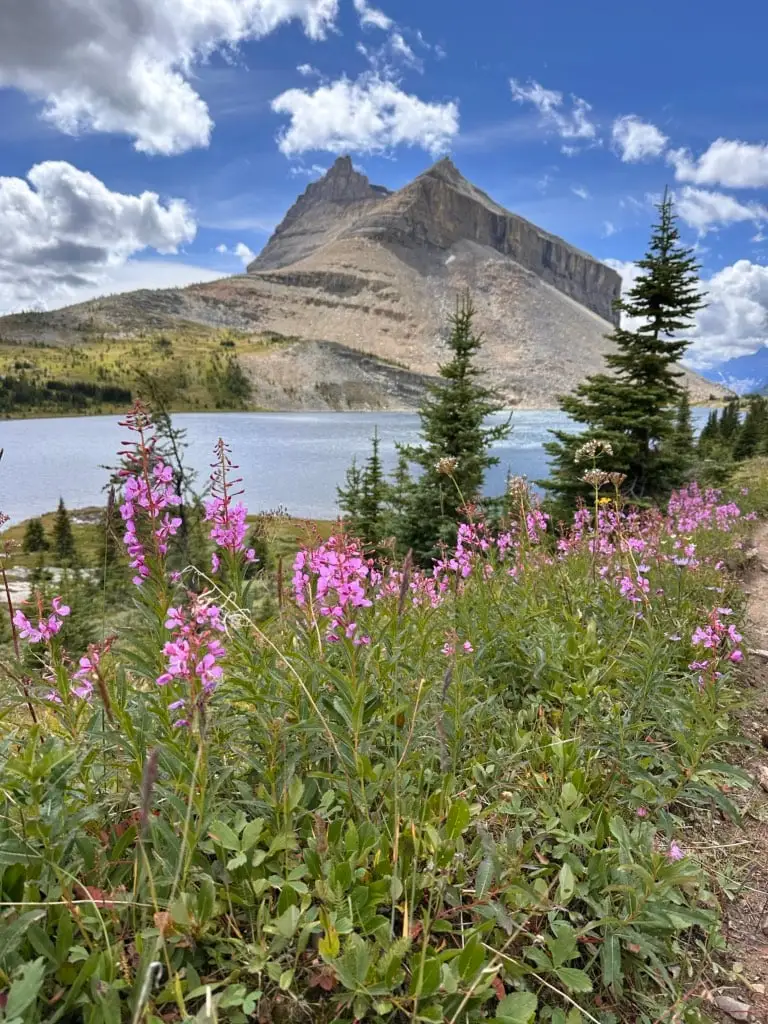
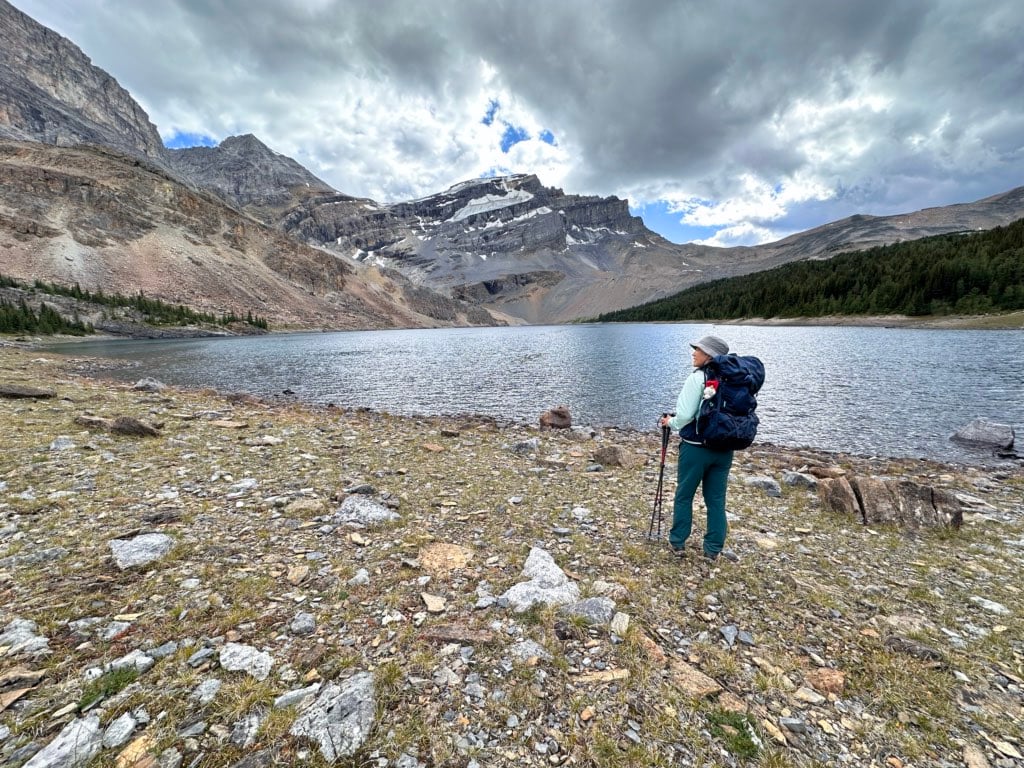
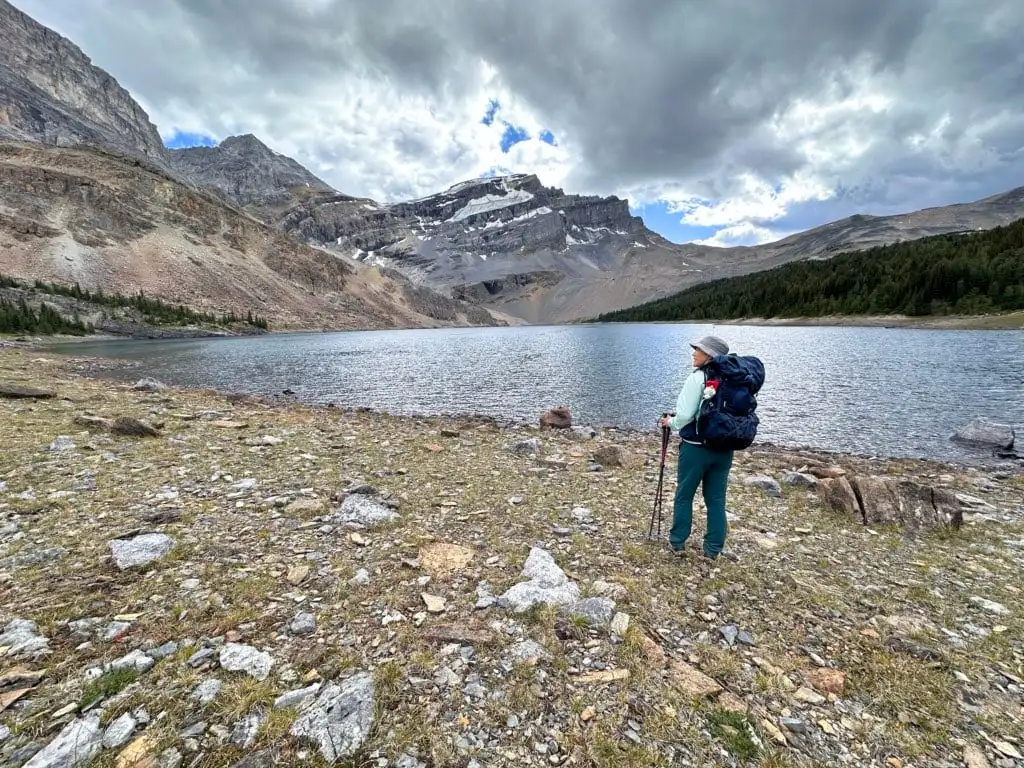
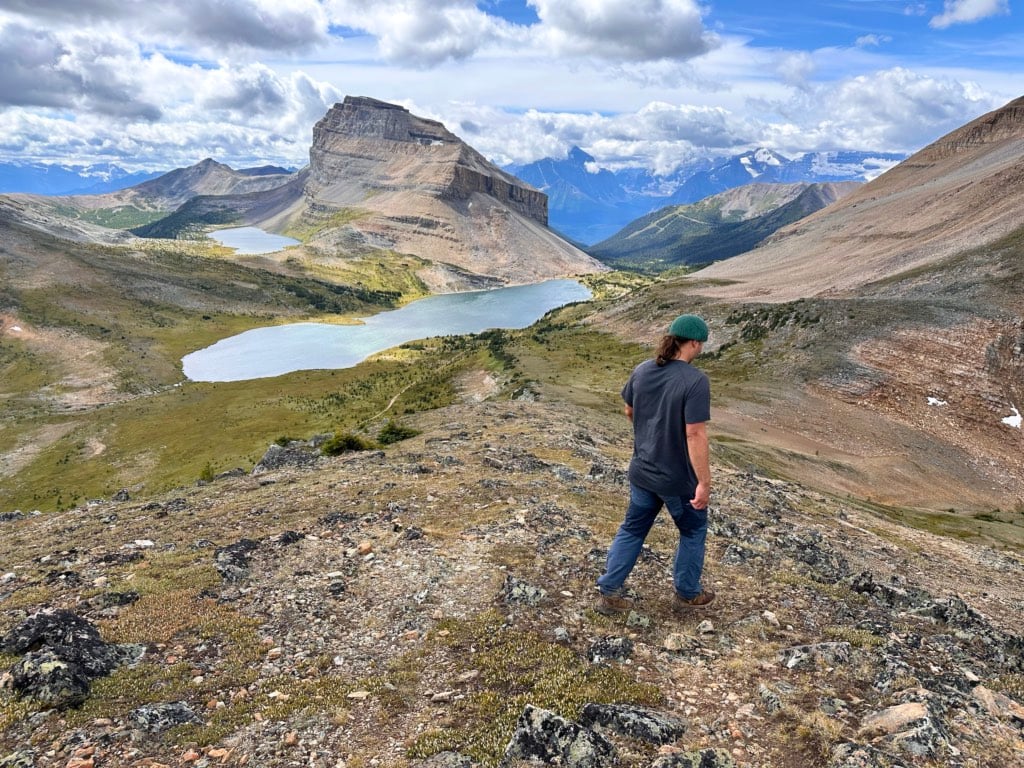
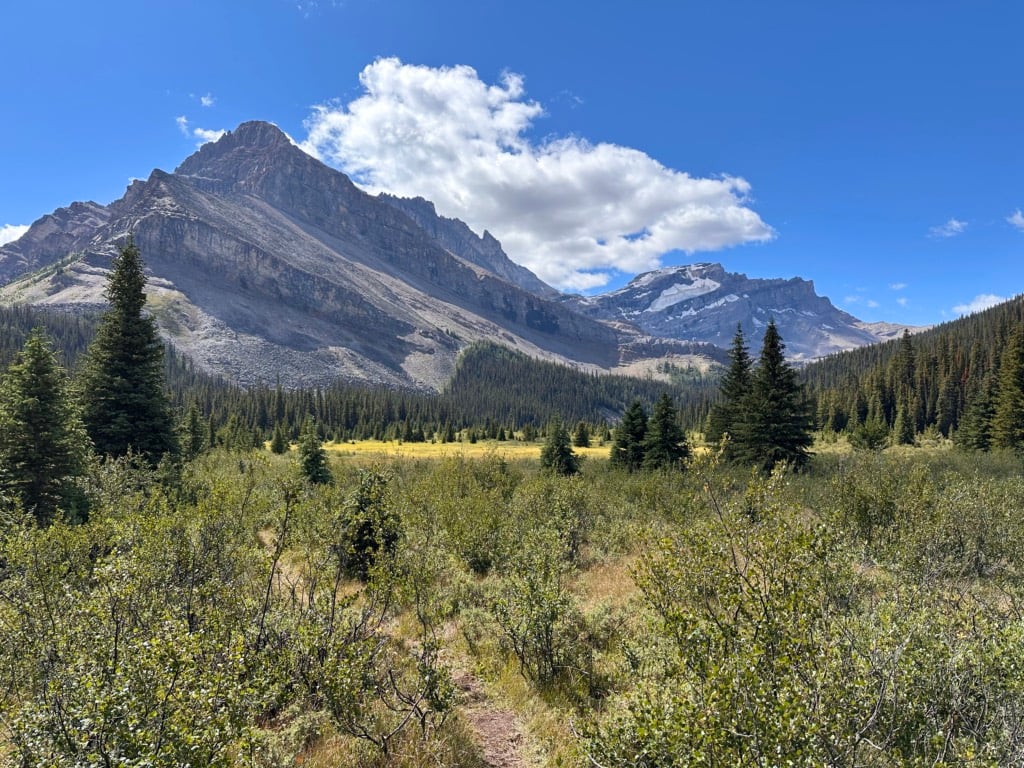
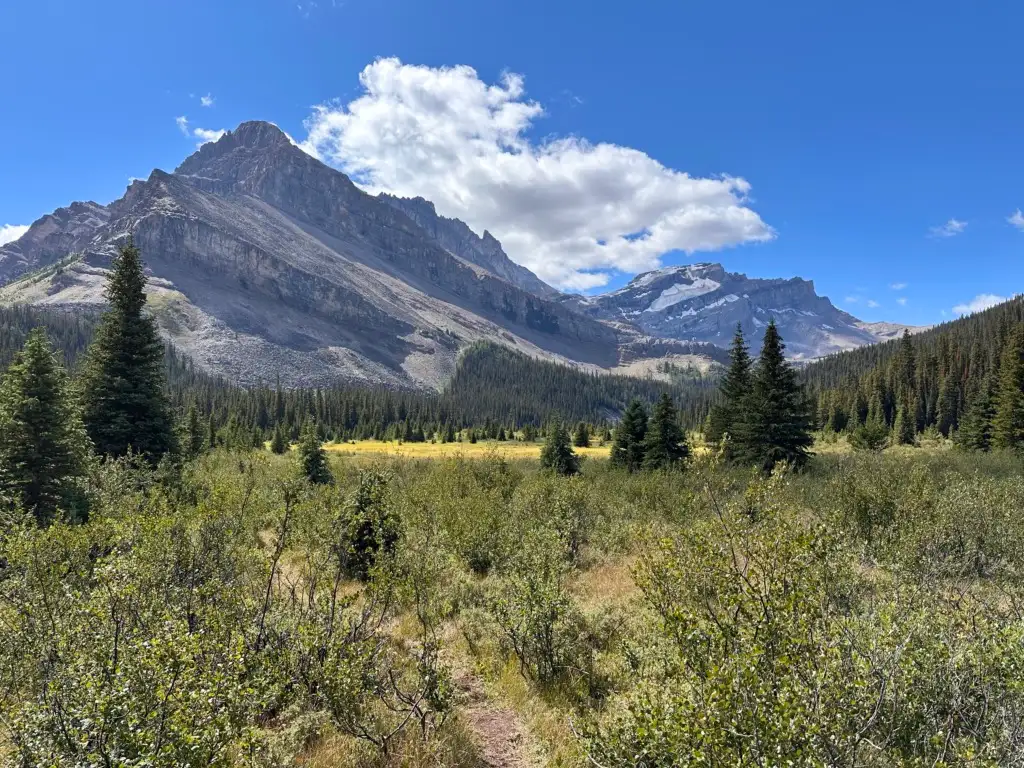
The trail skirts a huge rock slide below Redoubt Mountain with lots of enormous boulders. Reach the crest of Boulder Pass at 8.5 km. The huge expanse of Ptarmigan Lake stretches out in front of you. This is a great place for a break to enjoy the incredible views.


Keep following the trail as it skirts around the northwest edge of Ptarmigan Lake. At 9.3 km, you may be able to spot the unmarked junction with the Packer’s Pass Trail. This is your return route. For now, continue along the main trail as it stays in the grassy meadows above Ptarmigan Lake.
At 10.3 km, reach the marked junction with the Deception Pass Trail. This is an alternative (and more direct) route to Skoki Lodge. However, my recommended route continues east, since it is more scenic.
Follow the trail through grassy meadows, speckled with wildflowers. Descend to the north shore of Baker Lake, then follow the trail through low bushes along its length. Arrive at the turn-off to Baker Lake Campground at 12.8 km.


Baker Lake Camp to Skoki Lodge
Distance: 6.5 km
Elevation Gain: 145 m
Elevation Loss: 285 m
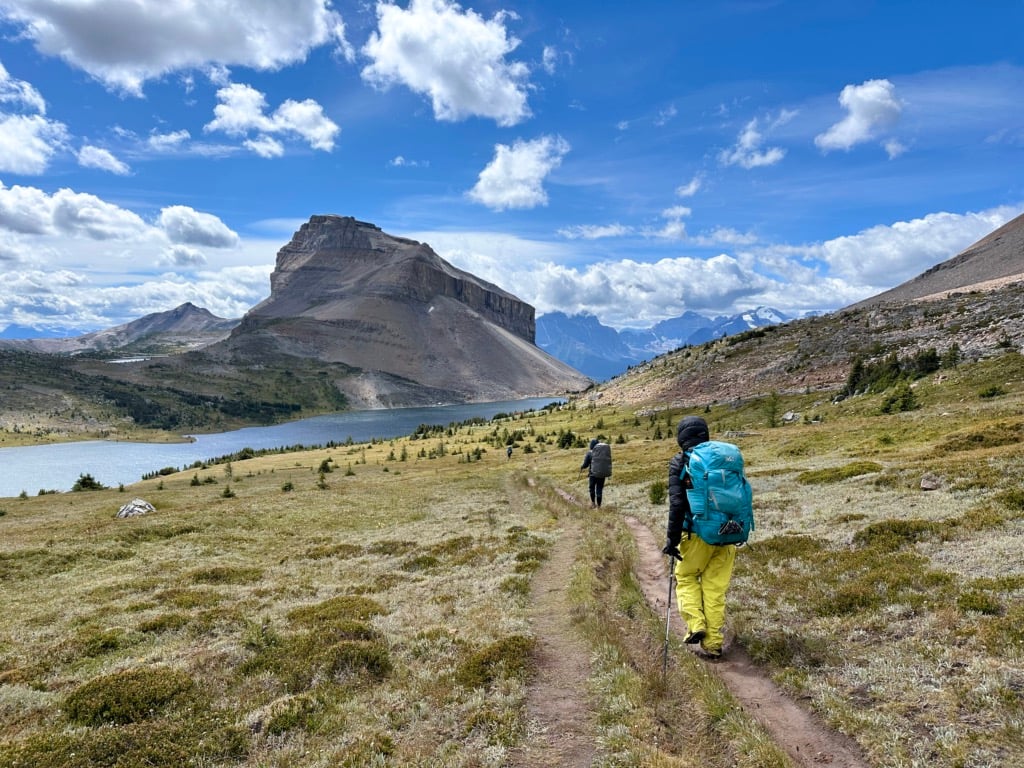
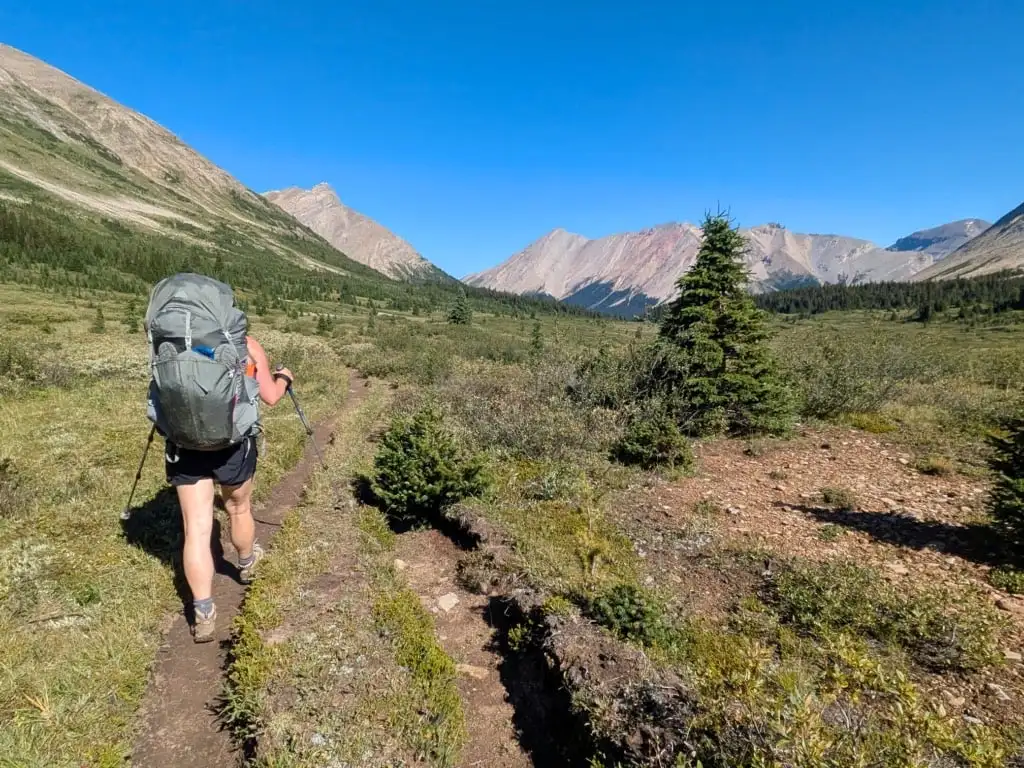
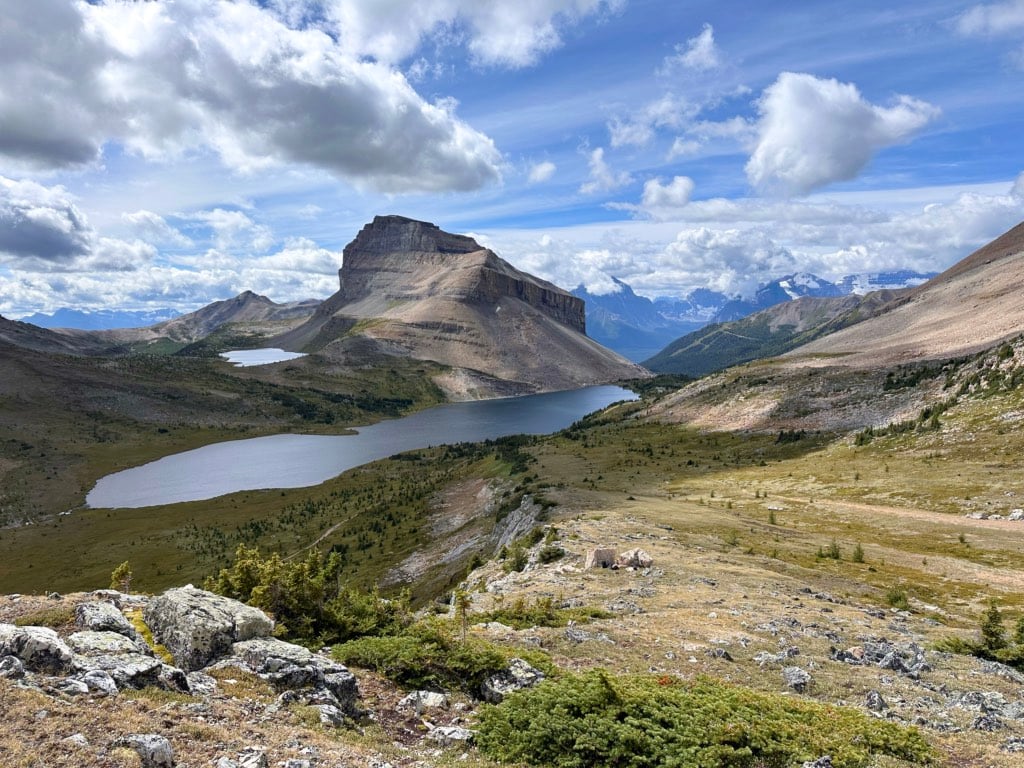
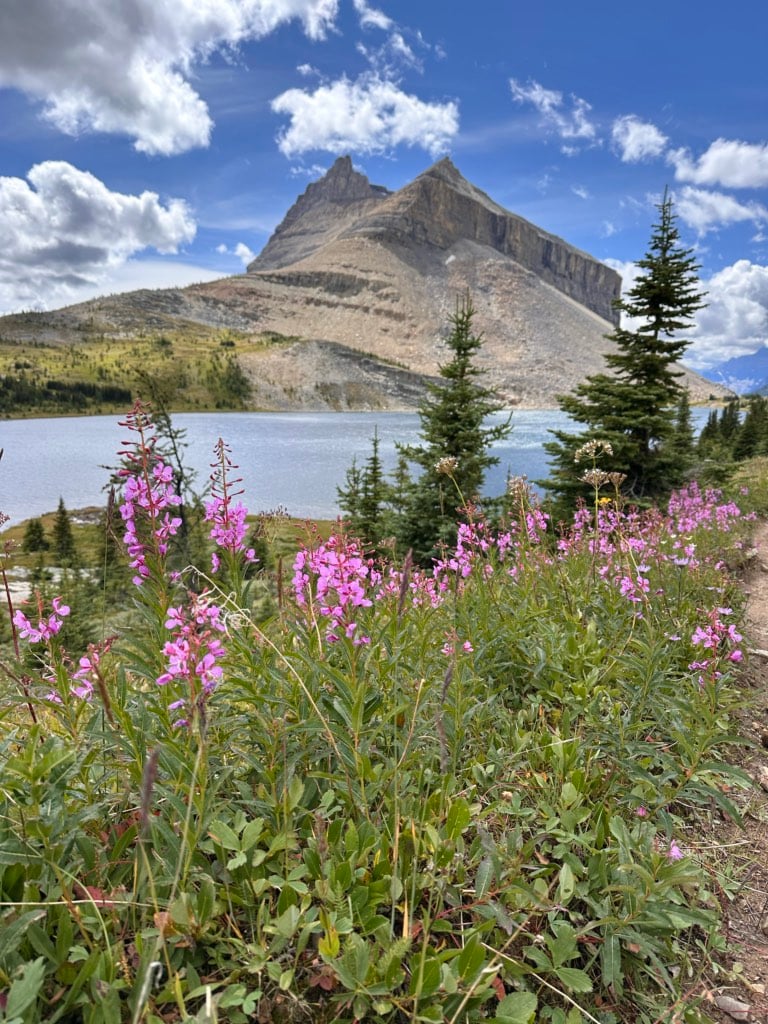
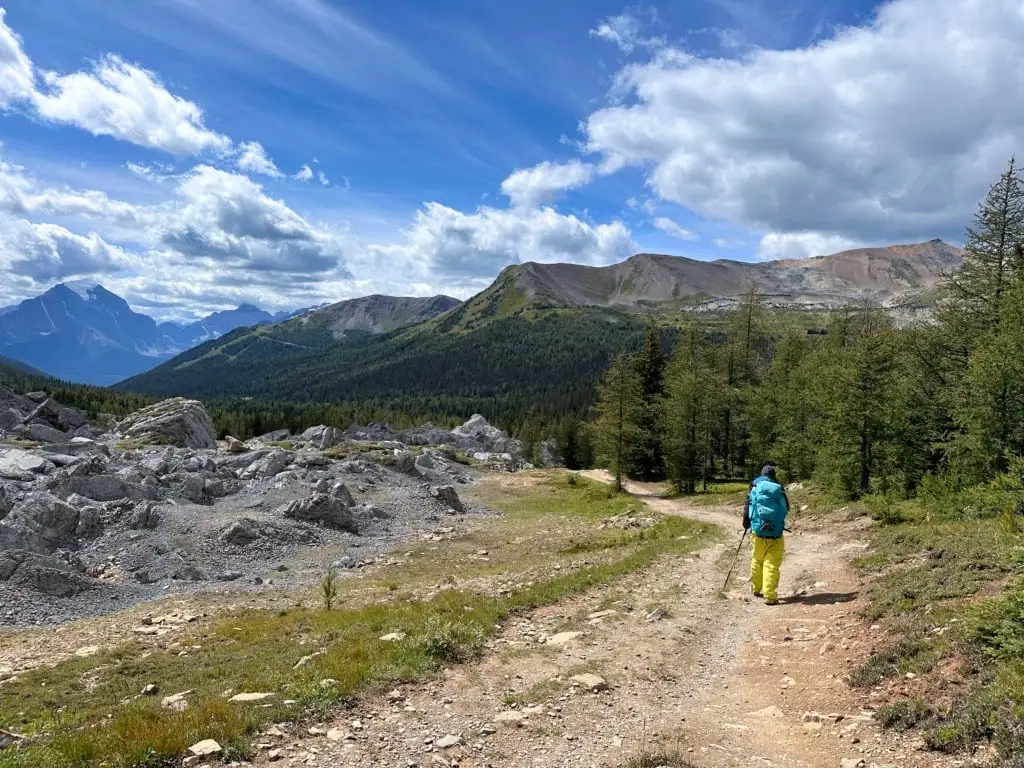
From Baker Lake Camp, follow the trail east to a junction, then turn left to go north on the Cotton Grass Pass Trail. The first few minutes are in the trees, but the trail quickly emerges into a wide, grassy valley. There are great views of Oyster Peak to the east. The wavy ridge of the mountain did kind of look like an oyster shell!
Reach a junction at 15.7 km. The trail continues straight up the valley to Red Deer Lakes 2.9 km away. However, my recommended route goes left between Fossil and Skoki Mountains. The narrow trail climbs gradually through tight forest before crossing a creek in a wet meadow at 18.2 km. This is Jones Pass.


From here, follow the path slightly downhill through the forest. When the trees start to thin out, reach a junction with the trail from Deception Pass at 18.8 km. Turn right and walk a few more minutes through the open forest and meadow to Skoki Lodge at 19.3 km.
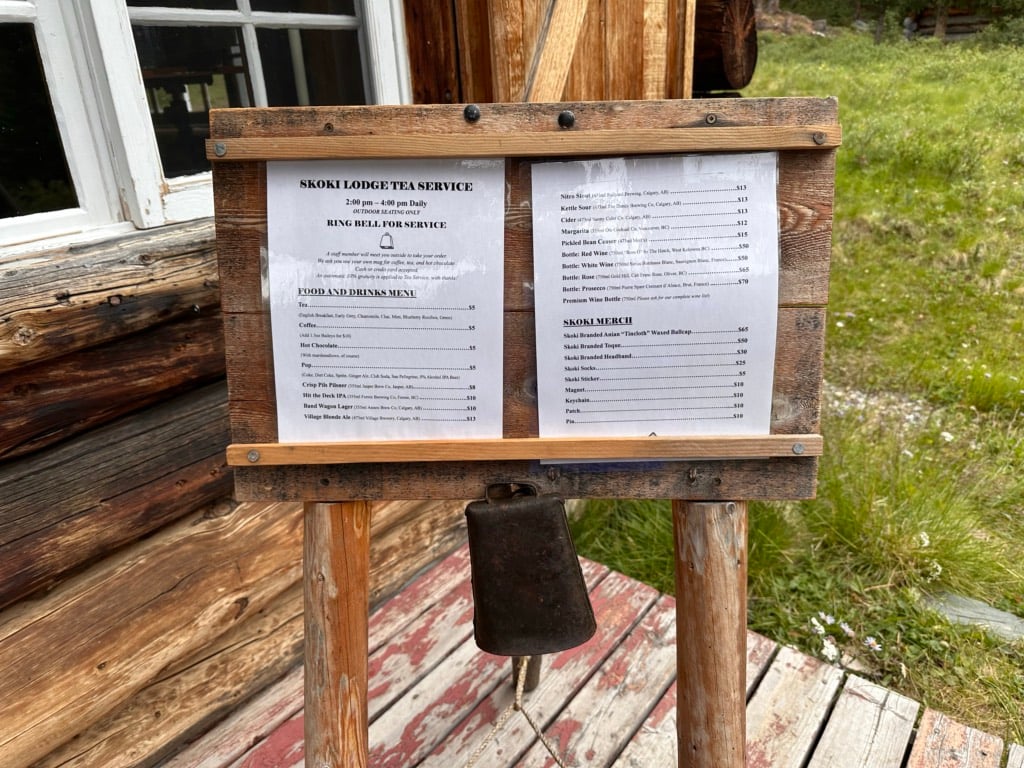
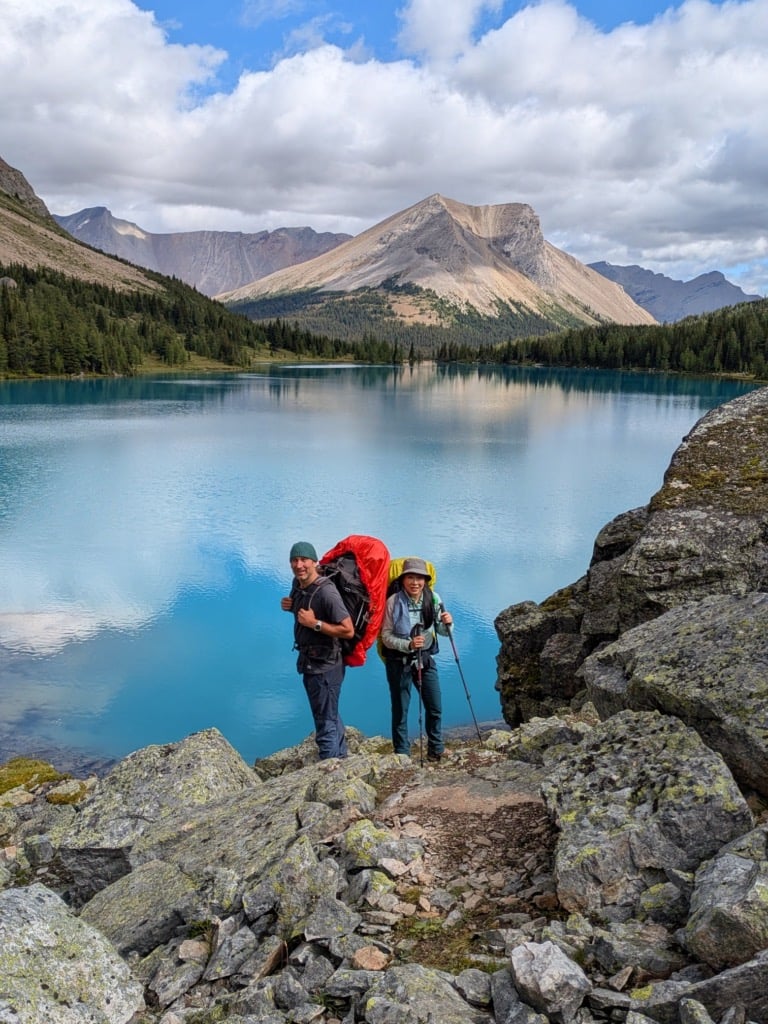
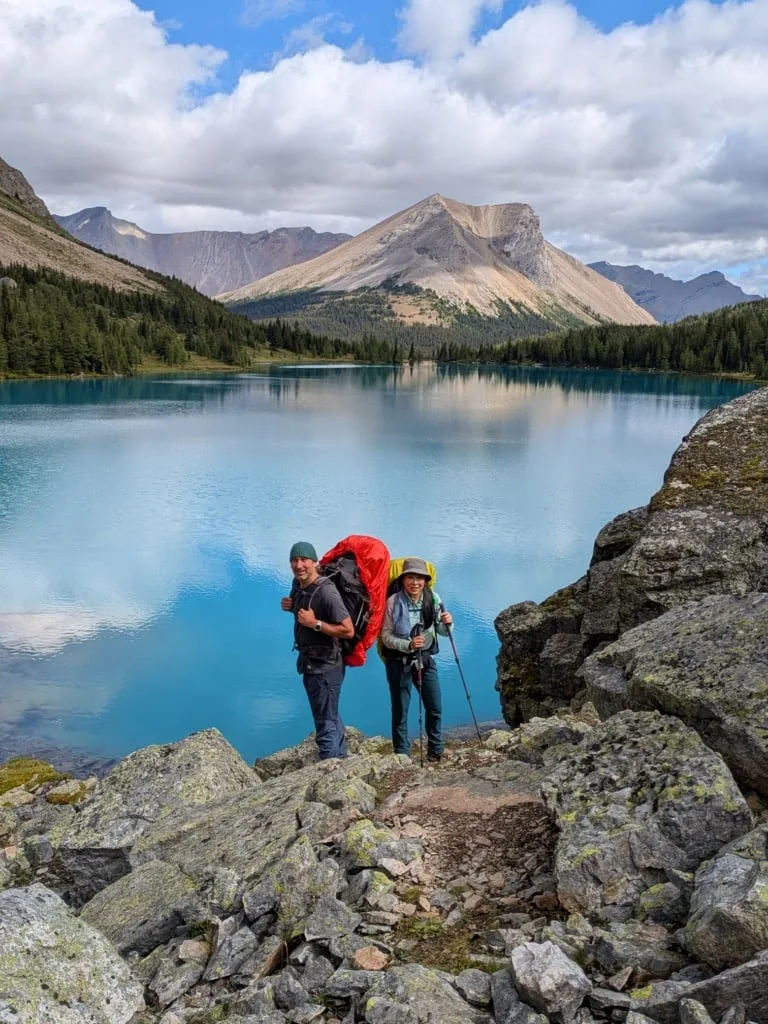
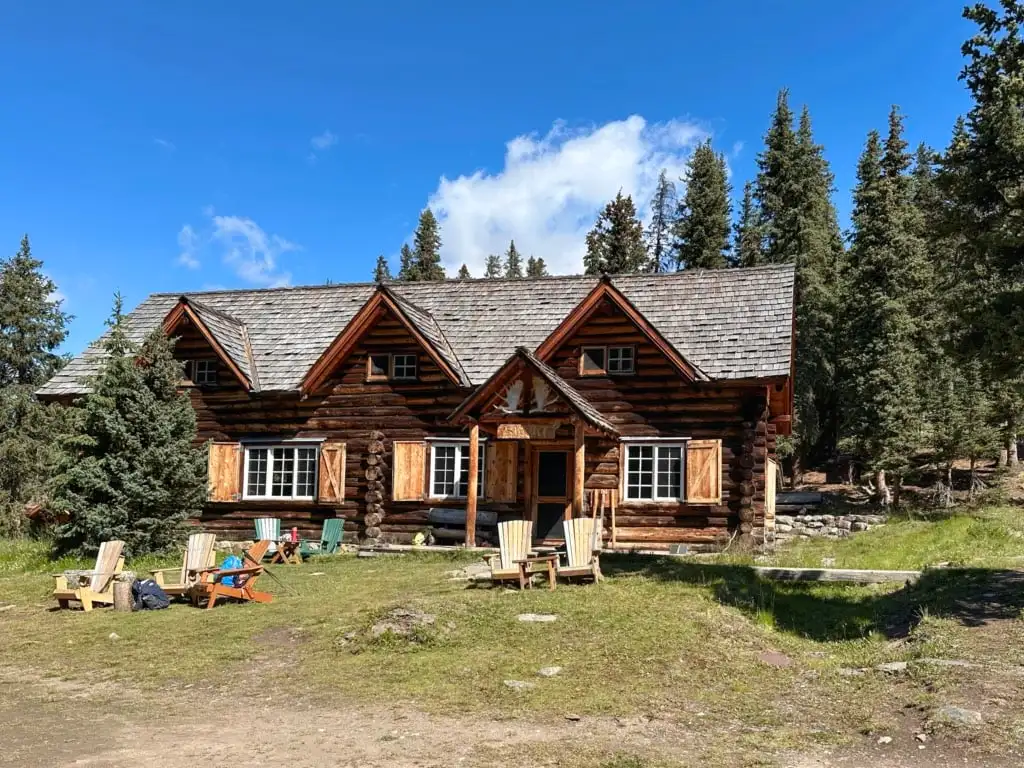
The benches and chairs outside the historic lodge are the perfect place to take a break. The lodge is a Canadian historic site, dating back to 1933, and is the first backcountry ski lodge in North America. If you aren’t staying in one of their rustic log cabins, you can buy snacks and drinks (including alcohol) from them between 2 and 4 pm. They accept cash and cards.
If you are staying at Merlin Meadows Campground, it’s 1 km away on the trail to the north.

Skoki Lodge to Zigadenus Lake
Distance: 3.1 km
Elevation Gain: 135 m
Elevation Loss: 30 m
To continue your hike around the Skoki Loop, follow the signs in front of the lodge to cross the bridge over the creek. At 19.5 km, reach a literal fork in the trail – there is a huge wooden fork propped against a tree! The route to Merlin Lake heads right, but your route goes left towards Packer’s Pass.
The Packer’s Pass Trail is not an official Parks Canada trail and does not appear on most maps. However, it is easy to follow.
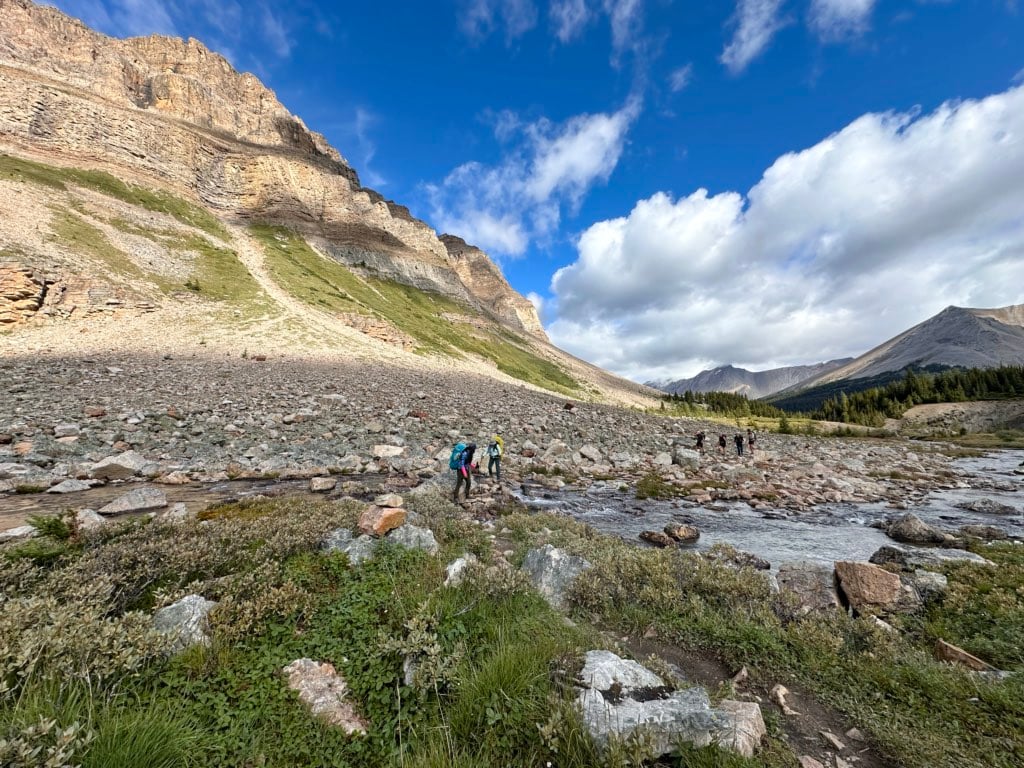
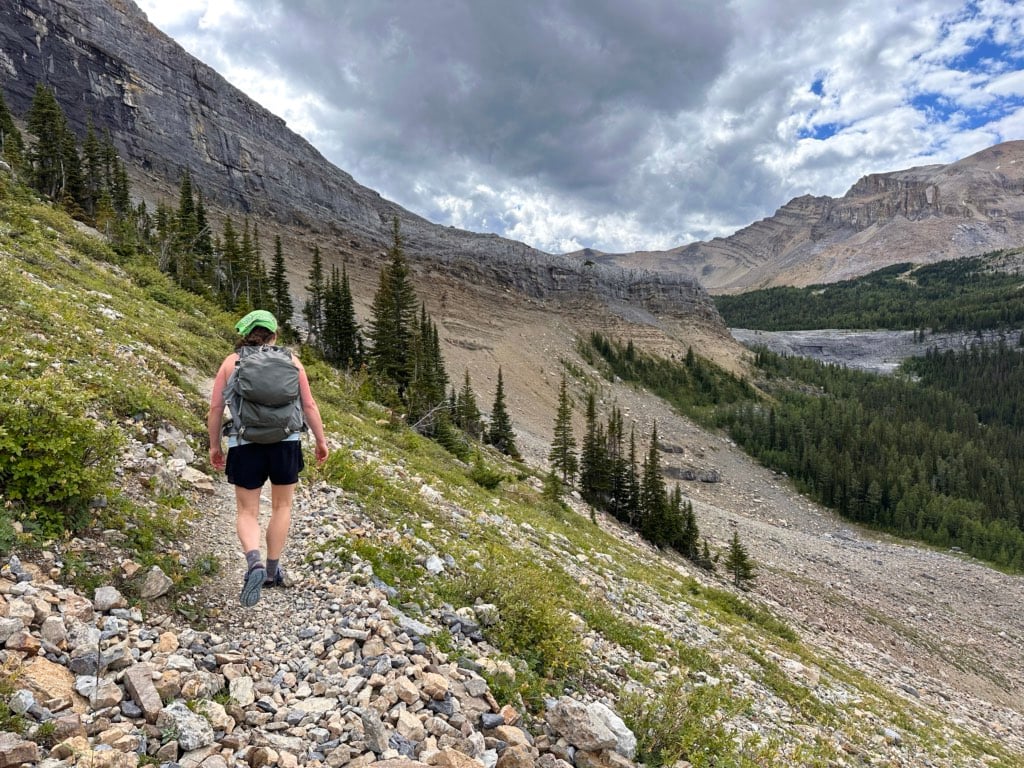
The trail goes through forest and patches of meadow. After the trail leaves the forest and contours below a rock slide on the Wall of Jericho, rock hop across a wide creek at 21.3 km. Follow the trail through another patch of meadow.
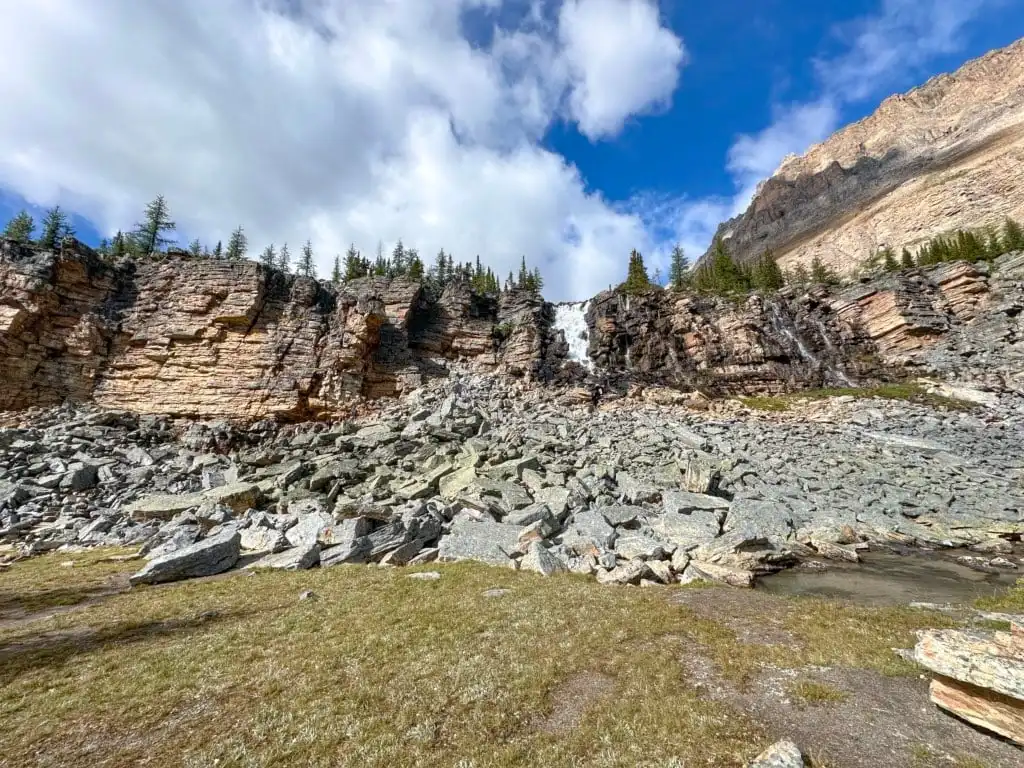
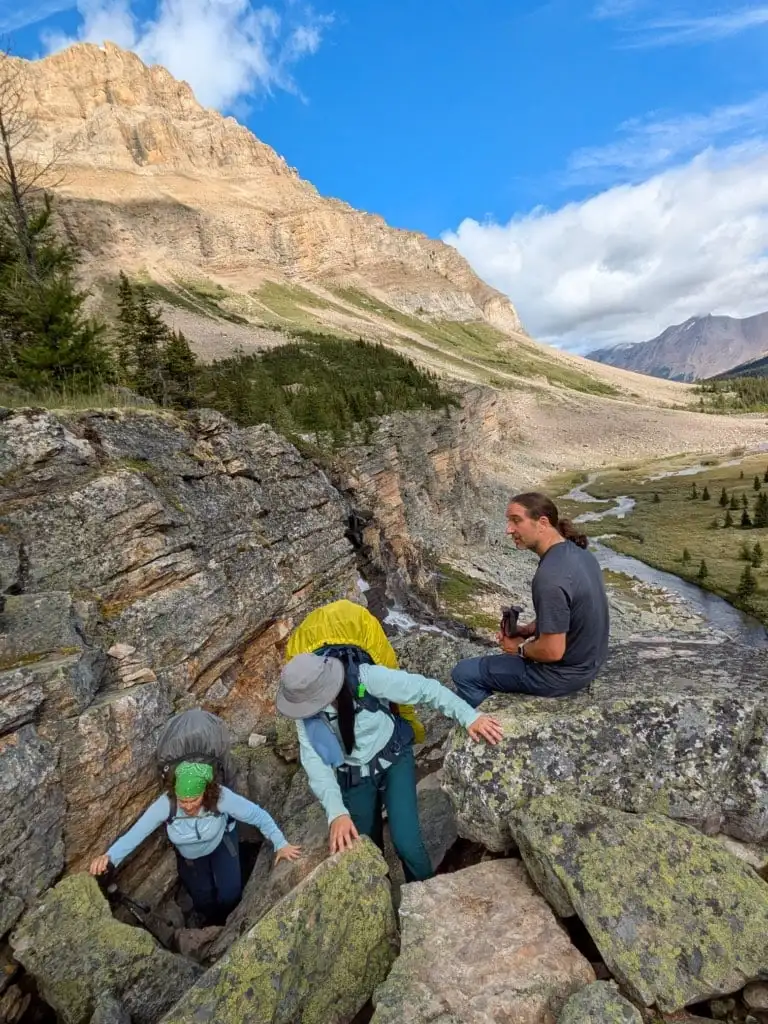
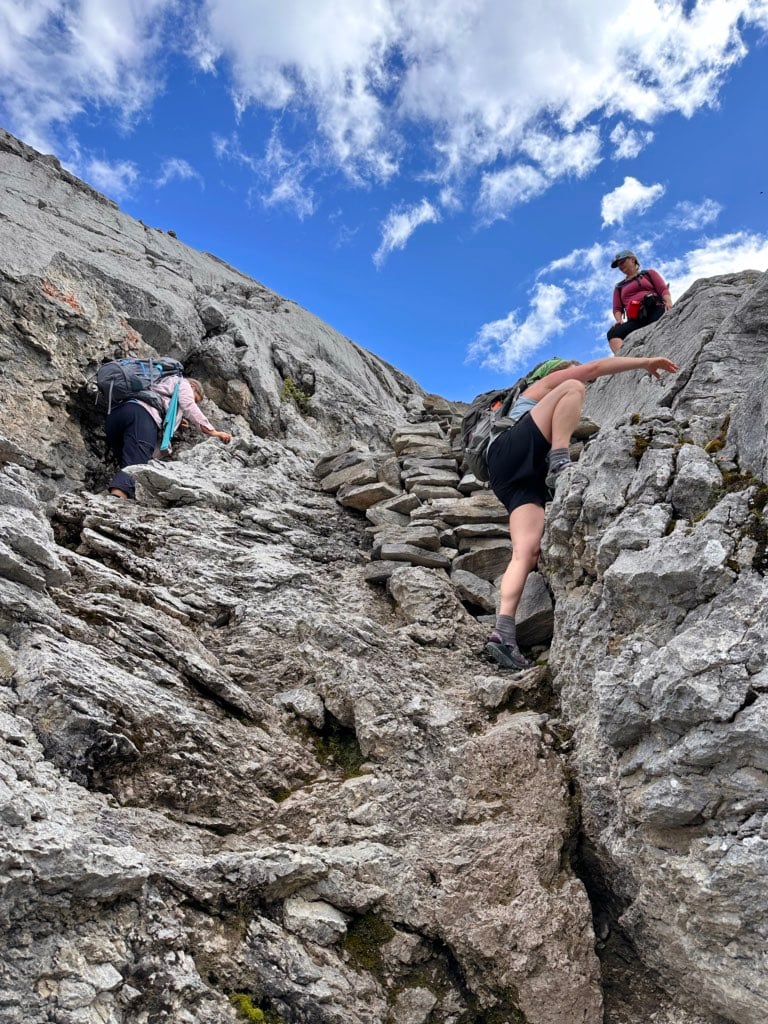
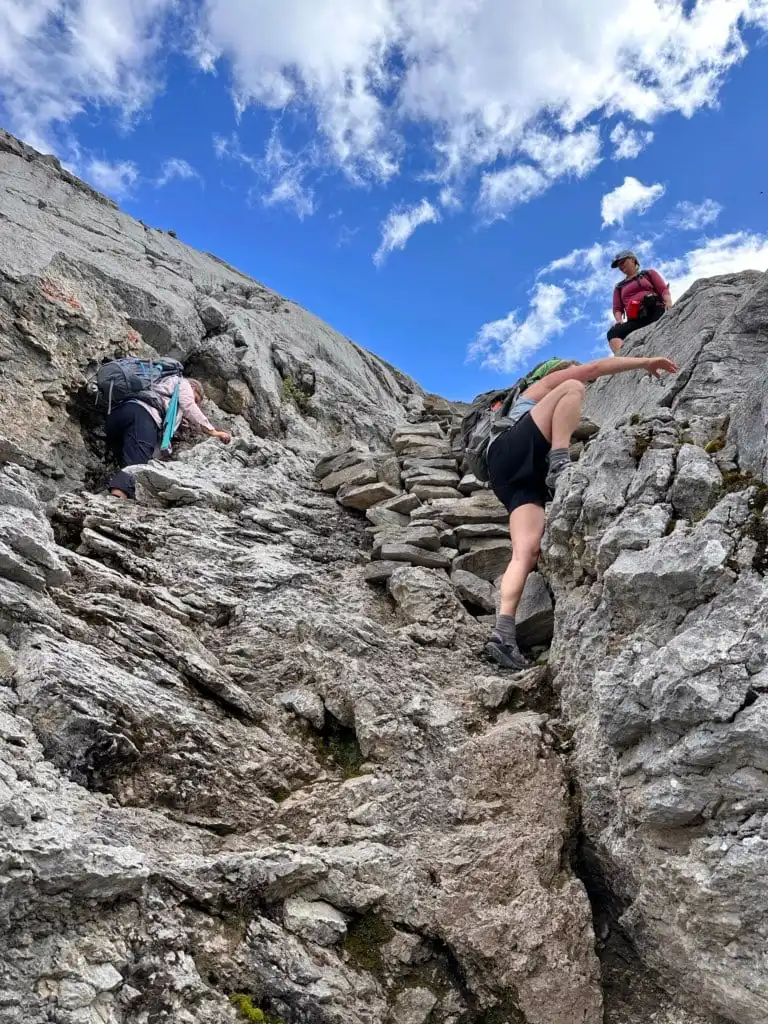
Cairns take you up through a talus field beside a waterfall. It looks like the trail disappears, but it actually tucks in behind a rock fin. You’ll clamber up between the narrow rock walls of a chimney, passing under a chock stone. There is one tricky move with a big step. Some hikers may wish to take their packs off and pass them up through here. And some hikers may need a boost up the step. But in general, it is very easy scrambling.


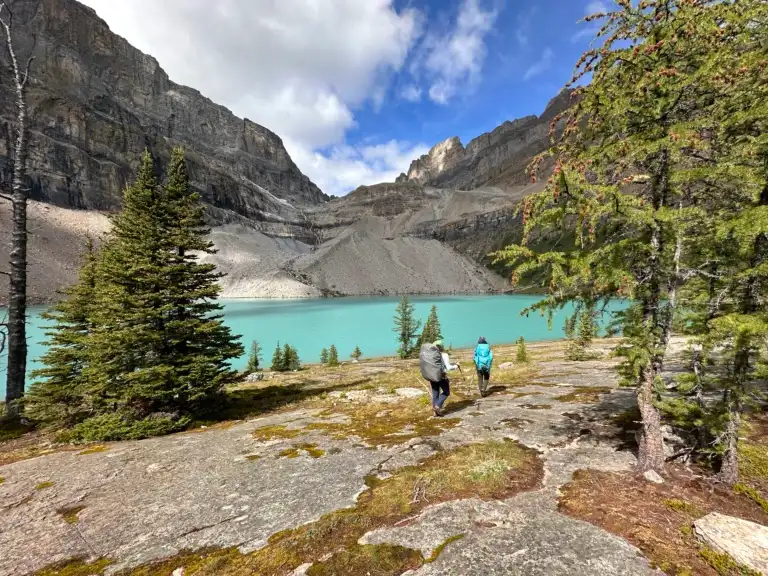
At the top of the chimney, follow cairns southwest towards Myosotis Lake at 21.7 km. Several side trails lead you down to the lake shore. Myosotis is the Latin name for forget-me-nots – you might spot these blue flowers in alpine meadows.
The trail continues along the east side of the lake, popping in and out of the forest. On the south side of the lake, follow cairns across a talus field, then head south up a short, steep hill.
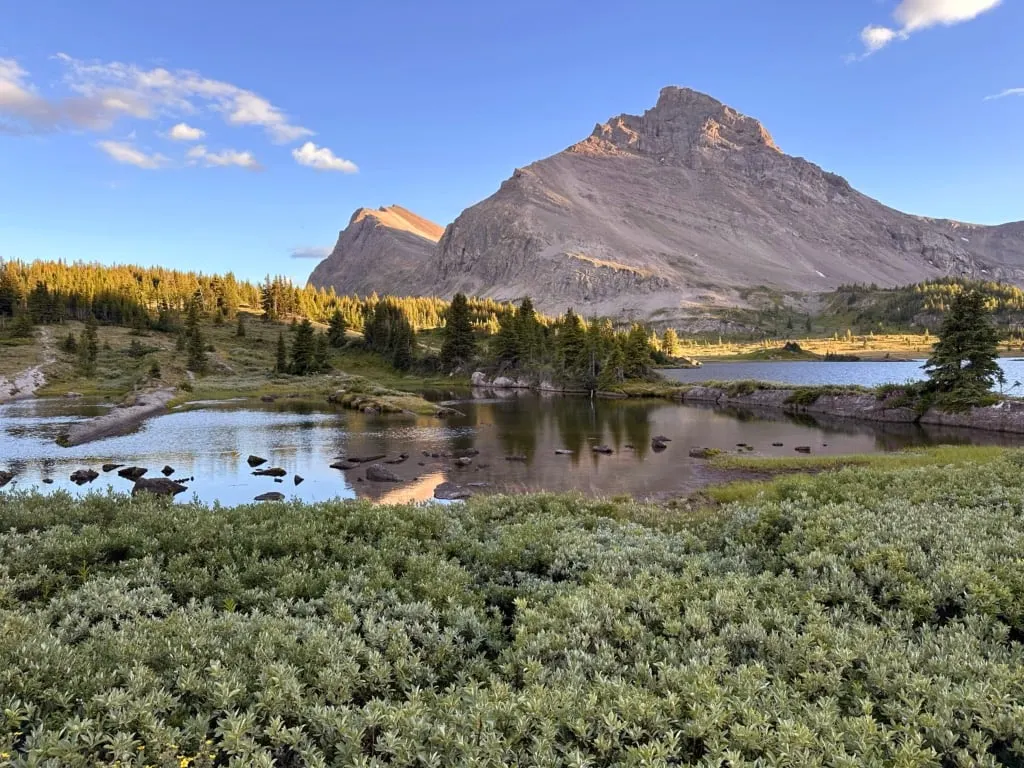
Reach the shores of Zigadenus Lake at 22.4 km. The huge tilted rock slab holds back the lake’s western edge. It reminded me a bit of the sloped concrete edge of a half-empty swimming pool! The lake gets its name from mountain deathcamas, a whitish green flower that used to be classified in the Zigadenus genus. Together, Myosotis and Zigadenus Lakes are referred to as the Skoki Lakes.


Zigadenus Lake to Packer’s Pass
Distance: 1.1 km
Elevation Gain: 195 m
Elevation Loss: 0 m
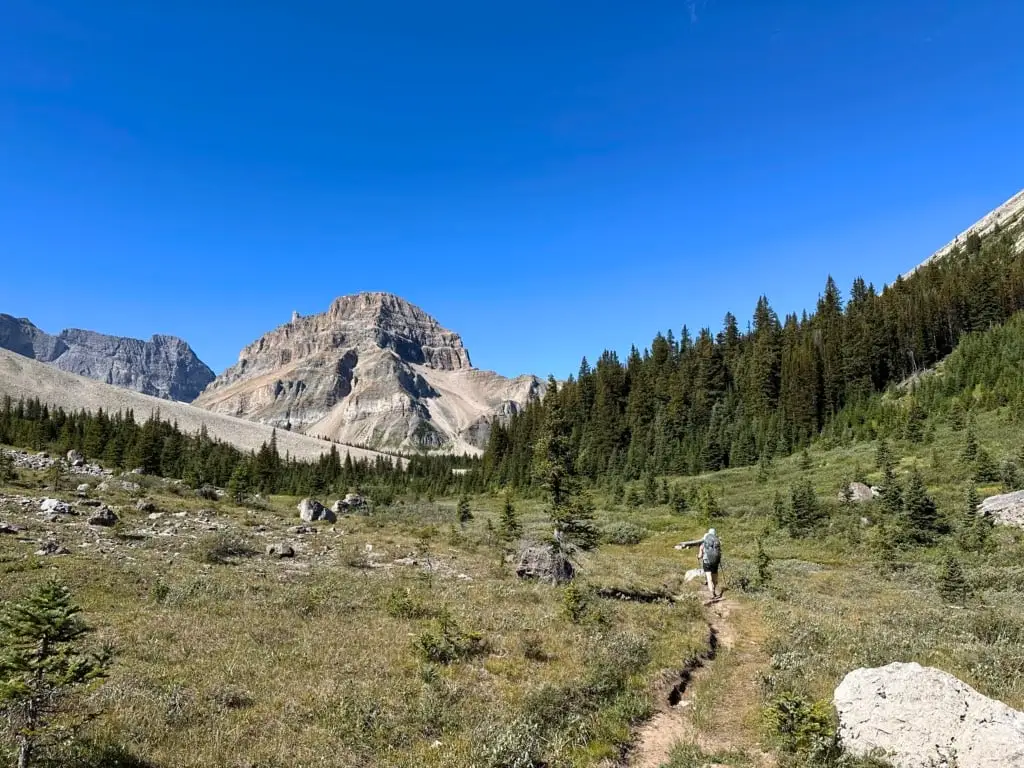
Past Zigadenus Lake, the trail climbs steadily uphill through open meadow and patches of larch trees. As you approach the pass, the vegetation ends, and you walk over bare gravel.
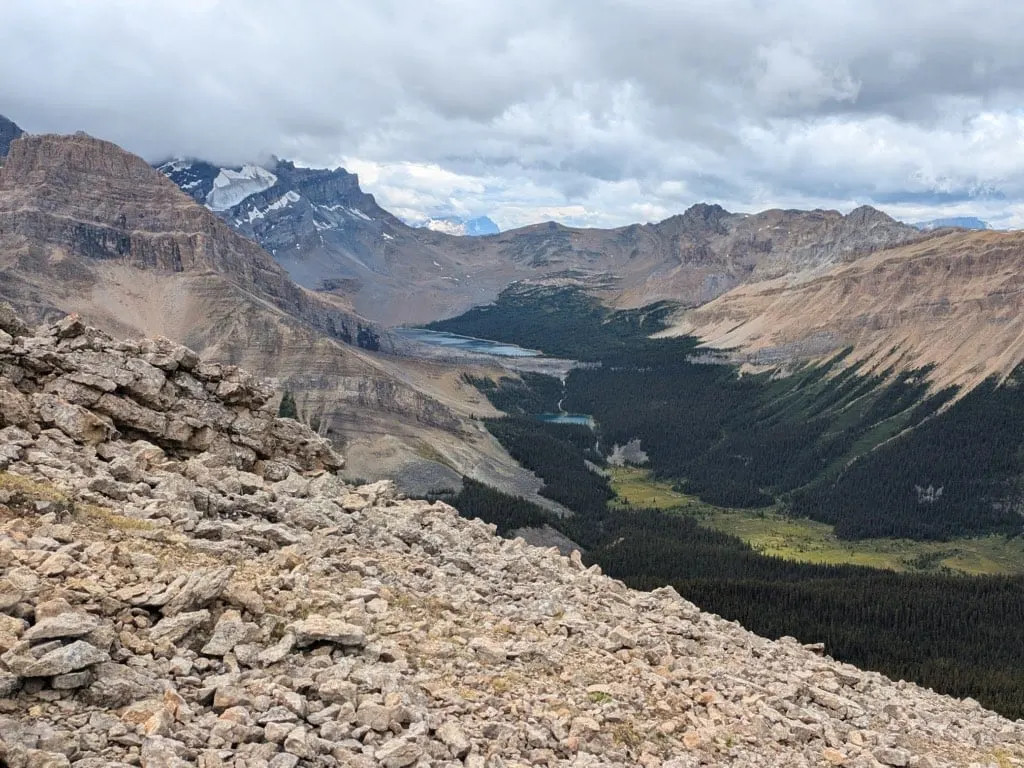
Reach Packer’s Pass at 23.5 km. This is the high point of the Skoki Loop. The pass takes its name from hired workers who packed supplies into Skoki Lodge on foot. While horses had to take the more gentle (and slightly longer) trip through Deception Pass, the packers could take the quicker Packers Pass since they could navigate the chimney at Myosotis Pass on foot.
Packer’s Pass has the best views on the entire Skoki Loop. Look back the way you came to the Skoki Lakes with the Wall of Jericho rising behind them. In front of you, look down at Ptarmigan Lake and Redoubt Lake with Redoubt Mountain towering overhead. For even better views, scramble up the trail-less Packer’s Pass Peak. (More details on that in the side trips section below.)

Packer’s Pass to Trailhead
Distance: 10 km
Elevation Gain: 40 m
Elevation Loss: 825 m
From the pass, follow the path downhill through the gravel, then meadows, to rejoin the main trail at 24.2 km. Retrace your steps along Ptarmigan Lake to reach Boulder Pass at 25 km.
Head downhill and back into the forest, passing Halfway Hut and Hidden Lake Camp junction at 26.5 km. Keep hiking downhill to re-enter the Lake Louise ski area and start the road walk at 29.6 km. Finish your hike on the Skoki Loop back at the parking lot at 33.5 km.


Side Trips and Alternative Routes on the Skoki Loop
Instead of rushing through your trip, I recommend building time into your itinerary to tackle some of the side trips or alternative routes. Details on those are below.
Merlin Lake Loop Side Trip
Distance: 6.7 km loop
Elevation Gain: 330 m
The Merlin Lake Loop is the most popular day hike in the Skoki area. The trail starts at Skoki Lodge. Go right at the famous “fork” in the trail, and ascend through the forest. From here, the trail cuts across steep gravel slopes on the north side of the Wall of Jericho. Lawrence Grassi, the architect of the renowned Lake O’Hara Alpine Circuit, built this trail in the 1940s.
Follow the narrow trail along the steep mountainside to a spot where it heads directly uphill into a chimney. Scramble up the chimney, following stacked rocks to stay on track. At the top, head across rock slabs to the shores of the gorgeous lake at 2.6 km. The glaciers of Mount Richardson tumble down the cliffs on the far side.

You can retrace your steps from here, or take the trail at the lake’s northeast corner to make a loop. I recommend the loop since it avoids having to down climb the chimney. Plus, it’s more interesting to make a loop.
For the loop, follow the trail from the lakeshore as it descends steeply through the forest before reaching the marshy valley bottom. Continue along the trail beside the stream, then cross a narrow log bridge. Turn right and take the trail through Merlin Meadows Camp, then back to the lodge to finish the loop.
Skoki Mountain Side Trip
Distance: 3.9 km round trip
Elevation Gain: 505 m
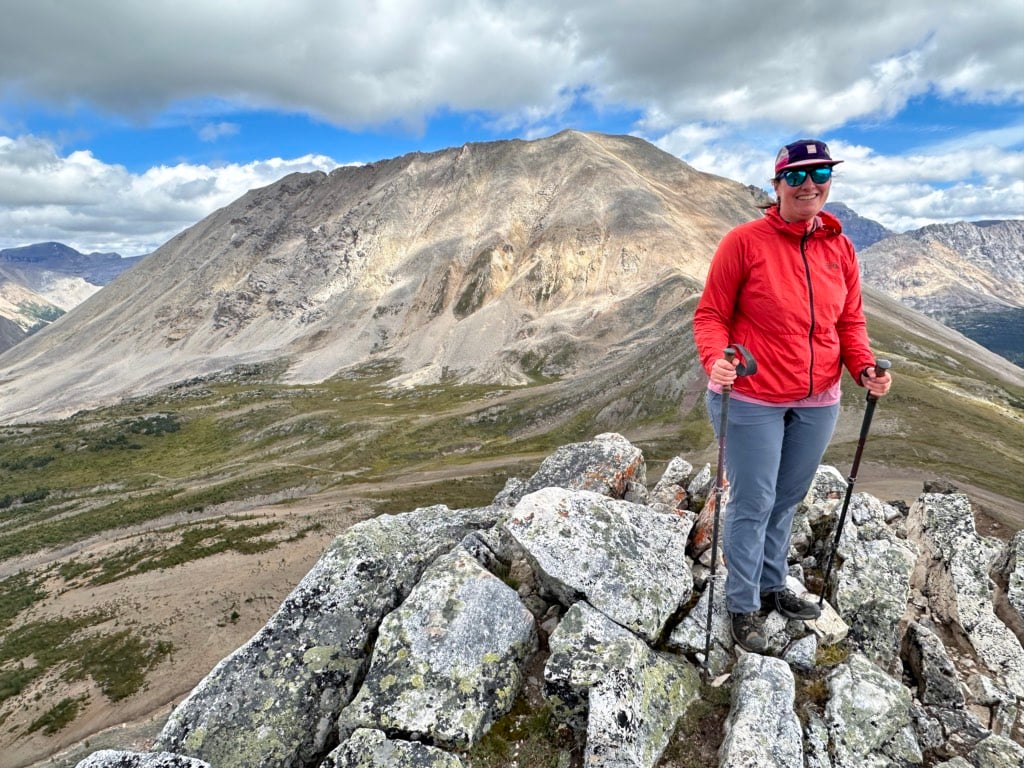
The informal trail to Skoki Mountain starts behind the outhouses at Skoki Lodge. Since the higher sections traverse scree without a real trail, it’s a scramble, but you never need to use your hands. The first part of the trail climbs steeply through the forest, where you will clamber over several fallen trees. As you get higher, the vegetation turns to open meadows, and then to scree.
Cairns mark your route as you climb higher on the mountain’s slope. In places, it is very steep and loose, so watch your footing carefully. The summit has great views of Merlin Lake to the west, the Skoki Lakes to the southwest, and Red Deer Lakes to the northeast. Watch for fossils in the rocks.


Packer’s Pass Peak Side Trip
Distance: 1.1 km round trip
Elevation Gain: 95 m
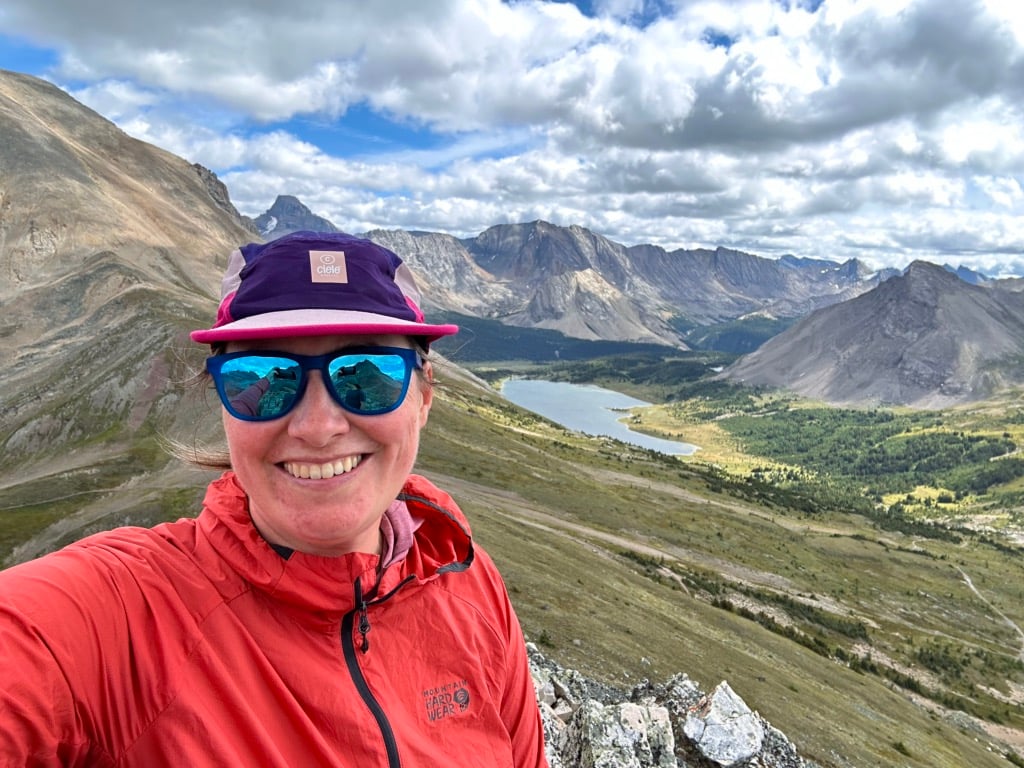
Packer’s Pass Peak is a quick side trip from Packer’s Pass. There is no trail, but you will find a vague footbed in a few places. Just follow the path of least resistance up the grassy slopes from the pass.
The southwest side of the peak from the pass is gentle, making for a straightforward ascent. But the north side drops off precipitously, so take care on the summit. Reaching the peak will give you great views of Baker Lake, Brachiopod Mountain and Heather Ridge to the southeast, as well as Fossil Mountain to the east. This was my favourite viewpoint on the Skoki Loop.


Red Deer Lakes Loop Alternative Route
Distance: 8.9 km one way
Elevation Gain: 145 m
If you want to make the Skoki Loop a little longer, you can continue north on the Cotton Grass Pass Trail to Red Deer Lakes. From there, you’ll go northwest around Skoki Mountain, then south through Merlin Meadows to Skoki Lodge. This route is 8.9 km from the Cotton Grass/Red Deer Lakes junction to Skoki Lodge instead of the 3.6 km direct route through Jones Pass.
I haven’t taken this route, but I’ve heard that it is beautiful along the Cotton Grass Pass Trail. However, once it gets to Red Deer Lakes, I hear that it is marshy and a bit overgrown. As well, I’ve heard that the section from Red Deer Lakes to Merlin Meadows is in the trees and isn’t anything special.
On my trip, we opted for the direct route through Jones Pass so we could spend the rest of the day doing a day hike to Merlin Lake instead of doing the longer route through Red Deer Lakes.
Deception Pass Alternative Route
Distance: 3.5 km
Elevation Gain: 80 m
The route from the Baker Lake Trail via Deception Pass is the traditional and most direct route to the Skoki Lodge. This is the route to take if you don’t have time for the loop around Fossil Mountain via Baker Lake, Cotton Grass Pass, and Jones Pass, or you don’t want to climb the chimney on the Packer’s Pass Route. Horses also use the Deception Pass Route.
I didn’t take the Deception Pass route since I heard that the Cotton Grass/Jones Pass and Packer’s Pass routes were much more scenic. If you take Deception Pass, you’ll miss the incredible Skoki Lakes!
The route climbs up to the pass through open meadows, then descends gently through more meadows with views of Fossil Mountain.

Join the Backpacking in BC Facebook Group
Skoki Loop Itineraries
While strong hikers with an early start can do the Skoki Loop as a day hike, I recommend spending a few days in the area to do some of the side trips. Here are some sample itineraries.
Recommended 3-Day Skoki Loop Itinerary
This is the itinerary I used and the one I recommend. It includes the Skoki Loop and has time for a side trip.
Day 1: Trailhead to Baker Lake Camp – Distance: 12.8 km, Elevation Gain: 775 m, Elevation Loss: 225 m, Time: 4 to 6 hours.
Day 2A: Baker Lake Camp to Merlin Meadows Camp via Jones Pass – Distance: 7.5 km, Elevation Gain: 145 m, Elevation Loss: 285 m, Time: 2 to 3 hours.
Day 2B: Merlin Lake Loop day hike – Distance: 6.7 km, Elevation Gain: 330 m, Elevation Loss: 330 m, Time: 2 to 3.5 hours.
Day 3: Merlin Meadows Camp to Trailhead via Packer’s Pass – Distance: 15.4 km, Elevation Gain: 440 m, Elevation Loss: 850 m, Time: 4.5 to 7 hours. Optional: Add Packer’s Pass Peak for and extra 1.1 km with 95 m of elevation gain and loss.
3-Day Base Camp Skoki Loop Itineraries
If you’d rather hike the bulk of the Skoki Loop with a day pack (or you can’t get a booking at Merlin Meadows), you can use Baker Lake or Hidden Lake campgrounds as a base camp to do the Skoki Loop.
Baker Lake Base Camp:
Day 1: Trailhead to Baker Lake Camp – Distance: 12.8 km, Elevation Gain: 775 m, Elevation Loss: 225 m, Time: 4 to 6 hours.
Day 2: Day hike Baker Lake Camp to Baker Lake Camp via Jones Pass and Packer Pass – Distance: 14.9 km; Elevation Gain: 520 m, Elevation Loss: 520 m, Time: 5 to 6 hours. Optional: Add Packer’s Pass Peak for and extra 1.1 km with 95 m of elevation gain and loss.
Day 3: Baker Lake Camp to Trailhead – Distance: 12.8 km, Elevation Gain: 225 m, Elevation Loss: 775 m, Time: 3.5 to 5 hours.
Hidden Lake Base Camp:
Day 1A: Trailhead to Hidden Lake Camp – Distance: 7 km, Elevation Gain: 540 m, Elevation Loss: 30 m, Time: 2 to 3 hours.
Day 1B: Day hike to Hidden Lake from Hidden Lake Camp – Distance: 2.6 km, Elevation Gain: 120 m, Elevation Loss: 120 m, Time: 1 to 2.5 hours
Day 2: Hidden Lake Camp to Hidden Lake Camp via Baker Lake, Jones Pass, and Packer’s Pass – Distance: 19.6 km, Elevation Gain: 725 m, Elevation Loss: 725 m, Time: 6 to 8 hours.Optional: Add Packer’s Pass Peak for and extra 1.1 km with 95 m of elevation gain and loss.
Day 3: Hidden Lake Camp to Trailhead: Distance: 7 km, Elevation Gain: 30 m, Elevation Loss: 540 m, Time: 2 hours.
2 or 3 Day Skoki Direct Itinerary
This route isn’t really the Skoki Loop since it doesn’t go around Skoki Mountain… but it is still a little bit of a loop since it uses both Deception and Packer’s Passes. You can do it as a 2-day route, or add on an optional third day for day hikes.
Day 1: Trailhead to Merlin Meadows Camp via Deception Pass – Distance: 15.3 km, Elevation Gain: 825 m, Elevation Loss: 415 m, Time: 5 to 7 hours
Optional Day 2: Merlin Lake Loop day hike – Distance: 6.7 km, Elevation Gain: 330 m, Elevation Loss: 330 m, Time: 2 to 3.5 hours AND/OR Skoki Mountain day hike – Distance: 6 km, Elevation Gain: 570 m, Elevation Loss: 570 m, Time: 2.5 to 4 hours
Day 2 or 3: Merlin Meadows Camp to Trailhead via Packer’s Pass – Distance: 15.4 km, Elevation Gain: 440 m, Elevation Loss: 850 m, Time: 4.5 to 7 hours. Optional: Add Packer’s Pass Peak for and extra 1.1 km with 95 m of elevation gain and loss.

Camping and Where to Stay on the Skoki Loop
There are several campgrounds along the Skoki Loop as well as the Skoki Lodge. Here are details on each one:
Hidden Lake Campground
Located 7 km from the trailhead, you can use this campground as a base camp to hike into the core Skoki area, but it’s a bit far. If you’re with a slower group, you could also use this campground as a way to break up the journey into a longer trip. It’s also a great base for day hikes to Hidden Lake.
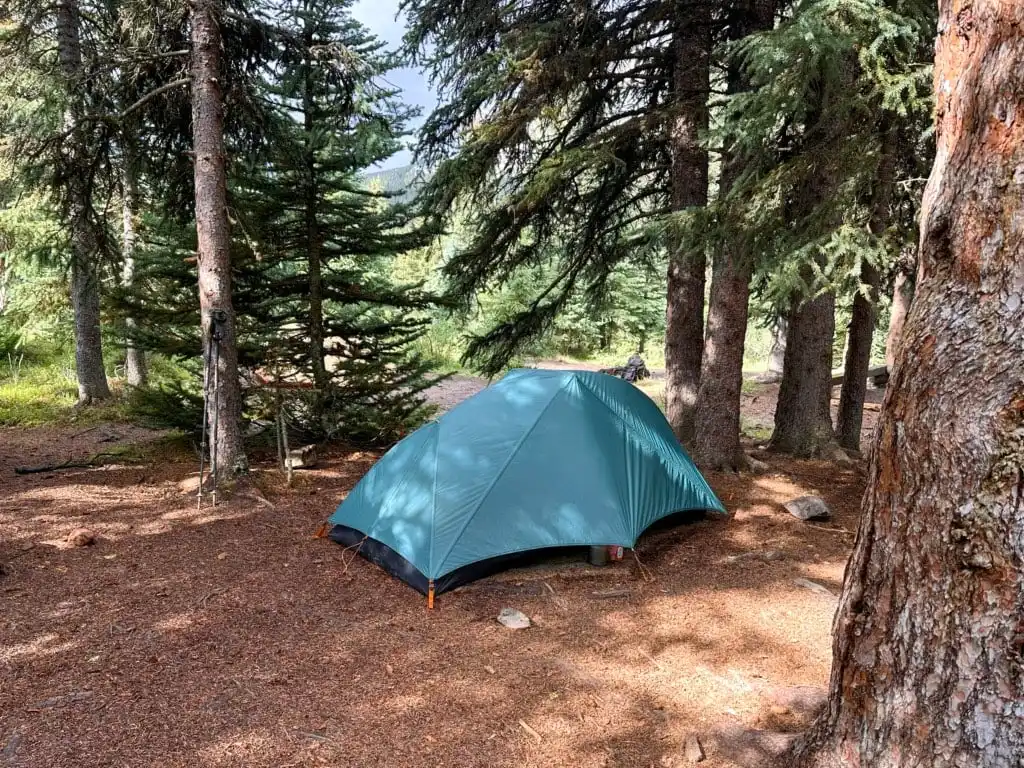
The campground has clumps of trees and patches of meadow. There is a stream on the west side of the campground for water. It has 10 tent sites on wood-framed dirt platforms, a cooking area, an outhouse, and food storage lockers.
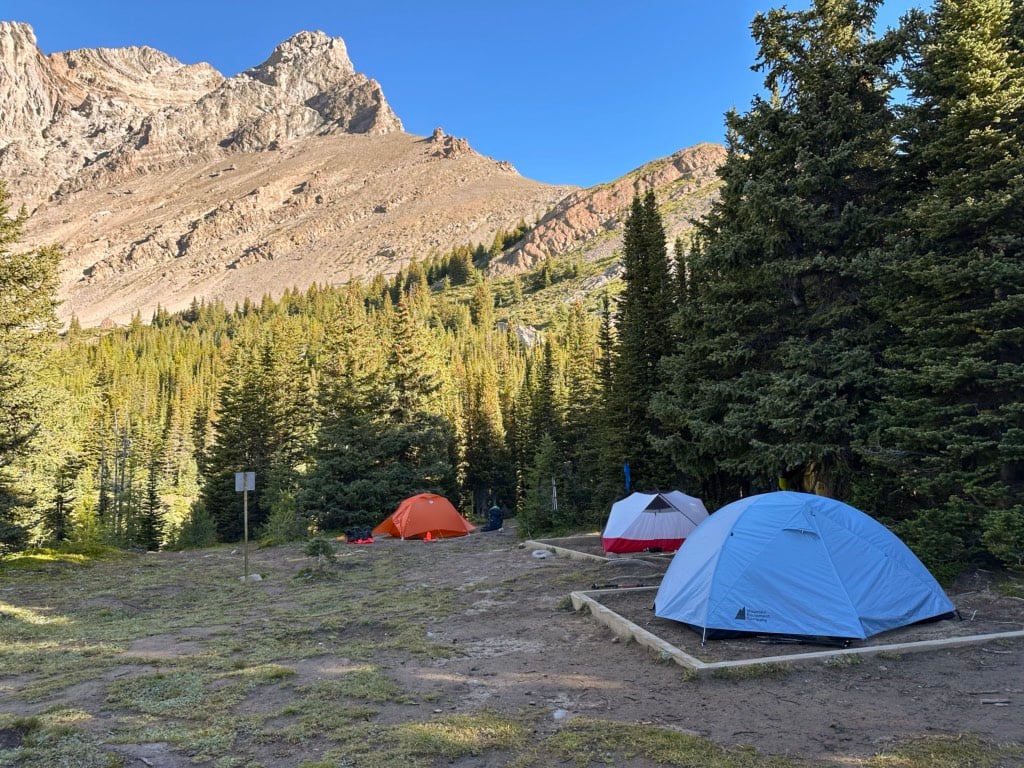
Baker Lake Campground
Baker Lake Campground is 12.8 km from the trailhead on a bluff at the east end of Baker Lake. It’s a good first night’s stop on the Skoki Loop. You can also use it as a base camp if you want to do the Skoki Loop without packs.
The campground is set in a clump of trees on a bluff with 10 wood-framed dirt tent pads, an outhouse, and a cooking area with tables, benches, and food storage cables. But it’s a 2-minute walk down the hill to the lakeshore, which has incredible views of the surrounding mountains. You can collect water from the lake.

Merlin Meadows Campground
This is the best campground for day hikes in the Skoki area. I spent two nights here so we could do day hikes to Merlin Lake and Skoki Mountain. The campground itself is kinda meh – both the tent area and the cooking area are in the trees. However, you can walk out in the meadows by the creek for good views.
There are no tent pads here – instead, you just choose a clearing in the trees. There are two outhouses near the tenting area.
The cooking area has four tables with benches and one food storage pole with cables. The main trail runs right through the cooking area. There are more food storage cables near the tenting area. There are several informal paths down to a creek to collect water north of the campground.

Red Deer Lakes Campground
Choose Red Deer Lakes if you can’t get a booking at Merlin Meadows or if you want a bit of solitude. It’s further from the Skoki core area, so it doesn’t make a great base camp. Despite the name, the campground is not on the lakeshore.
This campground does not have designated campsites – camp in the clearings along Red Deer River, which is the water source. It has an outhouse and food hanging cables.
Skoki Lodge
This historic Skoki Lodge dates back to the 1930s and is one of the oldest backcountry lodges in Canada. You can stay in the main lodge or one of the log cabins. They have room for up to 22 guests at once. Your stay includes all meals. Prices start at about $300/person/night. The lodge is in high demand, so you need to book about one year in advance.

Skoki Loop Reservations and Fees
Since the Skoki area has some of the most popular backcountry campgrounds in Banff National Park, advance reservations are required.
Reservations for the entire summer season open in January or February each year. In 2026, reservations open on January 26, 2026, at 8 a.m. Mountain Time. You must book on the Parks Canada Reservations website.
See my tips for booking backcountry camping for pointers on how to navigate the site. Be ready to book as soon as reservations open because popular dates will sell out in minutes.
Your booking can include up to 10 people and up to 3 tent pads on the same reservation. Keep in mind that you are only allowed to have one tent per tent pad and four people per tent.
Step-By-Step Reservation Instructions
To make a reservation, select:
- “Backcountry” at the top (with the hiker icon), the
- “Backcountry Zone” button
- “Banff, Kootenay, and Yoho” from the Park drop-down.
- Access point “Fish Creek Trailhead” from the Access Point drop-down.
Have the following info ready to go when you make your reservation:
- preferred itinerary with campgrounds and dates, plus backups
- number of tent pads and people you are booking for
- credit card
If You Didn’t Get a Reservation
If you didn’t get a reservation at your chosen Skoki area campgrounds, keep checking back as people cancel and spots open up. On my trip, there were empty tent pads in the campgrounds two out of the three nights, so it seems that cancellations do happen.
A more efficient way is to sign up for a camping cancellation notification app like Campnab or Schnerp. Read my guide to camping cancellation apps to find out how they work and which one I recommend.
Fees
You must pay a few different fees to hike the Skoki Loop. The cost breakdown is as follows:
- Backcountry camping reservation fee: $11.50 per booking (for up to 10 people and up to 3 tent pads)
- Backcountry camping fee: $13.50/person/night
- Yoho/Banff/Kootenay National Parks entry fee: $11/person/day (or $22 per car/day with up to 7 people)
Most people spend three days/two nights in the Skoki area. In that case, a solo hiker would pay $71.50. Per-person costs decrease if you hike in a group since you can share the expense of reservations and national park entry fees.
How to Get to the Skoki Loop
The Skoki Loop is located in Banff National Park near Lake Louise. The trailhead is near the Lake Louise Ski Area on the east side of Highway 1.
The trailhead is a 5-minute drive from the Lake Louise Visitor Centre. To get there, take the Lake Louise exit from Highway 1, then go east towards Lake Louise ski hill. Just before you get to the ski hill, take a gravel road to the right, marked with a sign for Skoki Lodge. Follow it for 1 km to a parking area.
You can park in the lot on the right or along the road. There are port-a-potties in the parking lot. You must have a valid national park pass on your dashboard to park here.
If you don’t have a car, you can take a shuttle bus to Banff, then take Roam bus route 8X from Banff to Lake Louise village. From there, it’s a 3.2 km walk to the trailhead with 120 m of elevation gain.
If you’re looking for a place to stay before your trip, I recommend booking a hotel in Golden. It’s only one-hour away and it is sooo much cheaper than Lake Louise or Banff. Basecamp Lodge Golden is a good mid-range pick. If you’re on a budget, stay at the basic Rondo Motel.


Tips for Hiking the Skoki Loop
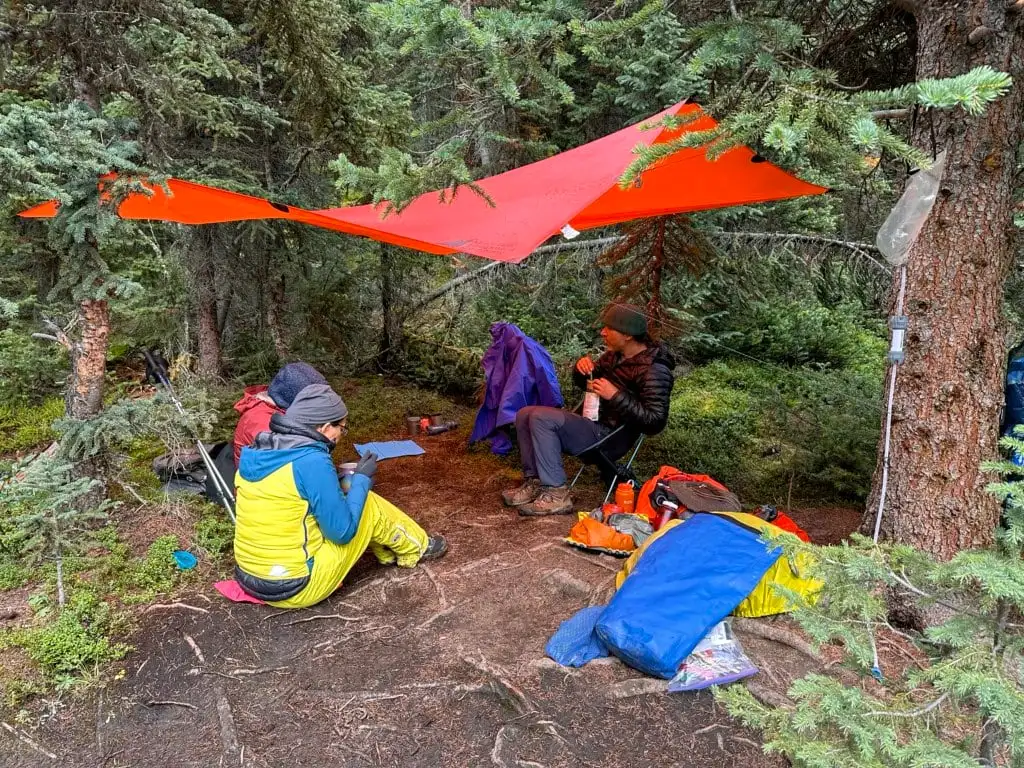
Cooking Areas: Each campground has a communal cooking area with a few tables. It was nice to have a place to sit down each evening! But don’t hog the tables – they are for everyone to share. The cooking areas are separate from the tenting areas for bear safety. Please don’t eat or cook near your tent.
Food Storage: Most campgrounds have a pole with pulleys for food storage. Bring a waterproof bag to store your food in case it rains overnight. I always keep my food in a lightweight dry bag. The pulleys have clips, but some are broken – carry a carabiner as a backup.
Mosquitos: Bugs can be bad on the trail in July and mid-August. Bring bug spray and a head net.
Bears: This is black and grizzly bear country. Bring bear spray, make noise while hiking, and store your food securely. See my bear safety tips for more info.
Porcupines: Some campsites (especially Baker Lake) are notorious for porcupines who will chew your gear. Hang packs, poles, and boots out of their reach at night or bring them into your tent.
Dogs: Allowed on leash.
Fires: Not allowed in the backcountry.
Check the weather before you go: The high mountains are notorious for fickle weather. Rainstorms can blow in at any time. Expect overnight lows near freezing on some days. City weather forecasts are useless in the mountains. Use an algorithmic spot forecast for Skoki Mountain like Spotwx. (Read my guide to weather apps for hikers for more tips.)
What to Bring: This is a remote hiking trip, so you will need to bring typical backpacking gear. Use my backpacking checklist to make sure you have everything you need. For Skoki, I recommend a warm sleeping bag, a lightweight tarp for eating under (I use the MEC Scout UL Silicone Tarp), and a head net for bugs.

Final Thoughts
I’m often a one-and-done hiker – I finish a trail and don’t think about repeating it for years, or even decades. However, the Skoki Loop was so beautiful (and easy) that I’m already thinking about doing it again. I even want to splurge and stay in the Skoki Lodge so I can hike in and out with a smaller backpack!
While the Skoki area is popular, it does seem easier to book than some other Rockies backpacking trips, and it never felt busy or crowded, even with Skoki Lodge guests out on the trails.
Do you have questions about backpacking the Skoki Loop? Ask in the comments and I’ll help you out.
READ NEXT:
- 11 Best Backpacking Trips in the Canadian Rockies
- Egypt Lake in Banff Hiking and Backpacking Guide
- Backpacking Checklist: Gear You Need To Go Backpacking
- Bear Safety for Hikers, Campers and Backpackers
- The Best Weather Apps for Hiking


- Best Sun Hoodies for Hiking - June 3, 2026
- Lower Stein Valley Trail Hiking and Backpacking Guide - May 27, 2026
- The Best Things to Do in Vernon, BC - May 21, 2026
Ben Wakefield
Sunday 21st of June 2026
I did this route alone over two days in june of last year, albeit a bit backwards... I had a very hard time finding my way down Myosotis Headwall, and from reading this article, it appears I was just not on the trail at all. Strongly recommend going up to the lakes under jericho from the direction of the Skoki lodge instead of from Ptarmigan.
Shaun Kelly
Tuesday 16th of September 2025
Hello, thank you for this write-up. I have an urgent question about my route.
My question is on route selection. I know I want to hike both packers pass and deception pass. This is my “loop”, instead of the more classic route counter clockwise around baker lake, then fossil mountain, then lodge/merlin meadows.
Which (packers or deception) do you suggest heading in north, and leaving out south?
I plan to include the Merlin Lake loop in this trip.
Two different routes I am contemplating:
1. [clockwise loop] night 1 at hidden lake camp, north via Packers pass passing Skoki lakes on the left, Merlin lake loop to Merlin meadows (night 2), south via deception pass, then night 3 at baker lake.
2. [figure 8] Night 1 at hidden lake camp, North via deception pass, Merlin lake loop to Merlin meadows (night 2), south via packers pass, then night 3 at baker lake.
Thank you for your time and help! :)
Taryn Eyton
Wednesday 17th of September 2025
Honestly both routes are great. If you go south through Packer's Pass you'll have a slightly easier time scrambling up the chimney and the scree slope between the two lakes. As well, you'll have great views of Baker Lake and Redoubt Mountain on the descent. But you'll have to keep turning around as you climb to get views of Zigadenus and Myosotis Lake. If you go north through Packer's Pass, you'll get great views of Zigadenus and Myosotis, but you'll have to turn around for views of Baker Lake and Redoubt.
I haven't been up or down Deception Pass (I opted to go around Fossil Mountain through Cotton Grass Pass, which I do recommend). But from what I've seen of the pass from the top of Packer's Peak, there are likely no great views going north, but going south you'd get good views of Baker Lake and Redoubt. It's a horse trail, so it should be easy walking in both directions.
If you have night three at Baker Lake, I would go north up Packer's Pass on day 1 and south via Deception Pass. But a better option is to go through Jones and Cotton Grass Passes between Skoki and Fossil mountains - that way you aren't going out of your way to get to Baker Lake the way you would from Packers or Deception Passes.