
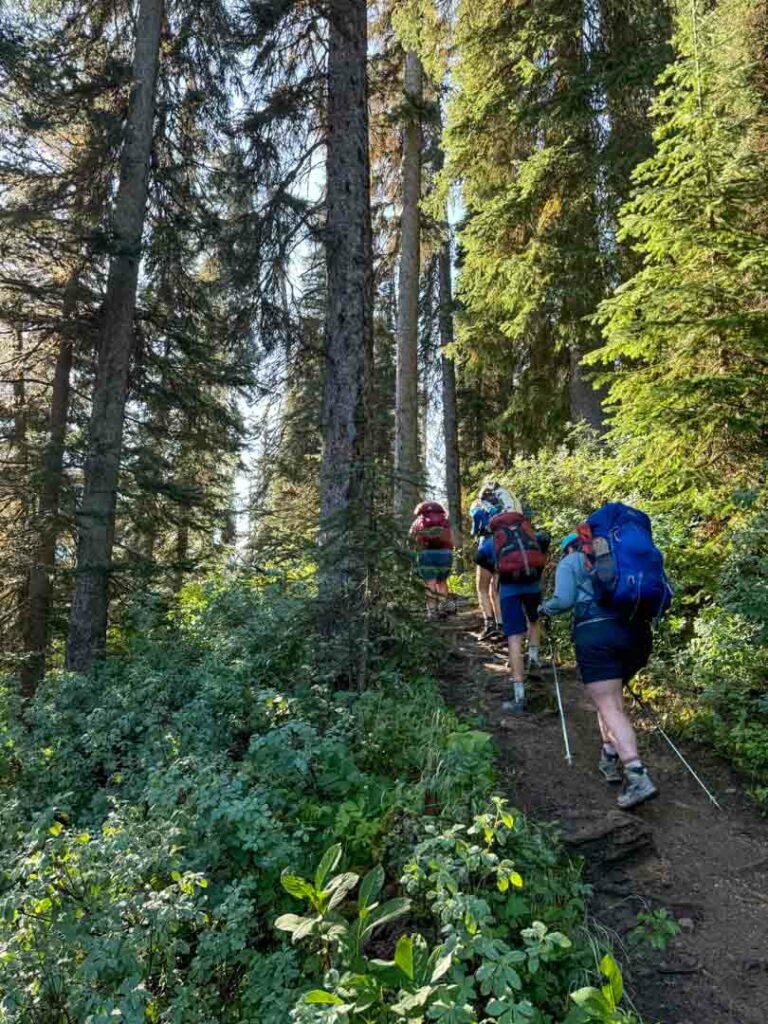
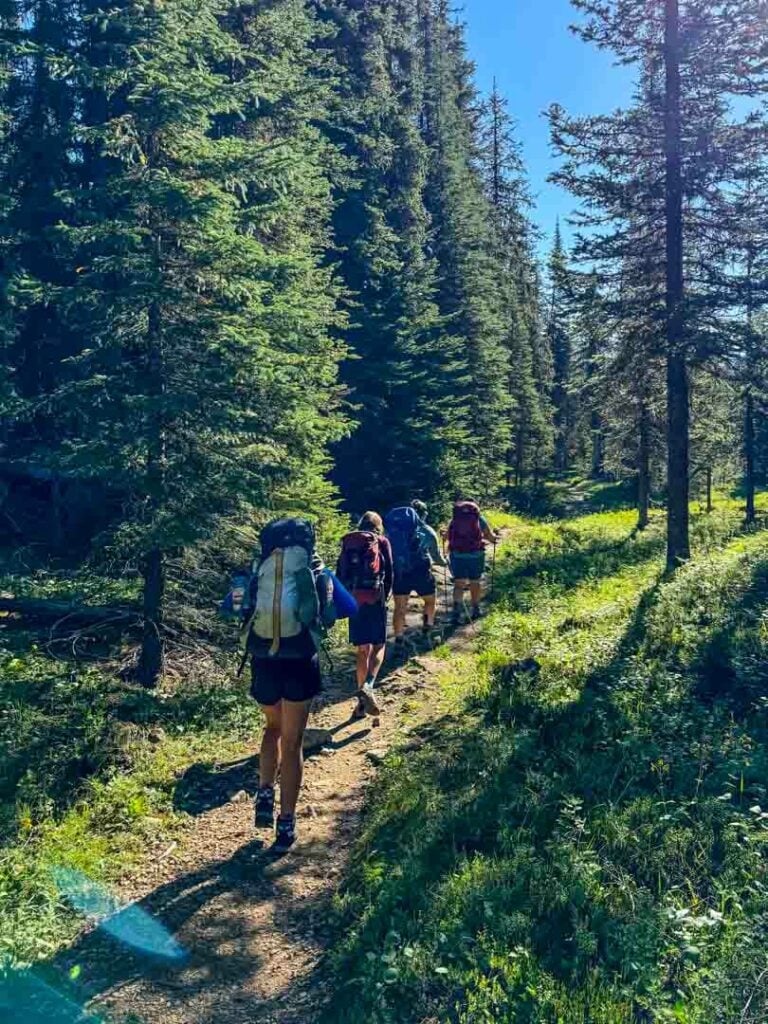
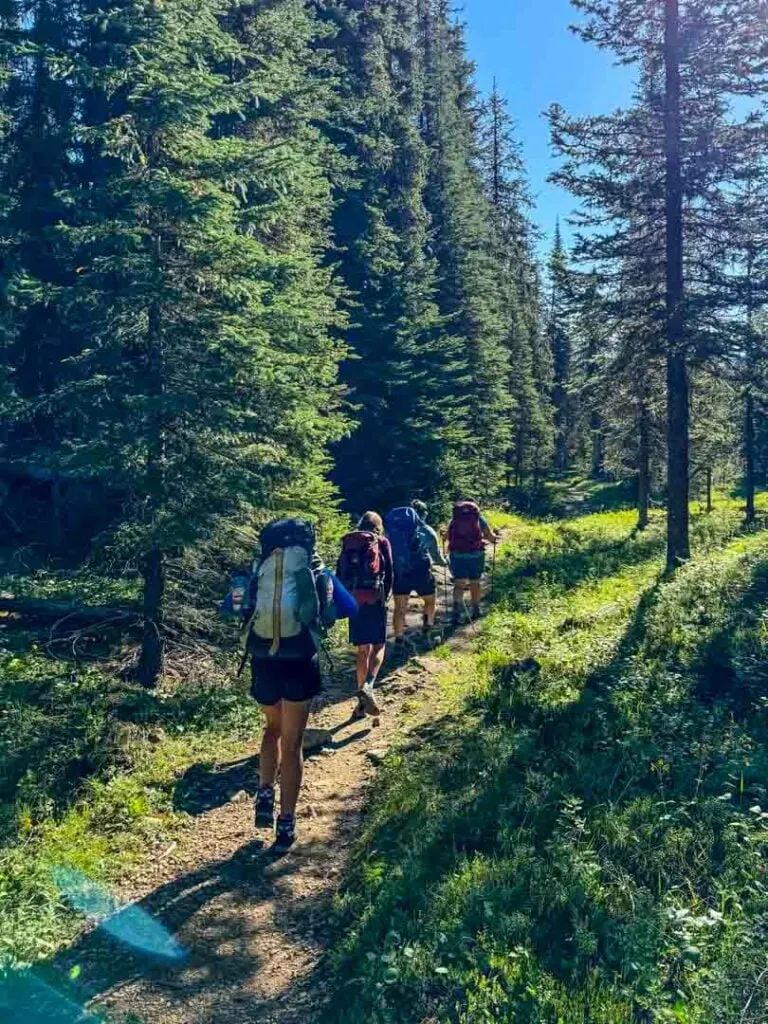
The Yoho Valley in Yoho National Park is a special place. In the Cree language, “Yoho” is an expression of wonder or awe. It pretty much means “wow!” And while it sounds cheesy, that’s what I kept saying when I spent three days backpacking the Yoho Valley Loop including the Iceline Trail.
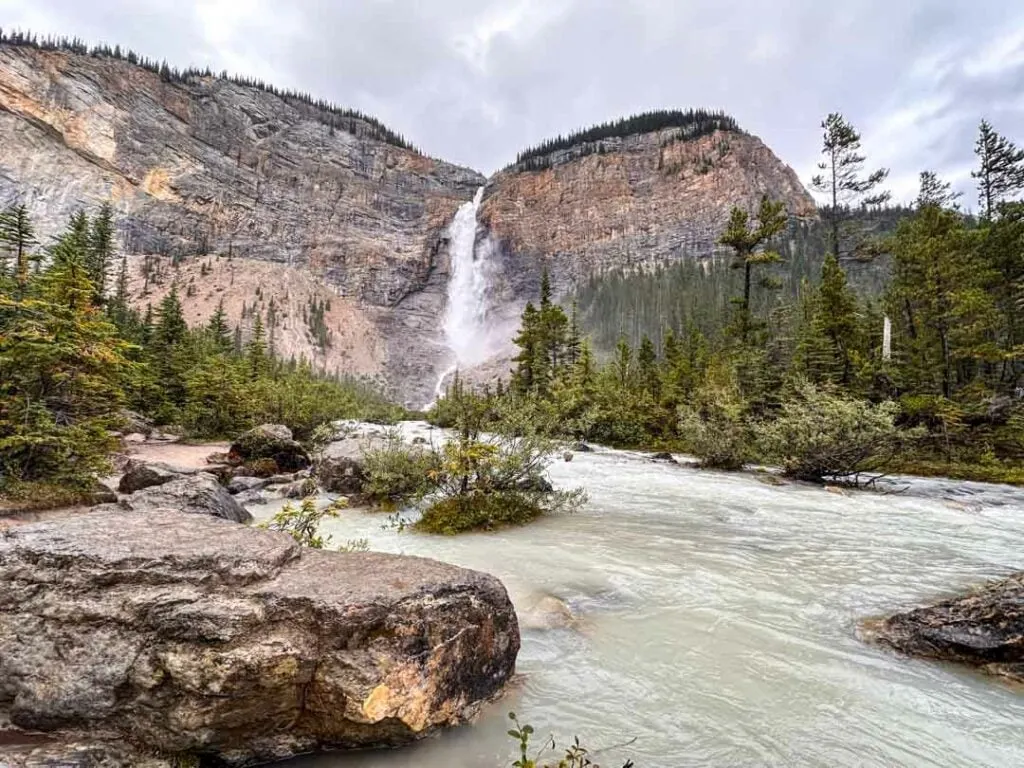
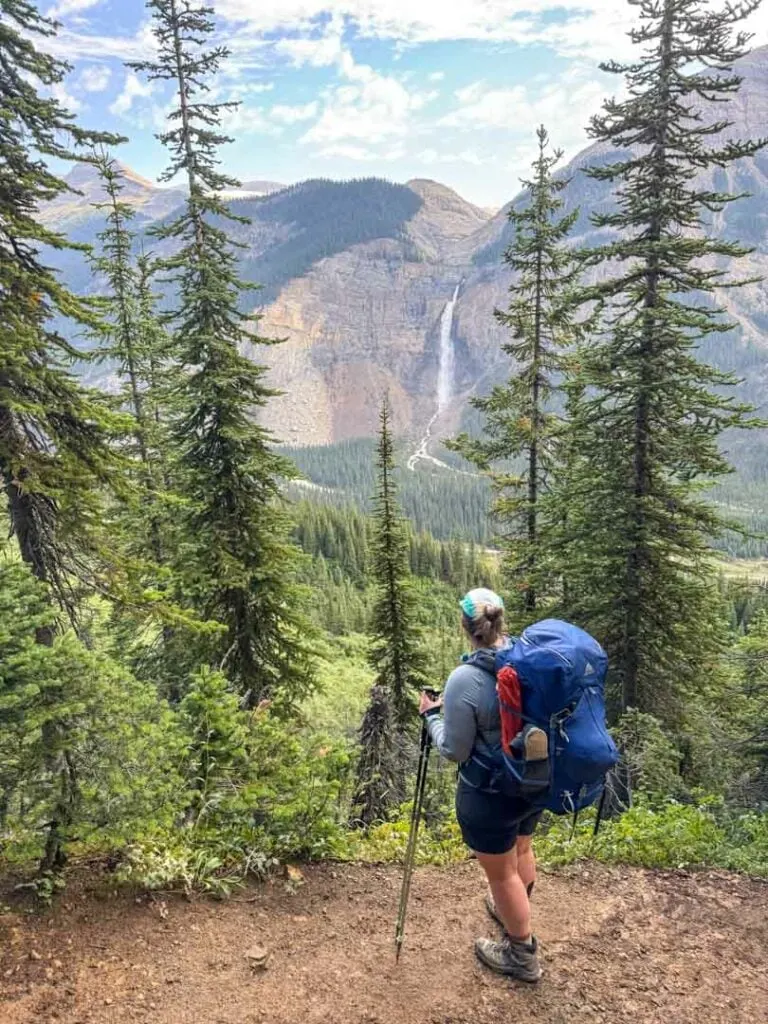
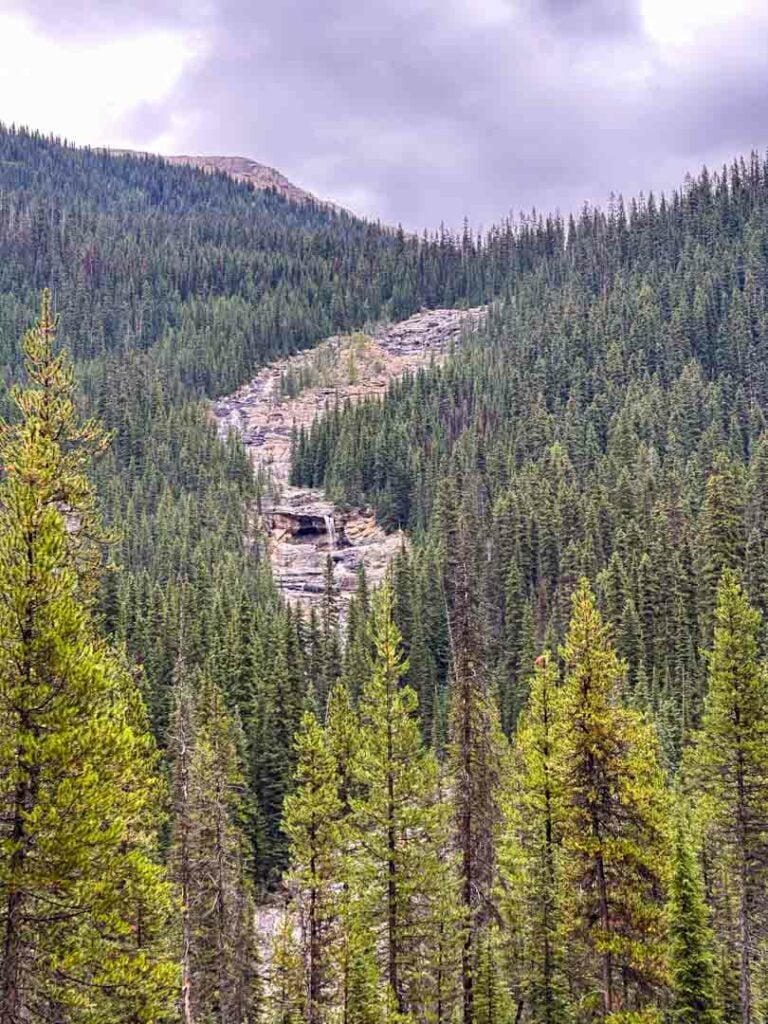
I had been to the valley before to see spectacular Takakkaw Falls, but I wasn’t prepared for how gorgeous the rest of the valley is. The whole valley is rimmed with glacier-capped peaks. The steep terrain means there are lots of waterfalls. And the well-built trails take you to tons of incredible viewpoints.
The Yoho Valley Loop is not an official trail – instead, it is a collection of trails that make a circular route that takes in all of the highlights in the valley. It includes the classic Iceline Trail as well as the Whaleback and Twin Falls.
I’m a hiking guidebook author and have backpacked all over BC and the Canadian Rockies. I hiked this route over three days in late August and was blown away by the beauty – and trust me, I’ve been to some gorgeous places!
My guide to backpacking the Yoho Valley and Iceline Trail includes:
- Quick facts about the Yoho Valley Loop including distance, how long it takes, weather, and more
- A map and elevation profile, plus a downloadable gpx file
- How to get to the Yoho Valley including info about parking and road closures
- Yoho Valley reservations: key dates plus booking tips
- How much does it cost to go backpacking in the Yoho Valley? A detailed budget breakdown
- Detailed trail description, broken down into sections with distances, times, and camping info
- Yoho Valley itinerary options from 2 to 4 days
- Yoho Valley hiking tips: advice for bears, food storage, weather, and more
This is a sensitive wilderness area. Learn how to Leave No Trace to keep the wilderness wild. Make sure you are prepared by bringing the 10 Essentials. Get ready for adventure with this checklist of things to do before every hike.
Hey there: Some of the links in this post are affiliate links, which means I earn a small commission at no cost to you. Thanks for your support. -Taryn

Yoho Valley Loop Quick Facts
Trail Overview: The loop strings together the Iceline, Little Yoho Valley, Whaleback, and Yoho Valley Trails in Yoho National Park to create a route that hits all the highlights in this part of the park. There are five campgrounds and one backcountry hut along the route.
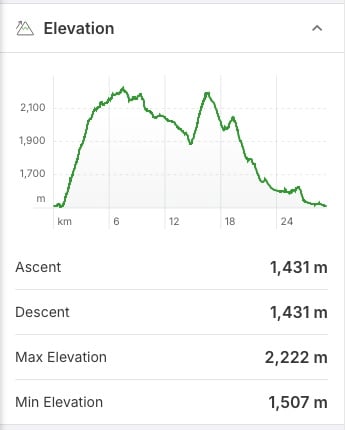
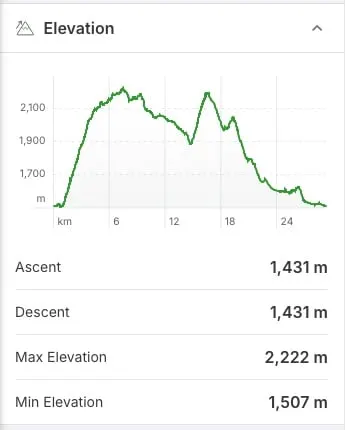
Distance: 29.4 km loop (But there are options to make it longer or shorter)
Elevation Gain: 1,430 m (But there are options with less elevation gain)
Difficulty: Moderate/Challenging. Most of the trail is moderate but there are challenging ascents and descents on the Iceline and Whaleback sections.
Duration: 2 to 4 days.
Best Time to Go: Mid-July to mid-September when the trail is snow-free.
Yoho Valley Weather: Most of the trail is above 2000m on the Continental Divide and has fickle mountain weather. In July and August, the average high temperature is 22°C and the average low is 5°C. Thunderstorms are common. Use my picks for the Best Weather Apps for Hiking to see the forecast for your trip.
Reservations and Costs: You must make reservations. You must also pay National Park entry fees, backcountry camping fees, and a reservation fee. More details are in the reservations and costs sections below.

What to Bring: This is a remote hiking trip, so you will need to bring typical backpacking gear. Use my backpacking checklist to make sure you have everything you need.
Wildlife: The trail is in bear country (both black bears and grizzly bears). Carry bear spray, hike in a group, and make noise, especially in brushy areas. Use campground cooking areas and store all your food and toiletries on the food storage poles. Read my bear safety tips for backpackers for more info.
Dogs: Allowed on leash.
Fires: Not allowed in the backcountry.
Indigenous Context: The Yoho Valley is in the traditional territory of the Tsuut’ina, Blackfoot/Niitsítapi, Stoney Nakoda, Ktunaxa, Secwépemc, and Métis. Before Europeans arrived, the nearby Kicking Horse Valley was an important travel and trading corridor. The government forced Indigenous people to leave when Yoho National Park was created in 1886 and prohibited them from accessing their traditional territory to hunt, fish, gather, and conduct cultural practices. Today, the park works with several Indigenous groups to facilitate park access for traditional, ceremonial, and cultural activities including harvesting.
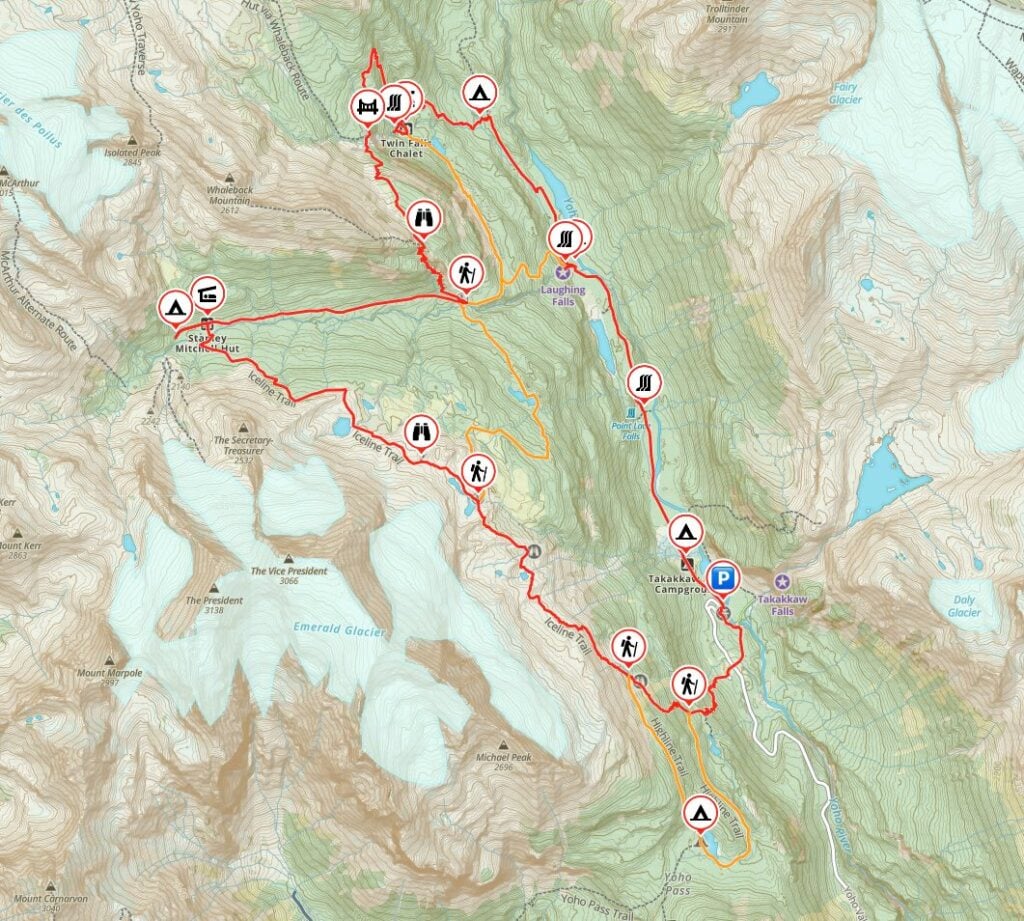
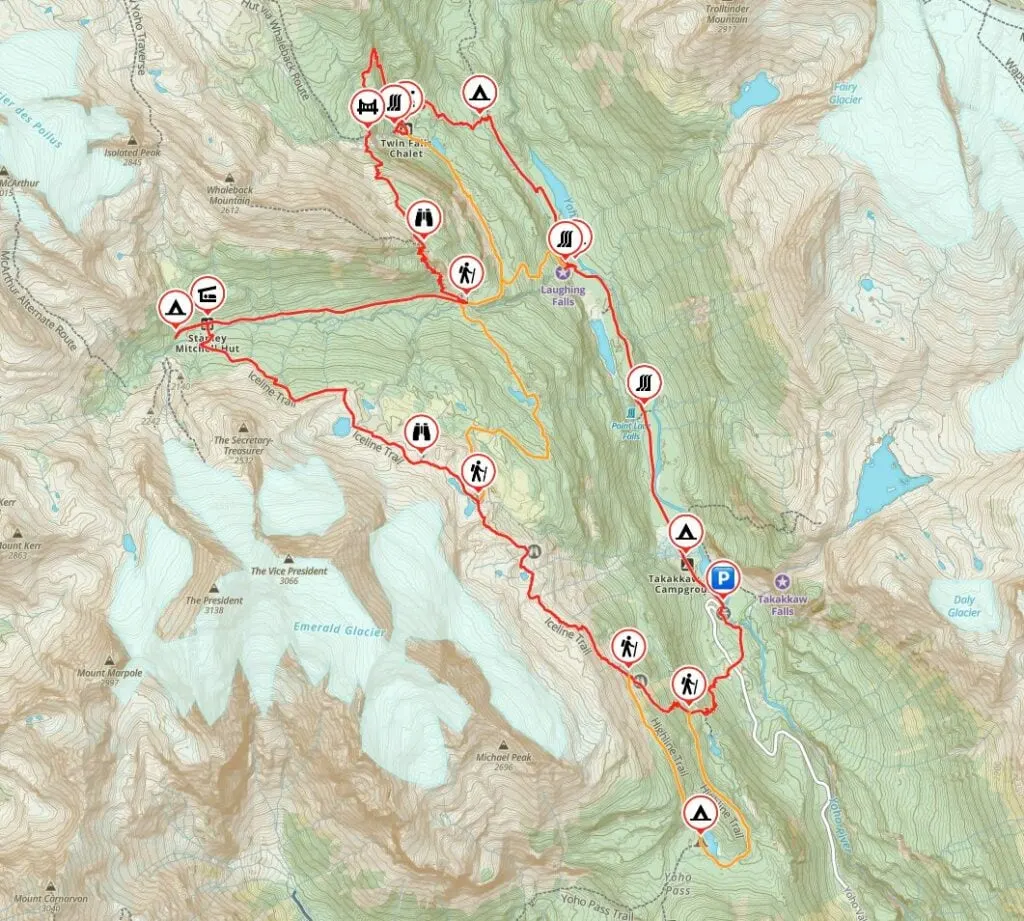
Yoho Valley Loop/Iceline Trail Map and Elevation Profile
The trails in the Yoho Valley are well-marked and easy to navigate with signs at all junctions. If you want a paper map, the Lake Louise and Yoho Map from Gem Trek is the best one.
I used the Gaia GPS app on my hike. It was helpful to know where I was on the trail to figure out how much higher I had to climb and where the next campsite or landmark was. All Trails+ is also great.
I also made you a trail map using Gaia GPS. Click through to zoom in and explore. You can also save it to your routes in Gaia GPS or export the gpx file.
How to Get to the Yoho Valley
The Yoho Valley is located in Yoho National Park in the Canadian Rocky Mountains. The trailhead is at the end of Yoho Valley Road near Takakkaw Falls, which is 13 km from Highway 1 near the small town of Field, BC.
The trailhead is 35 minutes from Lake Louise, Alberta in the east or 1 hour from Golden, BC in the west. There is no public transportation to the trailhead so you will need to drive yourself. It may be possible to get a taxi from Lake Louise, Banff or Golden, but it will be expensive. Here are Google Maps driving directions.
The parking lot has a designated section at the north end for campers. However, it is not big enough so you may have to park in the main parking lot. As well, the parking lots here can get very busy in the middle of the day since it’s where you park to visit Takakkaw Falls. There is additional overflow parking along Yoho Valley Road near the turn-off to the Whiskey Jack Hostel.

If you want to stay overnight nearby before your trip, you can book a walk-in campsite at Takakkaw Falls Campground near the trailhead or a drive-in campsite at Kicking Horse Campground near the start of Yoho Valley Road. I stayed at Takakkaw Falls before my trip and Kicking Horse after (because it has showers!)
The Whiskey Jack Hostel is also next to the trailhead, but it is currently closed for repairs with no announced re-opening date.
You can also stay in a hotel in nearby Field, BC (25 min from the trailhead). Charlie’s Guesthouse gets great reviews. If you want to splurge, Cathedral Mountain Lodge is mountain luxury at its best.

Yoho Valley Loop/Iceline Trail Reservations
Backcountry Camping Reservations
While backcountry campgrounds in Yoho National Park aren’t as competitive as some in nearby Banff National Park, advance reservations are required.
Reservations for the entire summer season open in January or February each year. In 2025, reservations open on January 26, 2026, at 8 a.m. Mountain Time. You must book on the Parks Canada Reservations website.
See my tips for booking backcountry camping for pointers on how to navigate the site. Be ready to book as soon as reservations open as popular dates will sell out in minutes.
You need to book each campsite when you make your reservation. Prepare a couple of different itinerary options and dates. (Use my suggested itineraries below.)
Your booking can include up to 10 people and up to 3 tent pads on the same reservation. Keep in mind that you are only allowed to have one tent per tent pad.
To make a reservation you will need to select the “Backcountry Zone” button and then “Banff, Kootenay, and Yoho” from the drop-down. Your access point is “Takakkaw Falls Trailhead”.
Have the following info ready to go when you make your Yoho Valley Loop/Iceline reservation:
- preferred itinerary with campgrounds and dates as well as backups
- number of tent pads and people you are booking for
- credit card
If you didn’t get a reservation, keep checking back as people cancel and spots open up. A more efficient way is to sign up for a camping cancellation notification app like Campnab or Schnerp. Read my guide to camping cancellation apps to find out how they work and which one I recommend.

Stanley Mitchell Hut Reservations
Reservations are required to stay in the Stanley Mitchell Hut. (More info on the hut in the trail description below.) You must make reservations on the Alpine Club of Canada website. ACC members can make reservations up to 180 days in advance. Non-members can make reservations up to 90 days in advance.
Join the Backpacking in BC Facebook Group
Yoho Valley Loop Fees
You must pay a few different fees to hike the Yoho Valley Loop. The cost breakdown is as follows:
- Backcountry camping reservation fee: $11.50 per booking (for up to 10 people and up to 3 tent pads)
- Backcountry camping fee: $13.50/person/night
- Yoho/Banff/Kootenay National Parks entry fee: $11/person/day (or $22 per car/day with up to 7 people)
- Stanley Mitchell Hut fee: $60/person/night for ACC members or $70/person/night for non-members
Most people hike the Yoho Valley/Iceline in three days/two nights and stay in backcountry campgrounds. In that case, a solo hiker would pay $71.50. Per-person costs decrease if you hike in a group since you can share the expense of reservation and national park entry fees.
Yoho Valley Loop/Iceline Trail Description
Which Direction to Hike?
When I was researching this trip, I debated which direction to hike. Either way, you have some steep climbs and descents. In the end, we decided to start with the Iceline Trail at the south end of the loop and work our way around clockwise. That way you get the hardest climb out of the way first.
You can definitely do the loop counter-clockwise, which means a more gradual ascent on the first day but a brutal knee-mashing descent on the last day. Pick your poison!
Since I went clockwise, that’s the way I will lay out the trail description below.
Takakkaw Falls Trailhead to Yoho Lake Camp Junctions via the Iceline Trail
Distance: 3.3 km
Time: 1 to 2 hours
Elevation Gain: 445 m
Elevation Loss: 0 m
Alternative Route: Add 4.5 km if you head south to Yoho Lake Camp along the Highline Trail
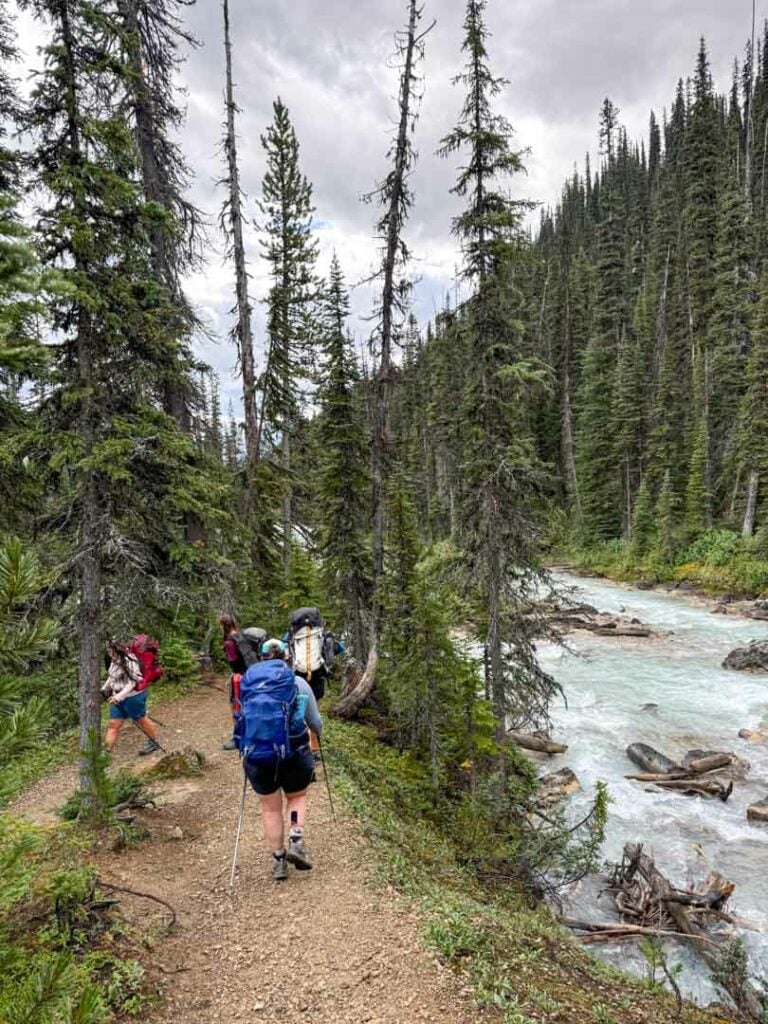
The route starts from the Takakkaw Falls Parking lot. Head south on the wide paved trail along the Yoho River for a few minutes. When you reach the bridge and a view of the falls, don’t cross it towards Takakkaw Falls. Instead, head right on the gravel trail that goes up a small rise.

Follow the trail through the forest and then out into an open area. Cross the Yoho Valley Road about 0.8 km from the start and follow the driveway for the Whiskey Jack Hostel to a sign for the Iceline Trail about 100 m away.
From here, the trail begins to climb steeply through lots of short switchbacks. The path stays in the forest, but there are occasional peek-a-boo views of Takakkaw Falls.


Reach a junction with the spur trail to Hidden Lakes (some unremarkable marshy ponds) about 2 km from the start.
Keep climbing and intersect junctions with the Highline Trail at 2.2 km and 3.3 km. Both branches of this trail lead south to Yoho Lake Camp, an alternative camping location. It’s 2.4 km to the camp via the lower branch and 2.1 km via the upper branch.
Yoho Lake Camp
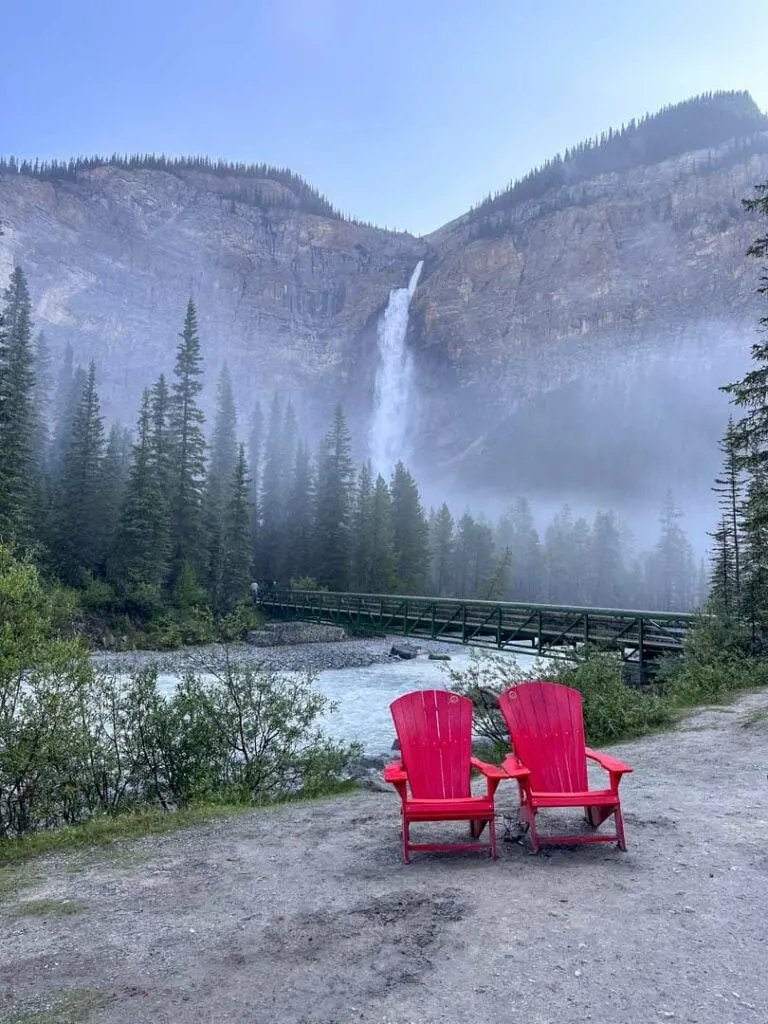
Yoho Lake is small and is below the treeline in mixed forest and subalpine meadow. It is famous as the location of the first-ever mountaineering camp for the Alpine Club of Canada in 1906, but otherwise, it’s not a major destination. However, it does have a pair of iconic Parks Canada red chairs and a great view of Mount Wapta.
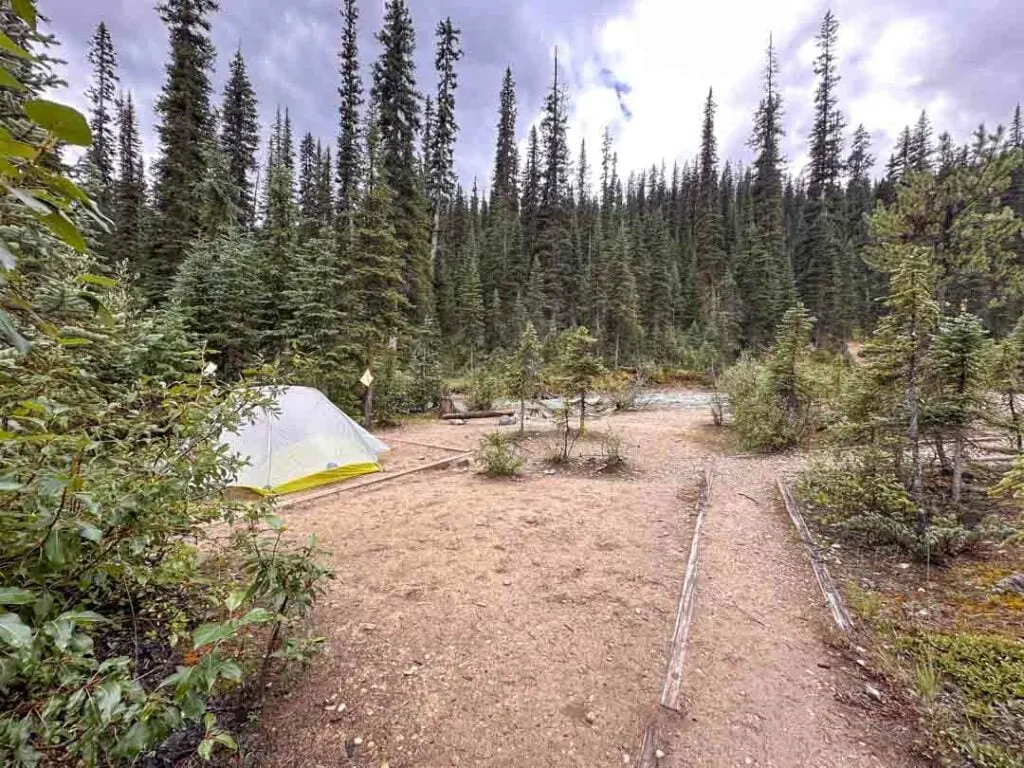
Yoho Lake Camp has cleared dirt tent pads, an outhouse, and a cooking area with picnic tables and food storage poles. Collect water from the lake.
Yoho Lake Camp Junction to Little Yoho Camp via the Iceline Trail
Distance: 8.1 km
Time: 4 to 5 hours
Elevation Gain: 428 m
Elevation Loss: 295 m
Alternative Routes: Skip Little Yoho Valley Camp/Stanley Mitchell Hut via the Celeste Lake Trail. From the top of the Celeste Lake Trail, you can take the Whaleback Trail (11.5 km) or Marpole Lake Trail (8.4 km) to Twin Falls Camp or the Little Yoho Valley Trail to Laughing Falls Camp (6.1 km).
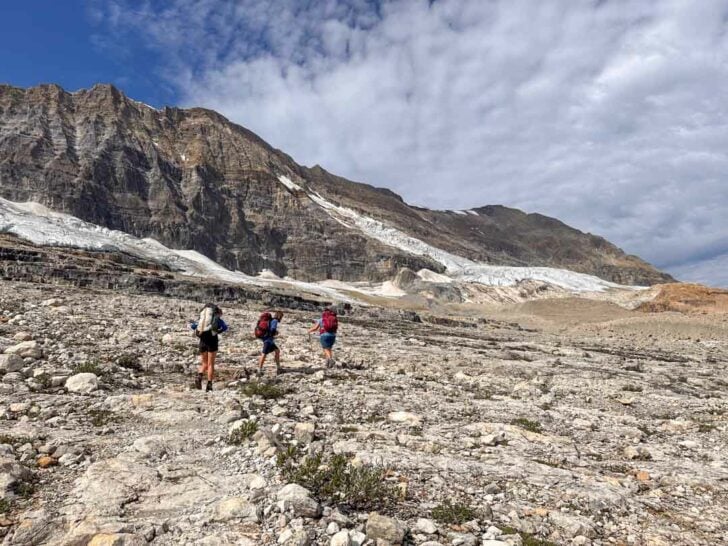
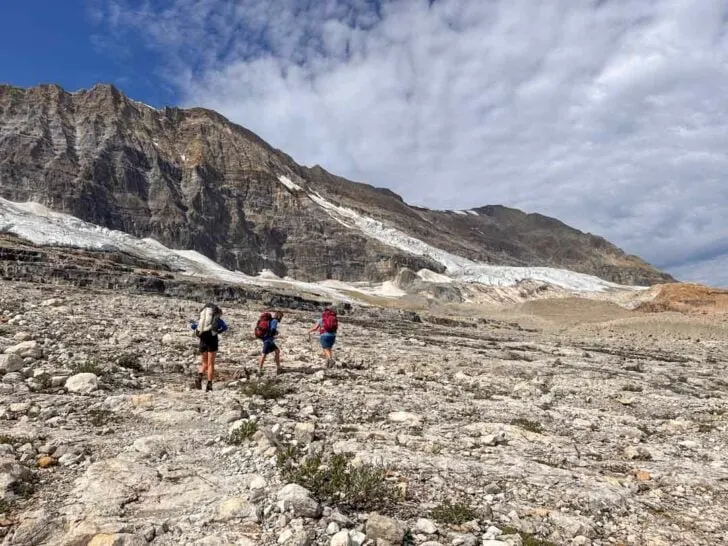
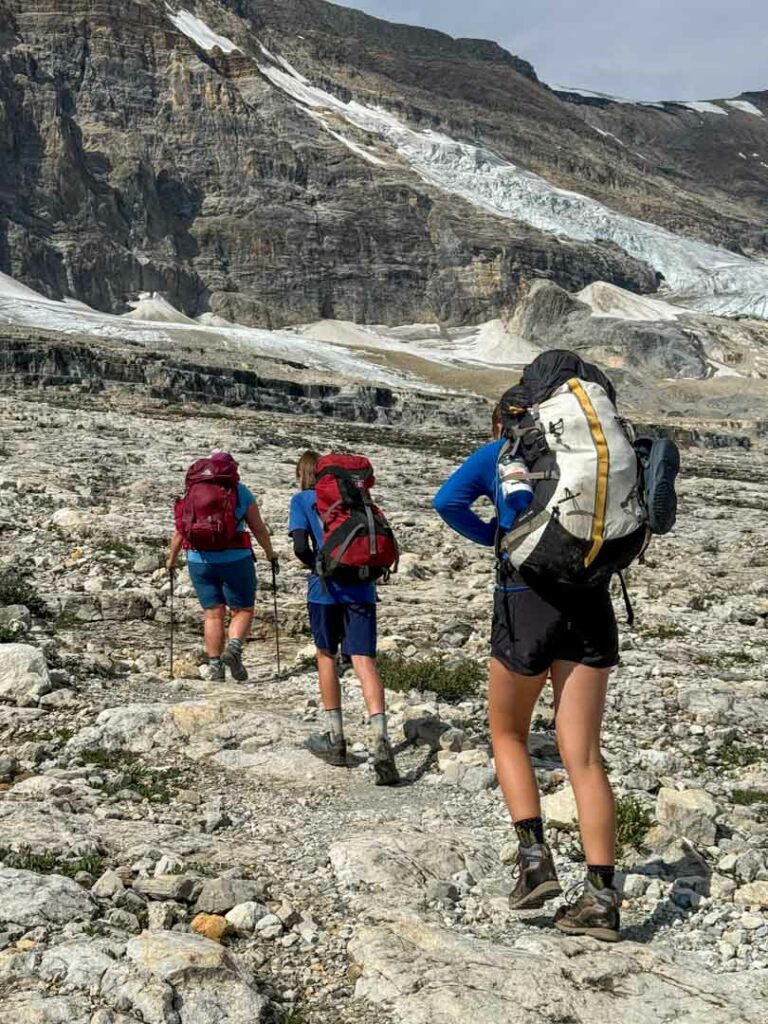
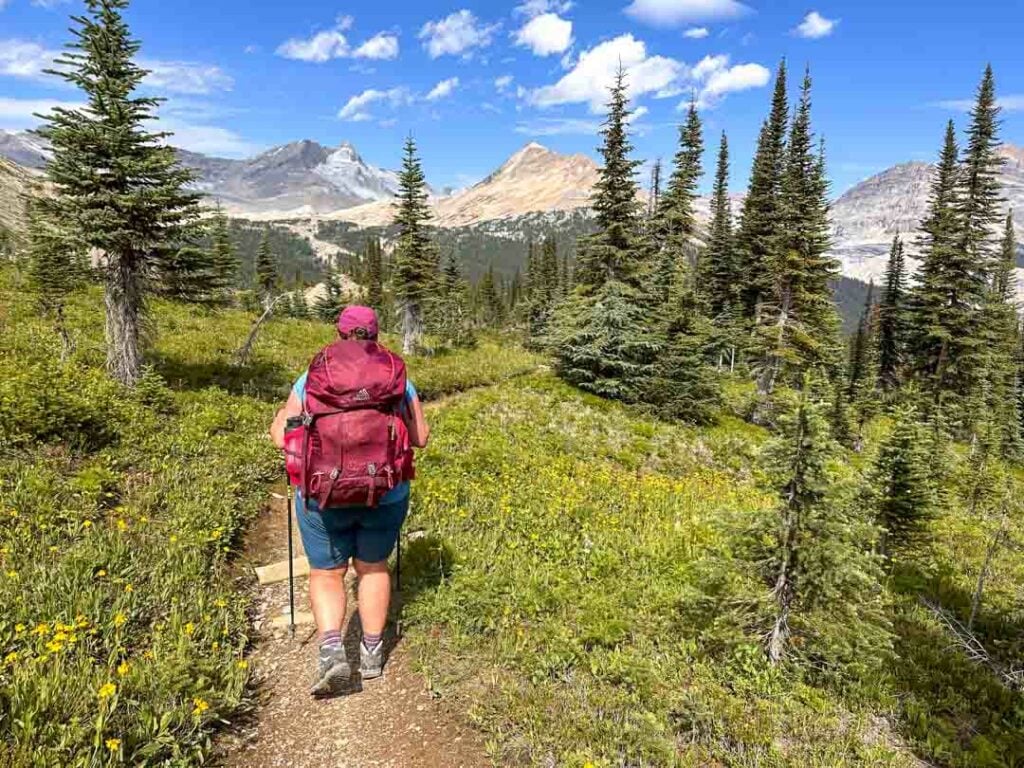
Continuing on from the upper Highline Trail junction you’ll still be climbing, but it’s a bit more gentle. As well, the trees start to melt away and you will start to appreciate the open terrain of the Iceline.


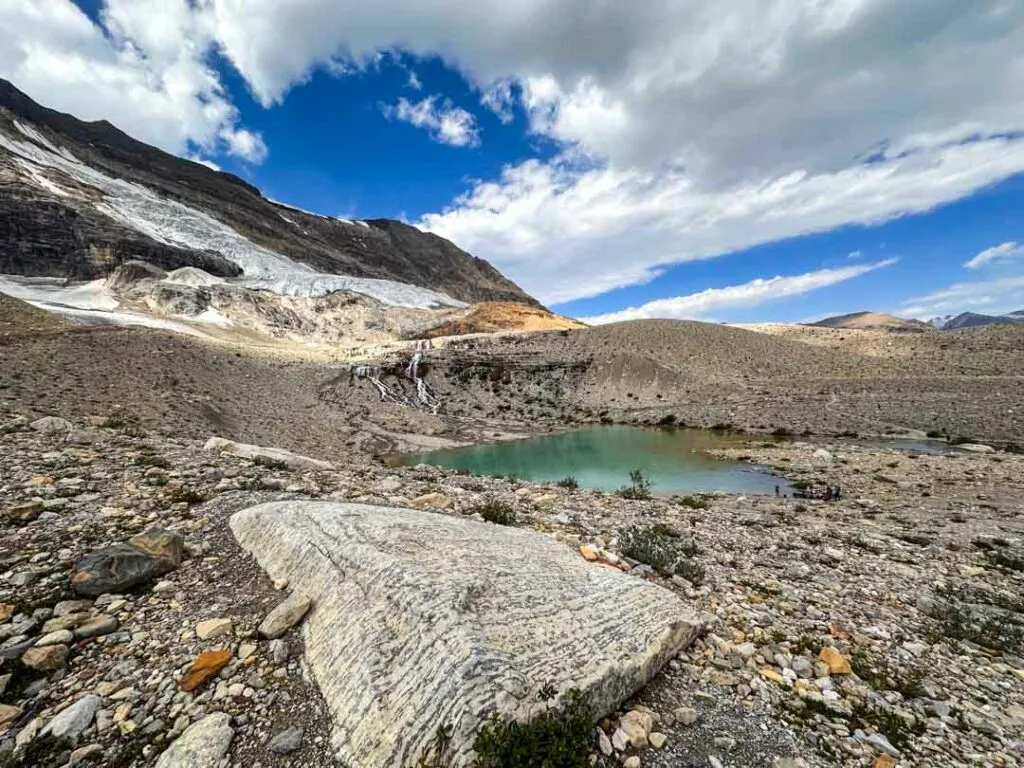
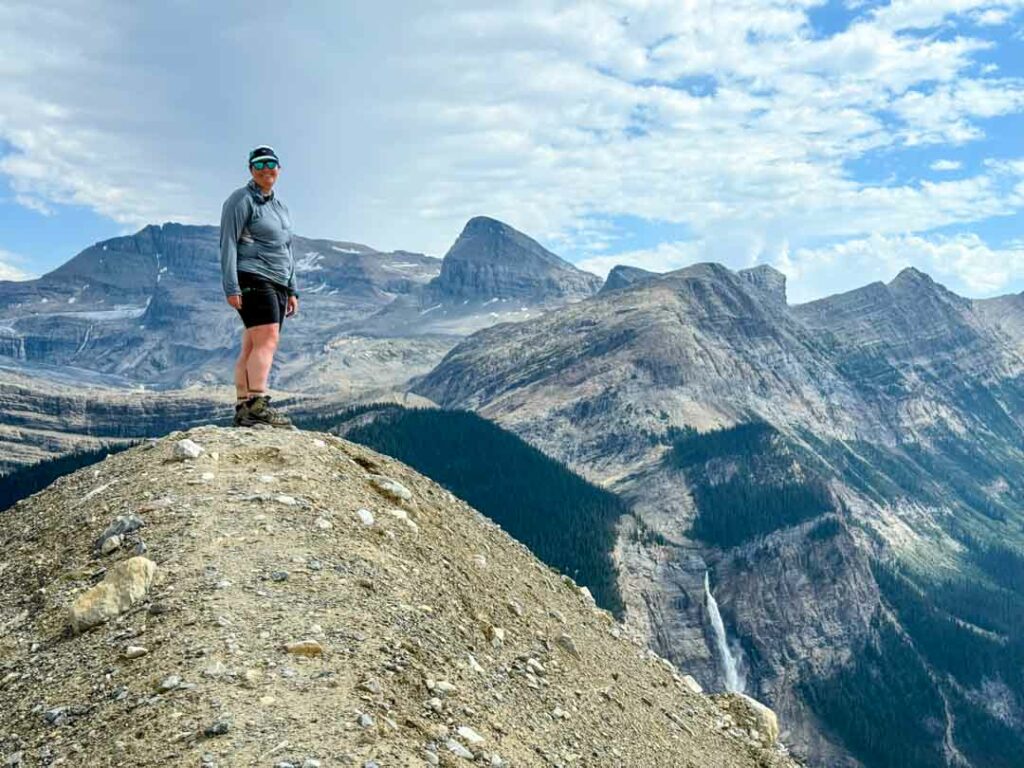
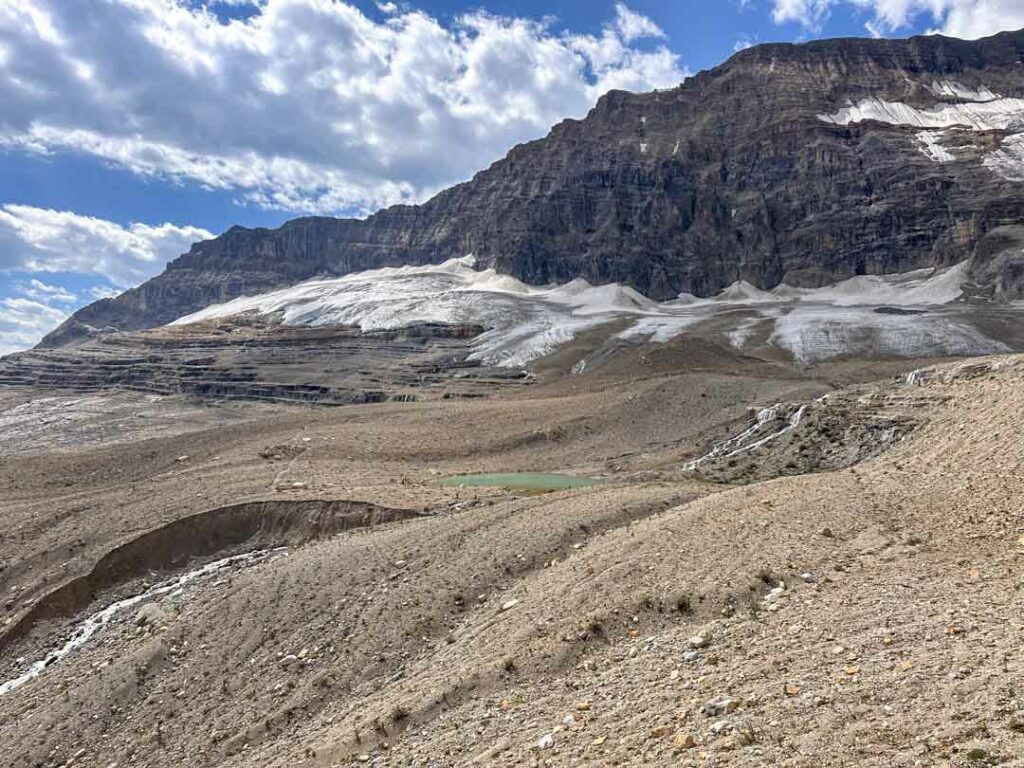
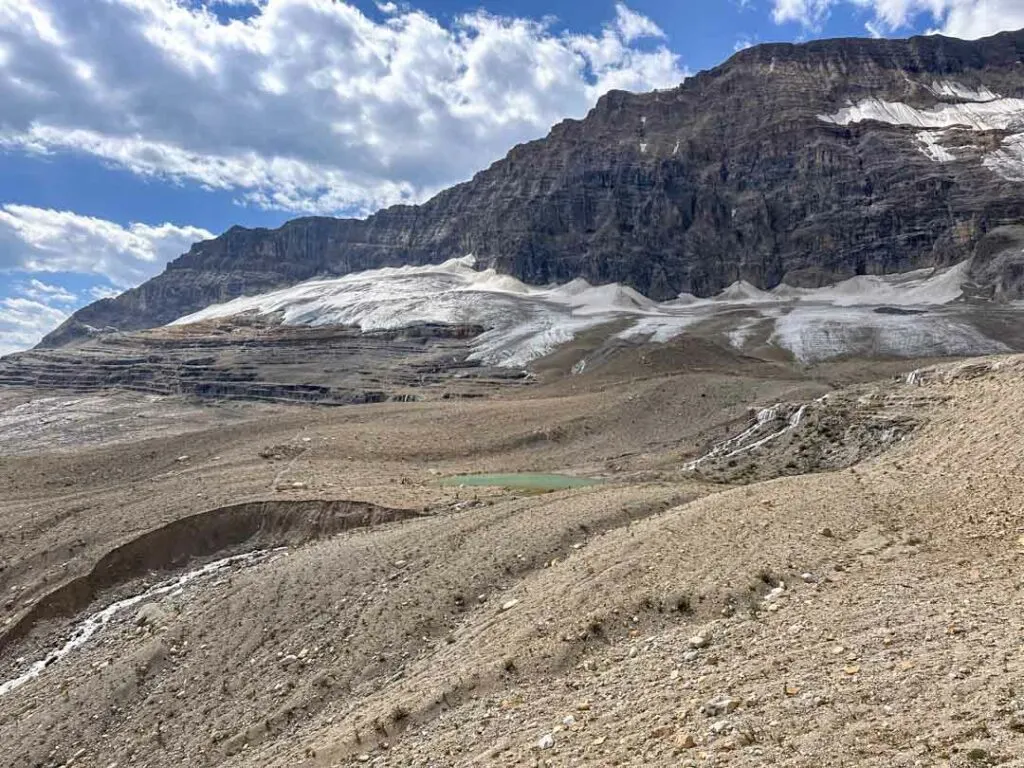
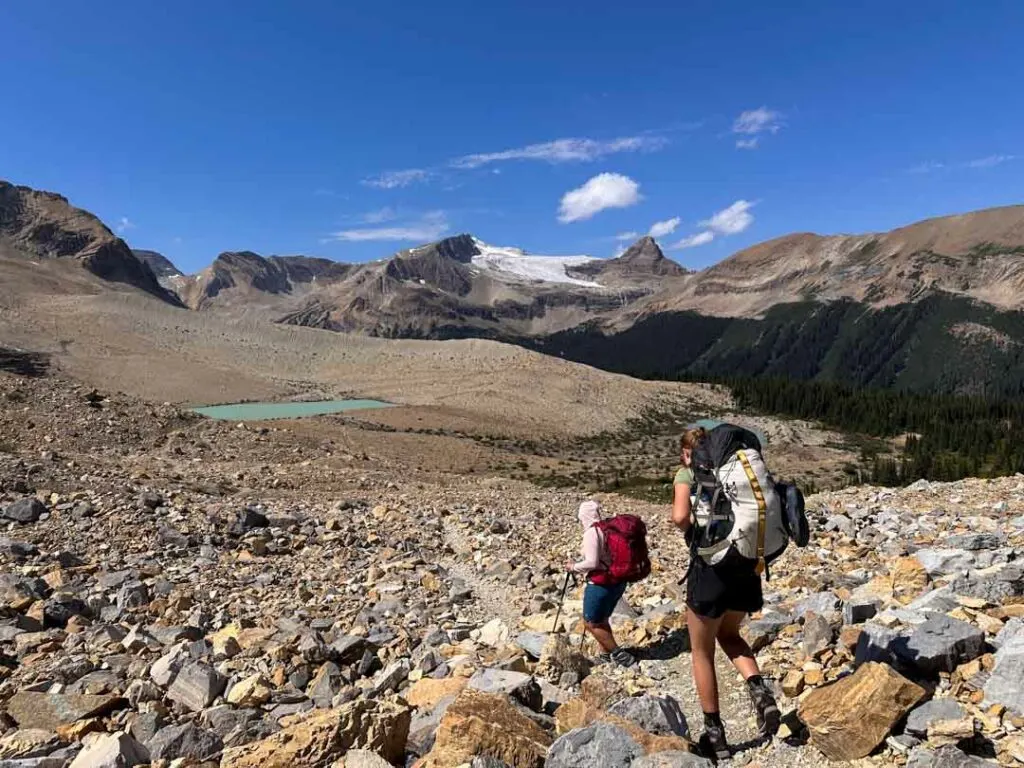
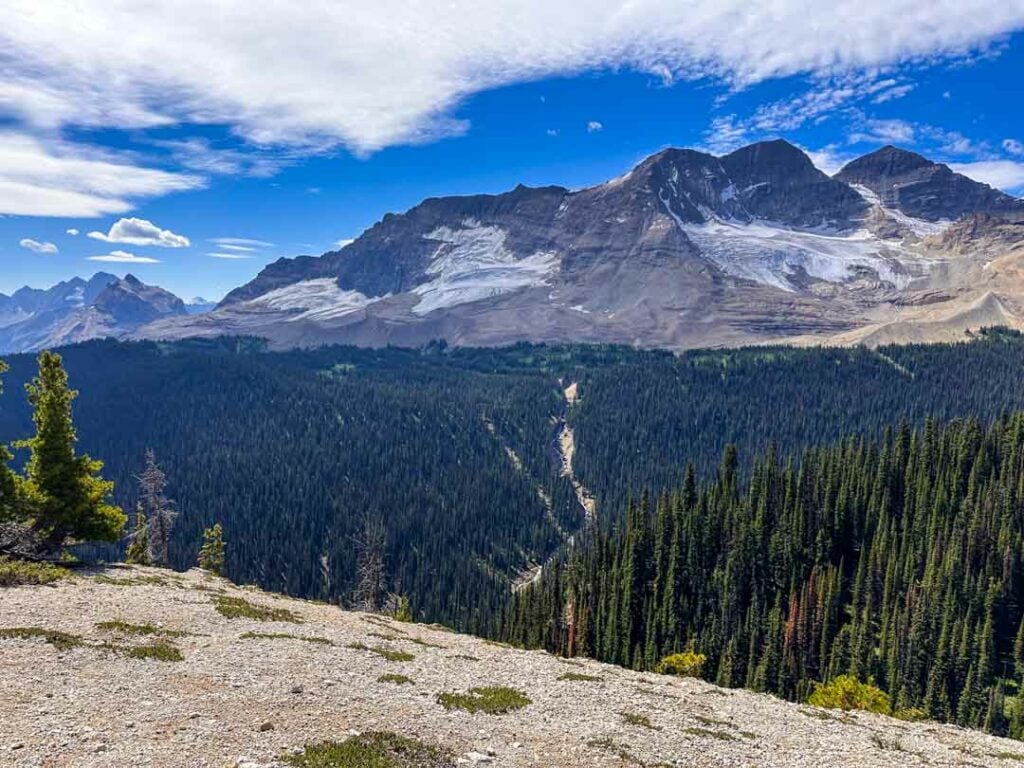
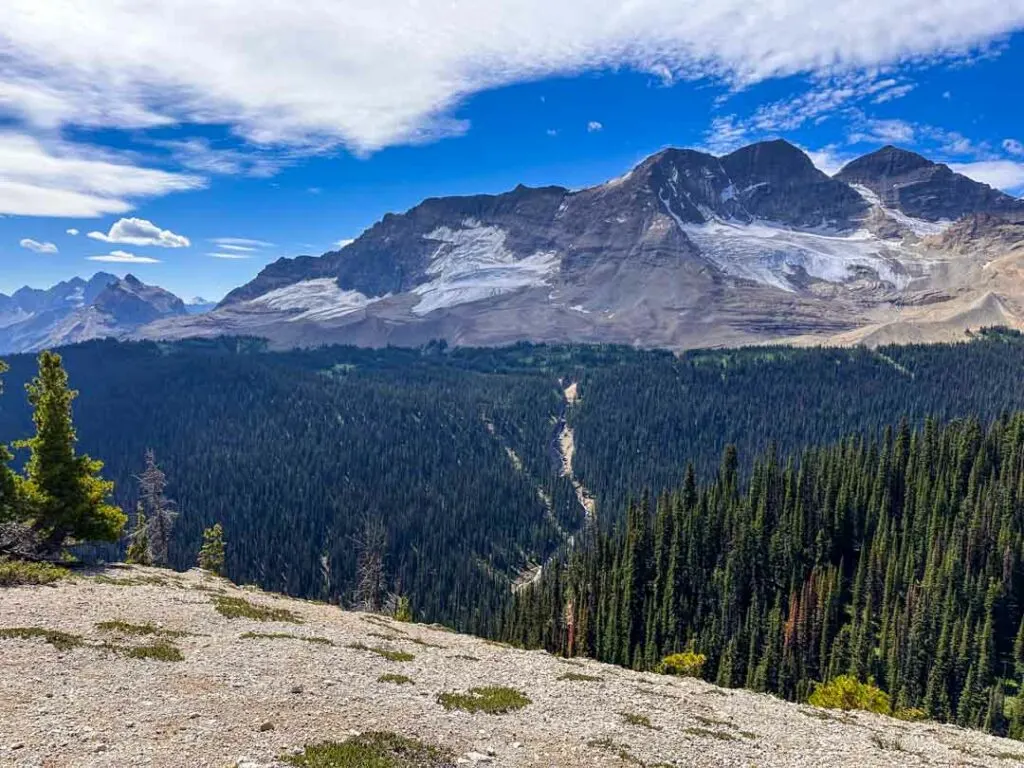
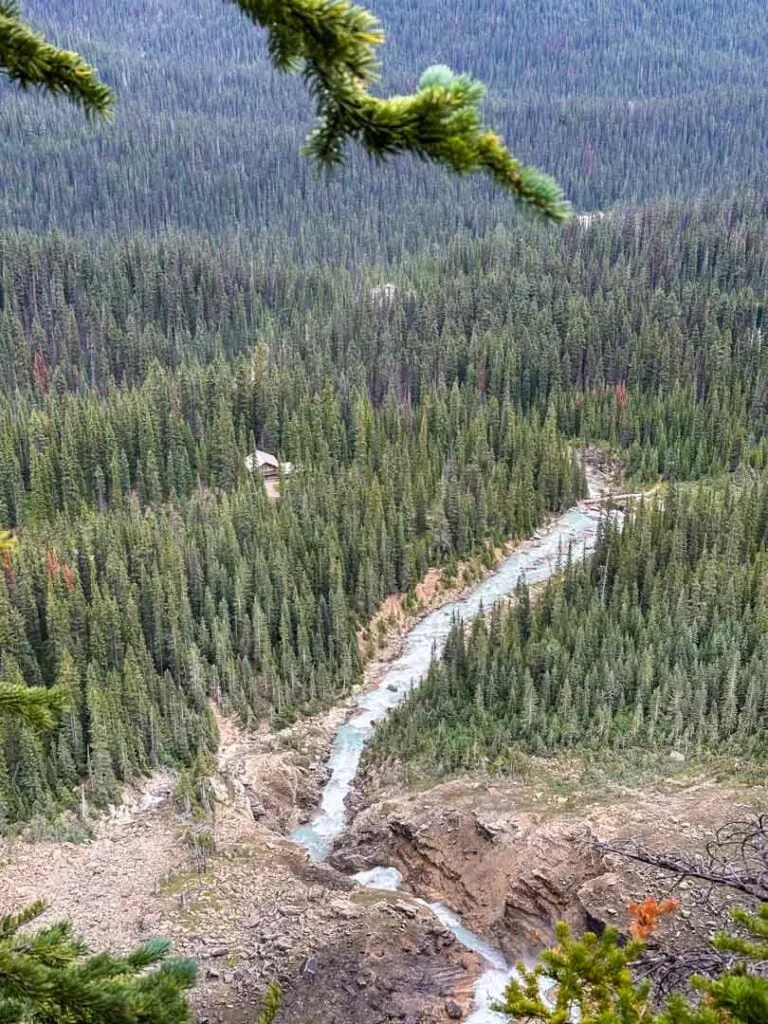
Look across the valley to Takakkaw Falls and the Wapta Icefield. The rocky summits of Michael Peak, The President, and The Vice President loom above you to the west. Below them, pockets of the Emerald Glacier gleam in the sunlight and gush meltwater down the slopes.

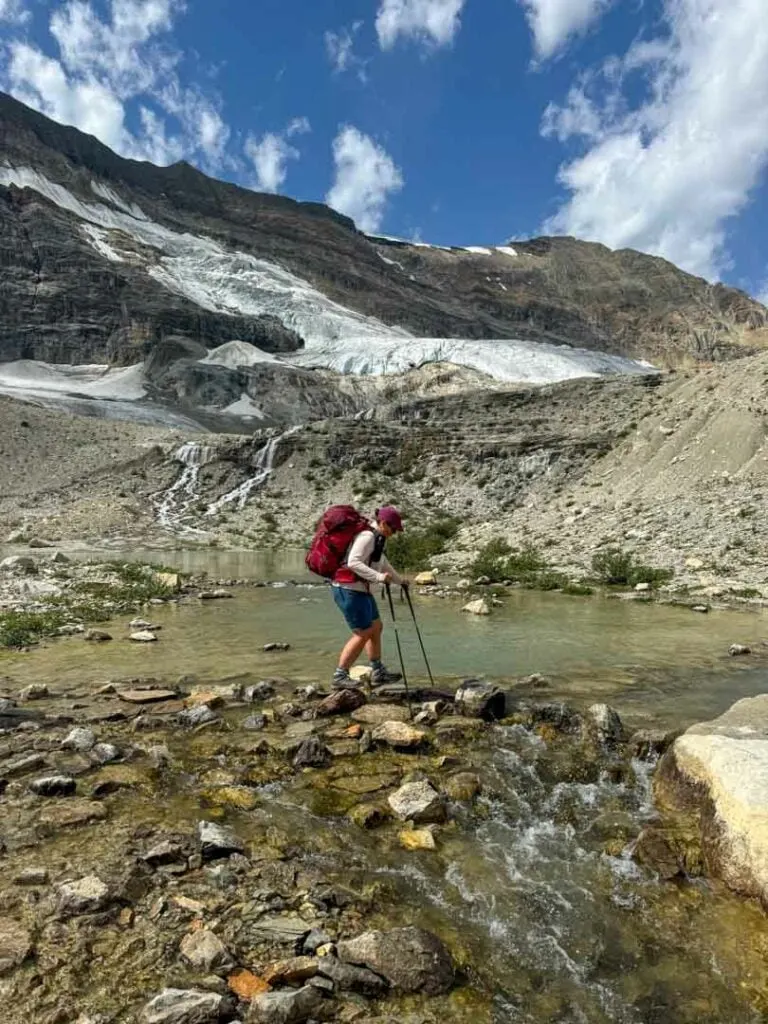
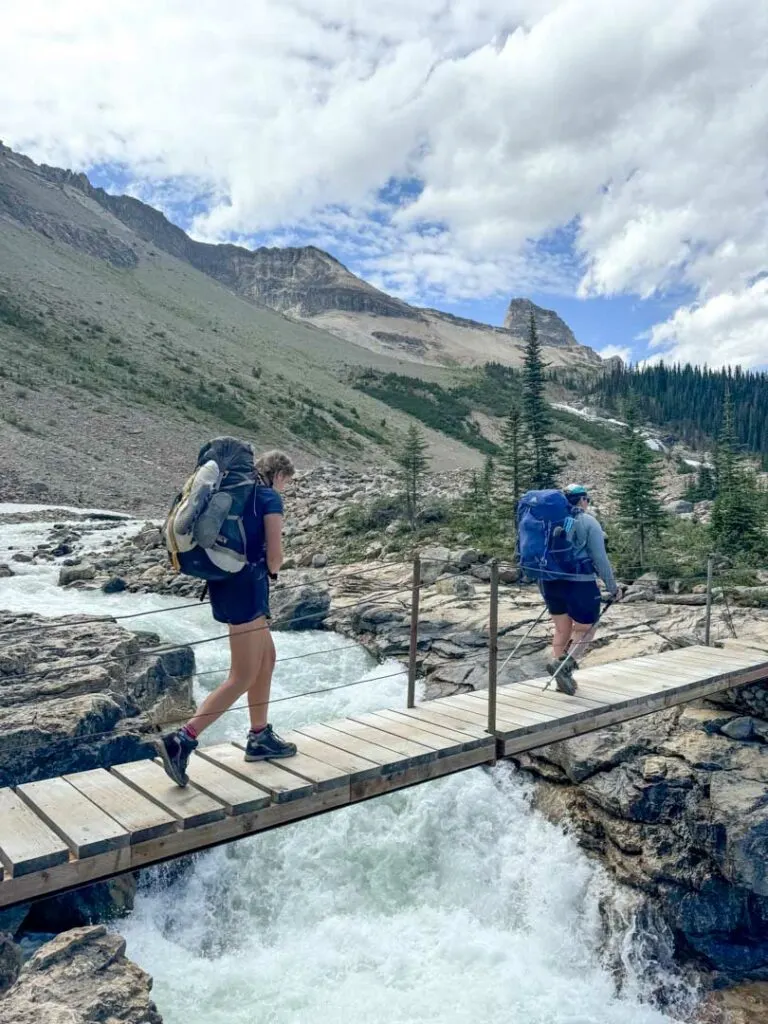
The next section of the trail treats you to some of the most spectacular scenery in the entire Yoho Valley. Pass the first of several turquoise blue glacial tarns about 5.3 km from the start. These tarns and their meltwater streams are good places to refill your water bottles. However, be sure to filter or treat your water – you never know if people or animals have pooped upstream. I use a Katadyn BeFree filter.

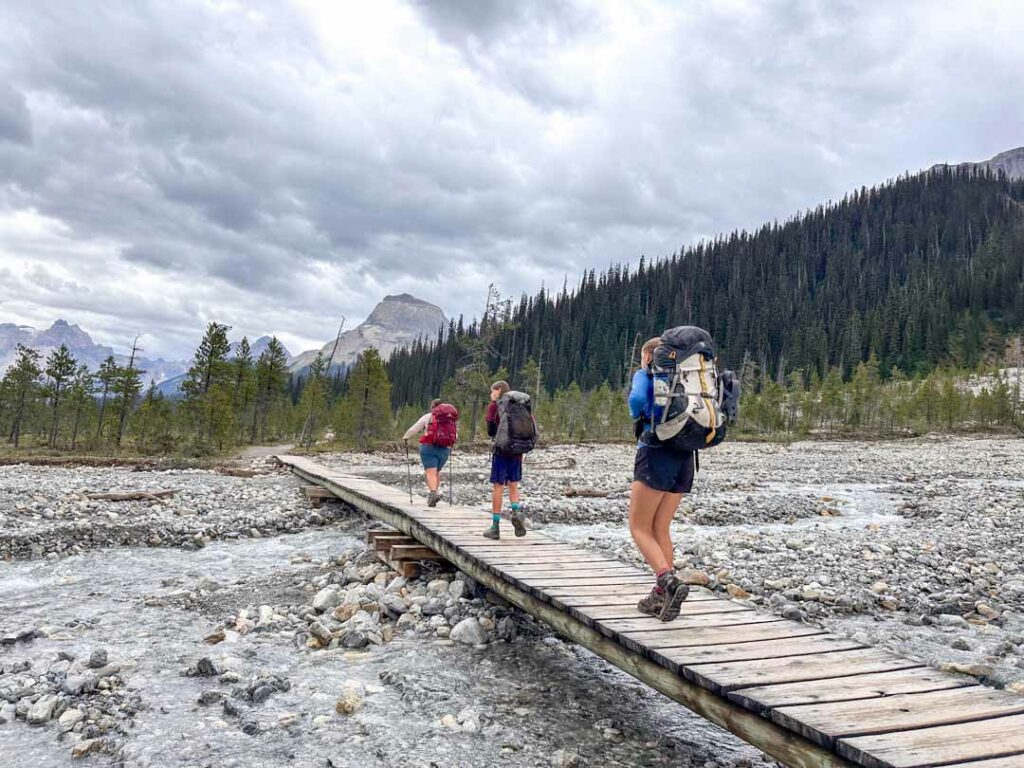
The streams do not have bridges. Sometimes you may be able to rock hop across, especially later in the summer. But earlier in the year be prepared to ford – bring sandals or Crocs to keep your boots dry.

There are tons of good photo opportunities in this section and it felt like we stopped a thousand times to take pics. One of the best places is a short spur trail to a viewpoint along a glacial mound.

About 6.6 km from the trailhead reach a junction near another lake. Your route along the Iceline continues straight. But if want to head directly to Twin Falls Camp or Laughing Falls, you can take the alternate route to the right on the Celeste Lake Trail.
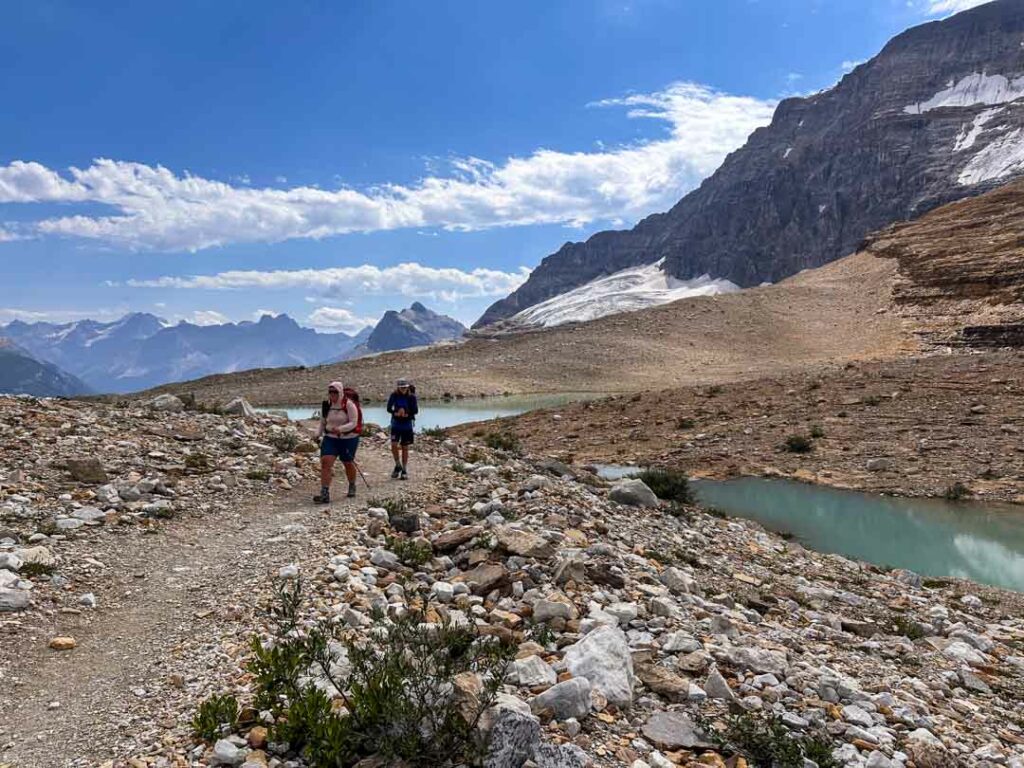

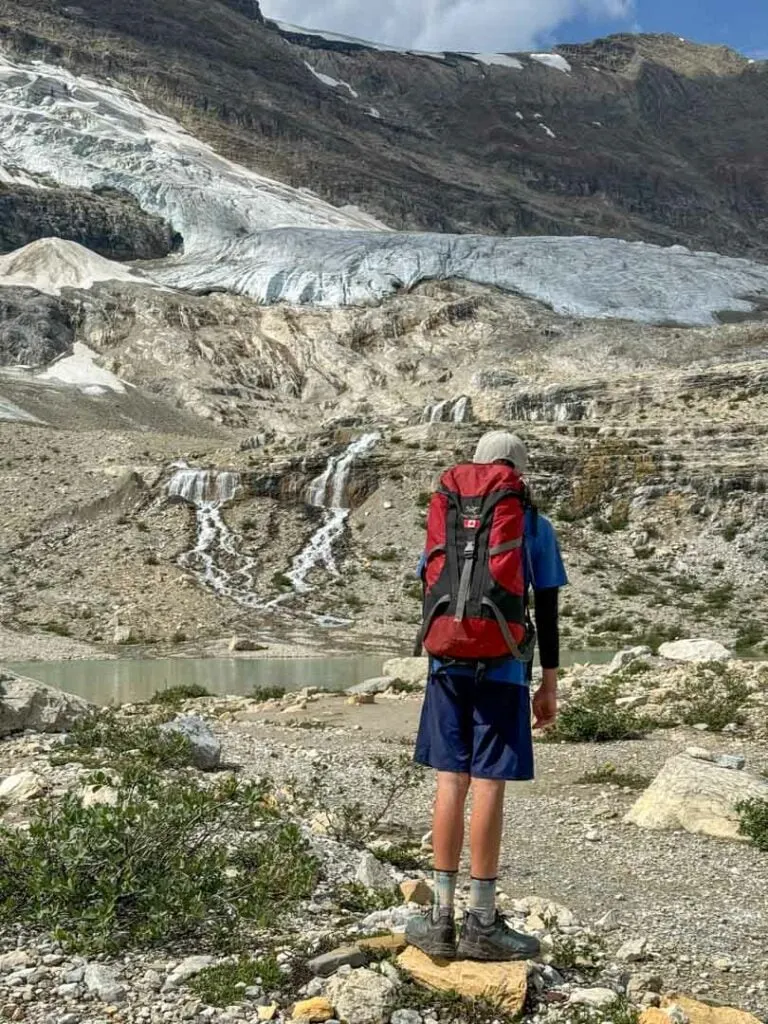
Continue along the Iceline Trail, climbing gently past two lakes to the Iceline Summit 7.5 km from the start. Follow a short steep side trail to the top of a mound of glacial till for an incredible view of the Yoho Valley.

From here, it’s all (mostly) downhill to camp. Stay on the Iceline Trail as it works its way through more gravel and past a final turquoise lake. Climb a small hill (which will feel tough since you’ll be mentally done with elevation gain), and then follow the trail as it makes a left and descends into the forest.
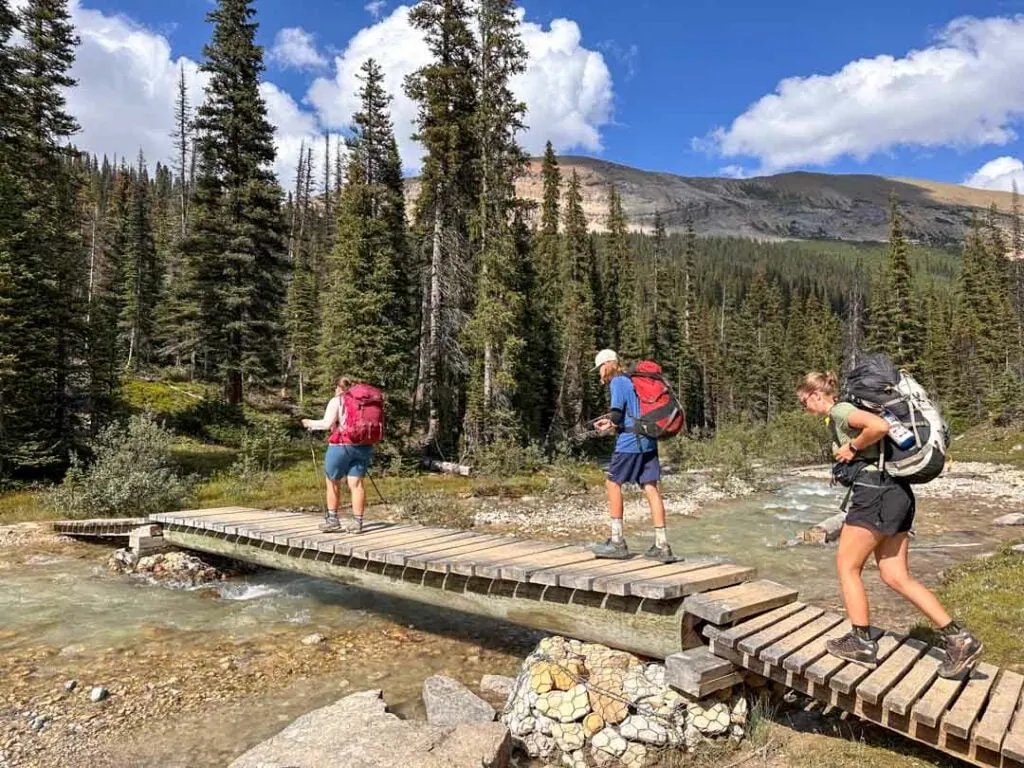
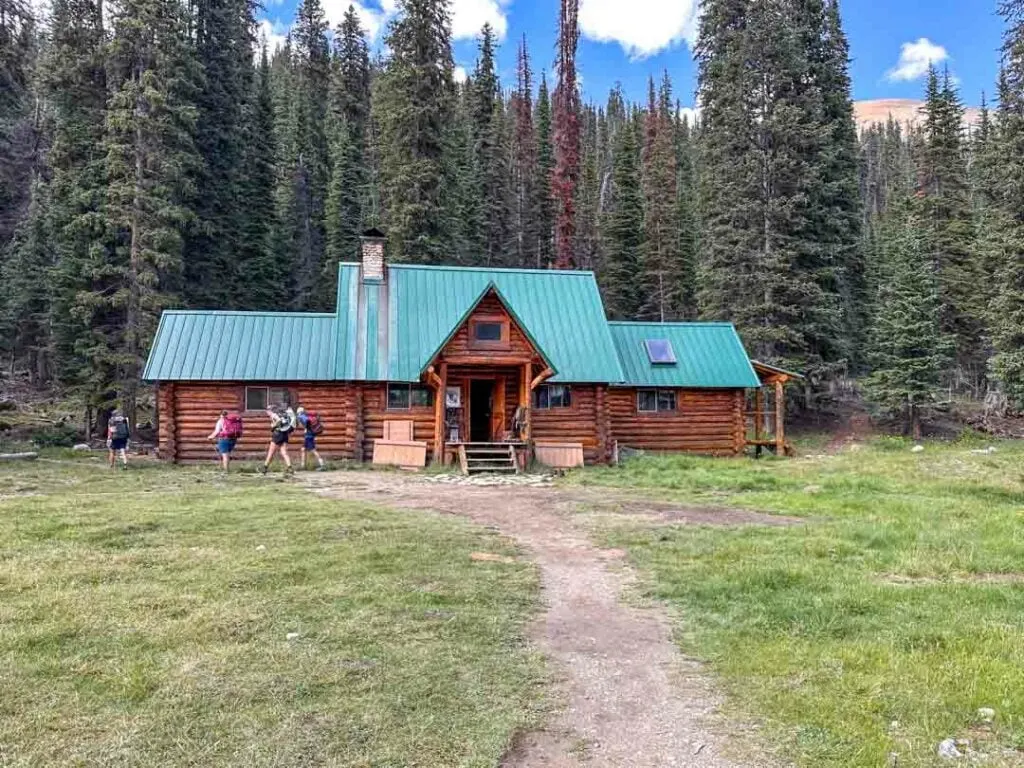
The trail parallels the gravel slopes for a little bit before diving downhill on a series of steep switchbacks that lessen as you lose elevation. At the bottom, cross the Little Yoho River on a wooden bridge and arrive at the Stanley Mitchell Hut 11.1 km from the trailhead. If you are camping at Little Yoho Camp, turn left at the hut and hike another 0.4 km west up the valley to the campground.

Stanley Mitchell Hut
The Stanley Mitchell Hut is a rustic self-catering backcountry hut run by the Alpine Club of Canada (ACC). It has a propane cooking stove and lighting. The hut sleeps 22 people in bunk beds and includes mattresses. There is an outhouse nearby and you can collect water from a creek.
The hut was built in 1940 and is a federal heritage building. It is named after Stanley Mitchell, one of the founding members of the Alpine Club of Canada and its Secretary-Treasurer for several decades.

Little Yoho Camp
Little Yoho Camp sits at the end of the Little Yoho Valley Trail next to the Little Yoho River.
There are two outhouses at the entrance to the campground.
There are no formal tent pads – instead, there are about ten clearings in the forest and meadow. Some of the clearings are a bit rooty or sloped, but a few have good views of the river. I found it a bit frustrating to find a campsite here since it wasn’t clear which campsites were official and which were not. (And the unofficial campsites were eroding the fragile meadows.)
There is a designated cooking area with picnic tables and poles with pulleys for food storage. Collect water from the Little Yoho River.
If you have energy for a day hike, you can follow a faint trail on the other side of the river up to Kiwetinok Pass and Kiwetinok Lake about 2.8 km away. The route is steep and only sporadically marked with cairns.

Little Yoho Valley Camp to Twin Falls Camp via the Whaleback
Distance: 11.1 km
Time: 4.5 to 7 hours
Elevation Gain: 463 m
Elevation Loss: 870 m
Alternative Routes: If you want to skip the Whaleback, follow the Marpole Lake Trail to Twin Falls Camp (7.5 km) or the Little Yoho Valley Trail to Laughing Falls Camp (5.2 km).
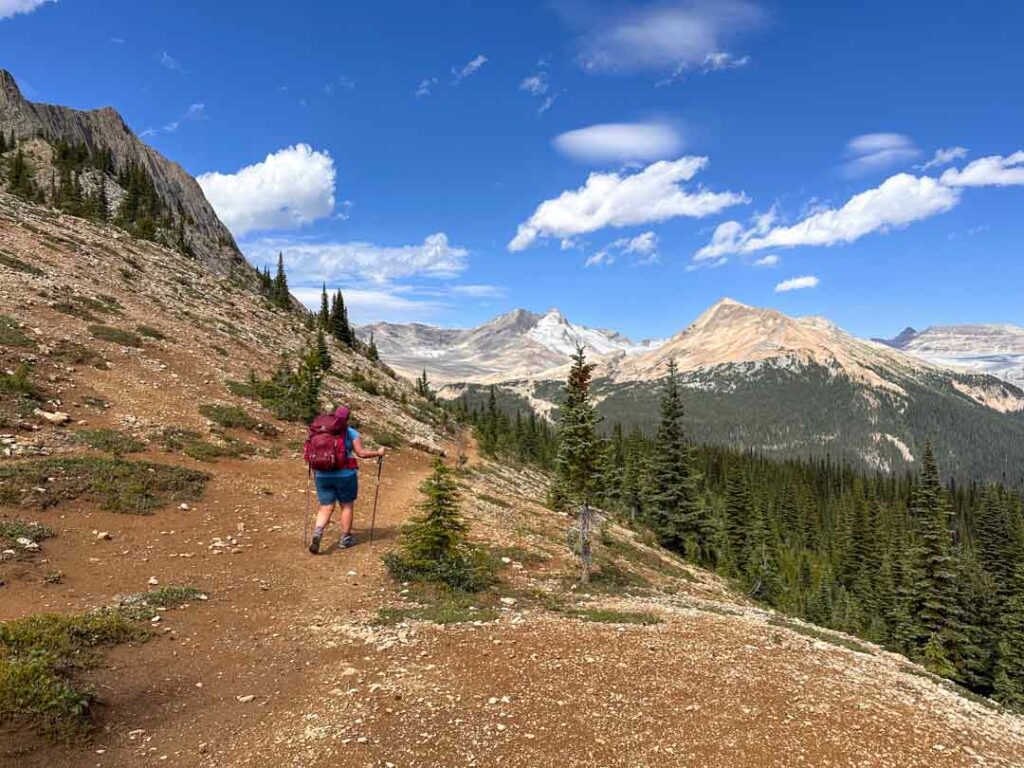
From Little Yoho Valley Camp, hike back downstream past the Stanley Mitchell Hut. Continue following the trail as it descends next to the Little Yoho River for the next three kilometres.
Reach a pair of junctions 14.8 km from the trailhead. Go left at the second junction to begin your ascent of the Whaleback. (If you want to skip the Whaleback, continue straight to head to Twin Falls Camp via the Marpole Lake Trail or directly to Laughing Falls.)
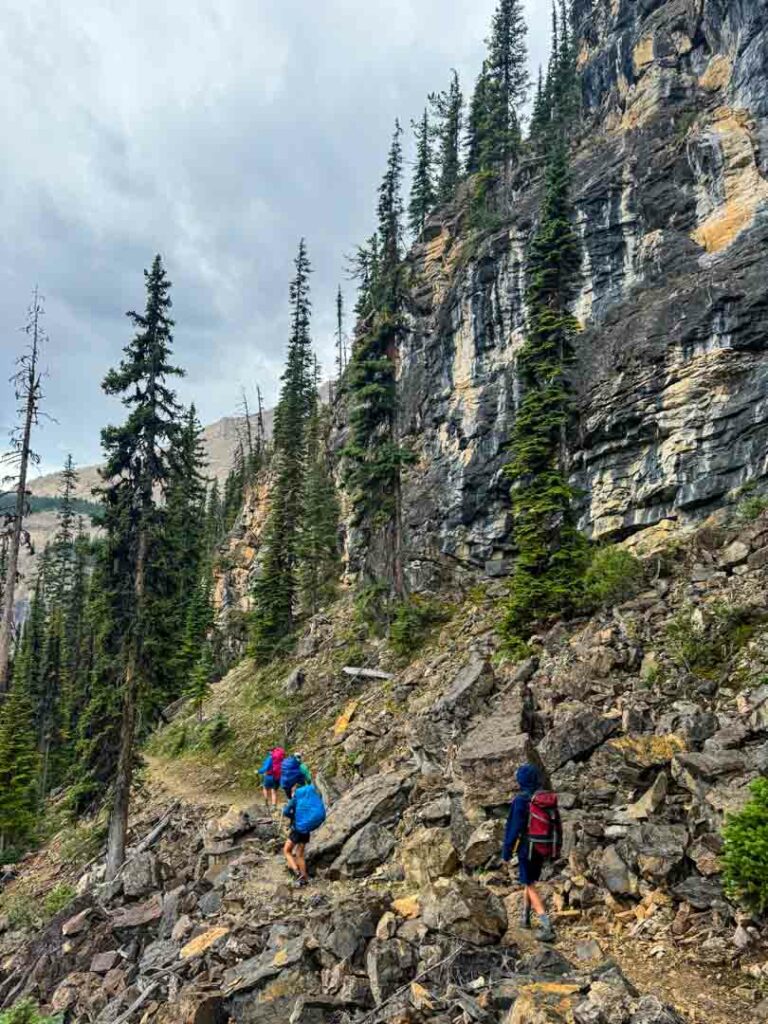
The Whaleback Trail has unrelentingly steep switchbacks. The path ascends through sparse forest and scree, so it is open to the sun. After about 30 switchbacks, reach your high point on the shoulder of Whaleback Mountain.

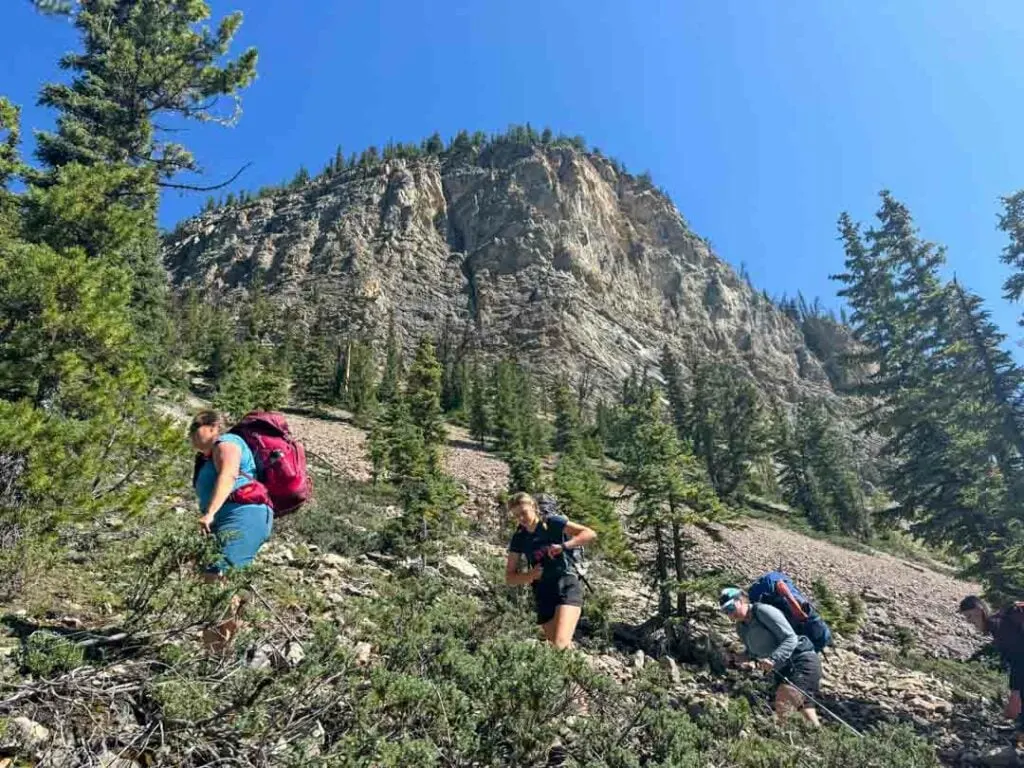
There is a surprisingly large plateau here at the edge of the ridge – be sure to wander around to take in the views south towards the Iceline and north into the heart of the Yoho Valley.

From the high point, the trail descends gradually through open forest and patches of meadow. It’s a sharp contrast to the bare rocks and gravel of the Iceline Trail.

Reach the Whaleback Bridge over Twin Falls Creek about 18.2 km from the trailhead. This bridge is only in place seasonally – check trail conditions online in early and late summer to be sure it is in place. If it is not, the crossing is impassible due to dangerously high water.

The bridge makes a great spot for a break. Follow faint trails along the side of the creek to look down at the top of Twin Falls, but be careful – it’s a very long way down the sheer cliff!

When you are finished at the top of the falls, continue along the trail as it makes a slow rising traverse to avoid some impassable cliffs. About one km after the falls, the trail swings right and starts to steeply switchback down the slope. The terrain is steep and a little bit loose in places – the original trail builders must have been mountain goats to find this route!

The grade starts to ease about halfway down as you hike through thick forest with lots of huckleberry bushes.
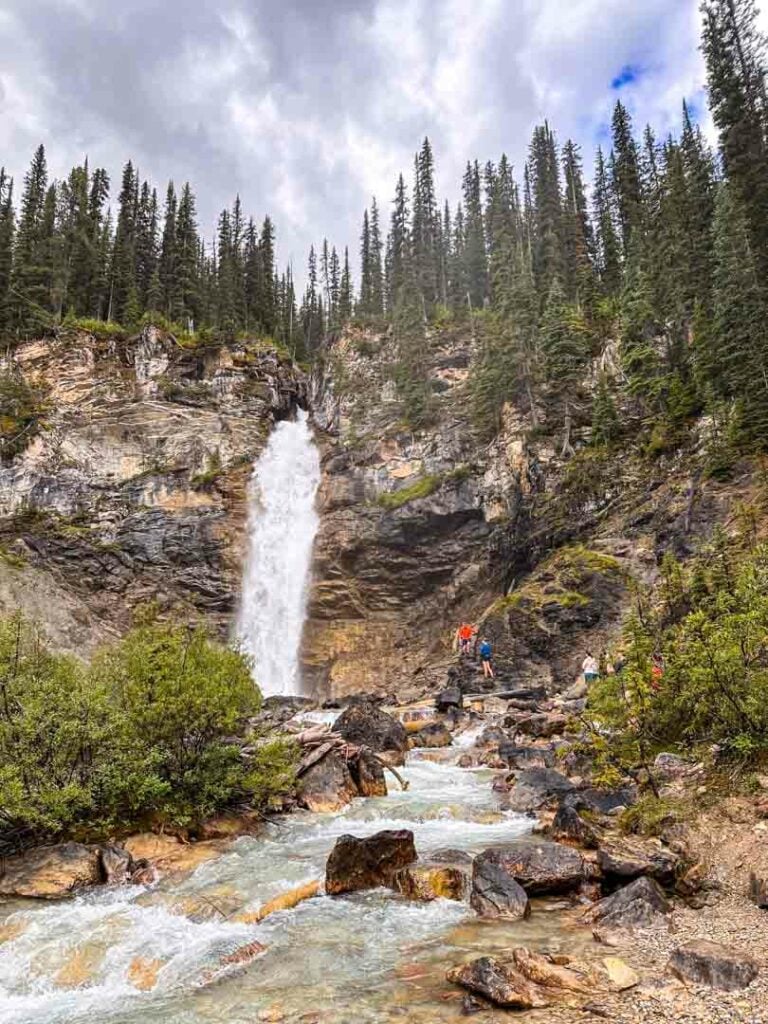
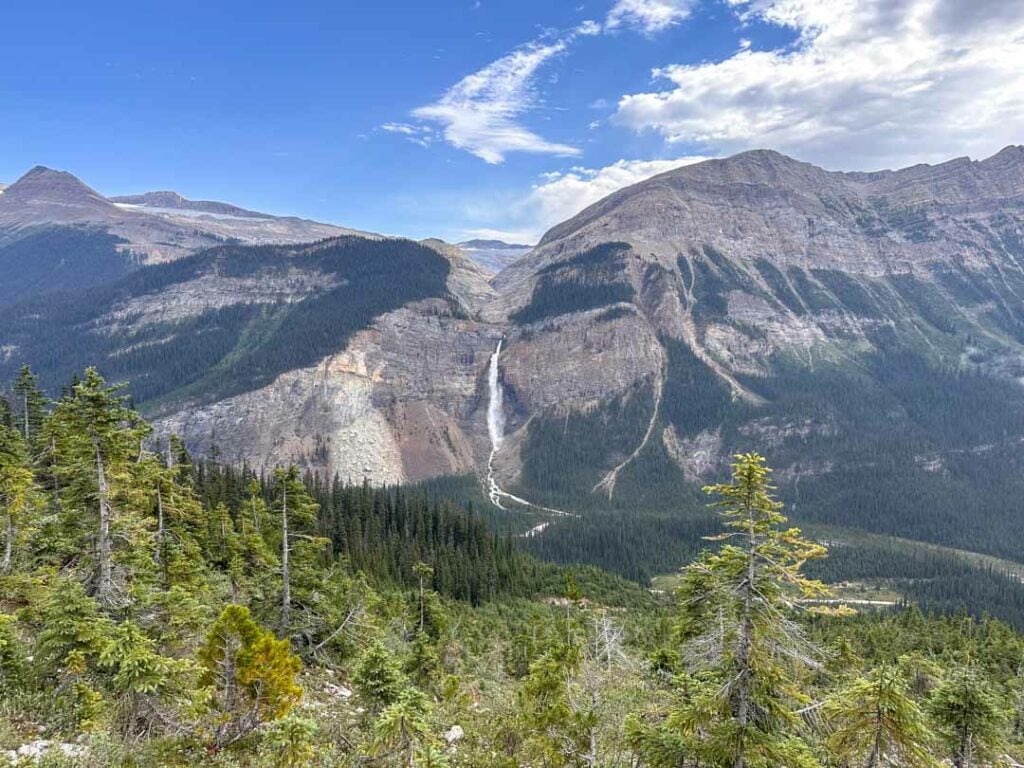
Arrive at a junction 20.7 km from the start. Turn right to follow a spur trail to the base of Twin Falls. The twin ribbons of the falls drop 120 metres down the cliffs. The base gets a lot of spray so you might want to put your rain jacket on.

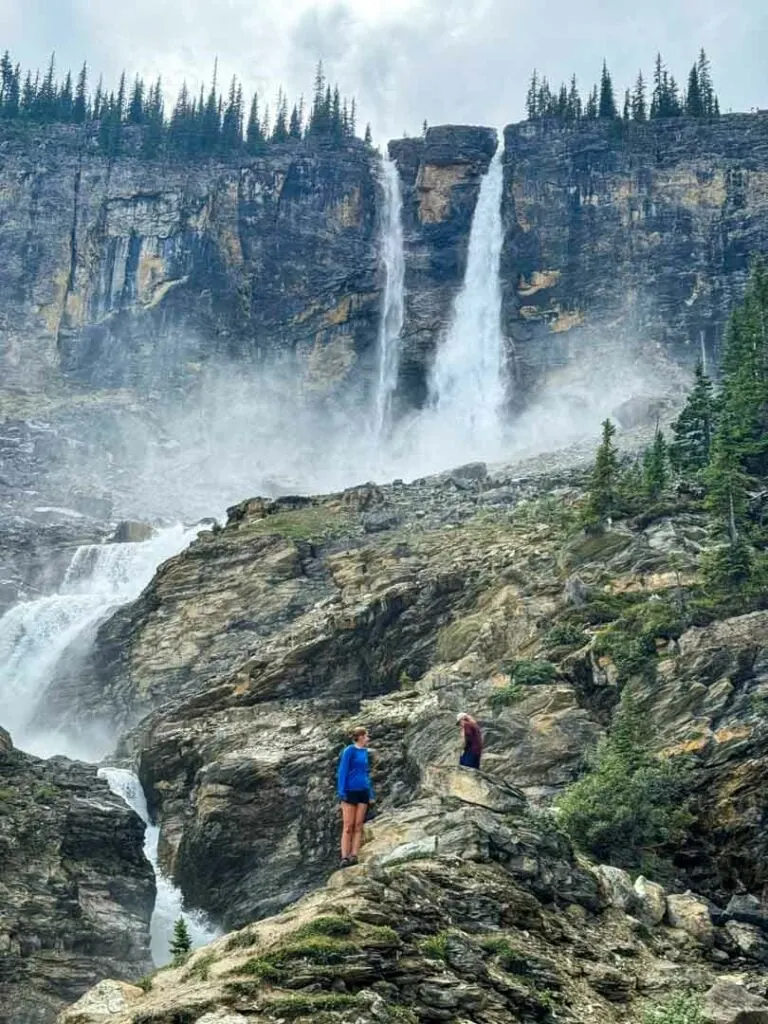
After enjoying the falls, backtrack to the junction and continue to Twin Falls Chalet 100 m away. Built in 1923, this building is a National Historic Site of Canada.
For decades Fran Drummond ran a teahouse and lodge for hikers here. Her last season was in 2019 and the tea house has sat vacant ever since. The Alpine Club of Canada was awarded a licence to run the tea house in 2022, but so far, they haven’t reopened. Even if the teahouse isn’t open, it’s worth a quick visit to see this cool old log building.


From the tea house, continue along the Yoho Valley Trail towards Twin Falls Campground. (Don’t take the Marpole Lake trail over the bridge – it leads back to the Little Yoho Valley.)
The trail descends gradually through the forest, often within earshot of the rushing waters of Twin Falls Creek. Reach the Twin Falls Campground on the banks of the creek 22.5 km from the trailhead.
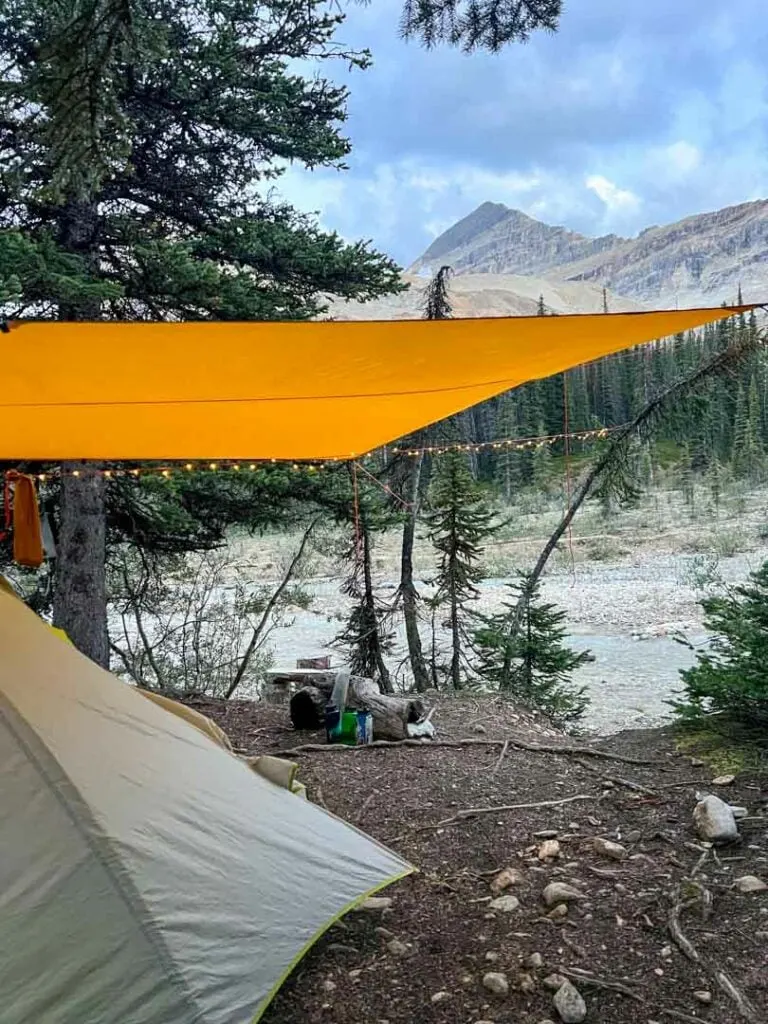
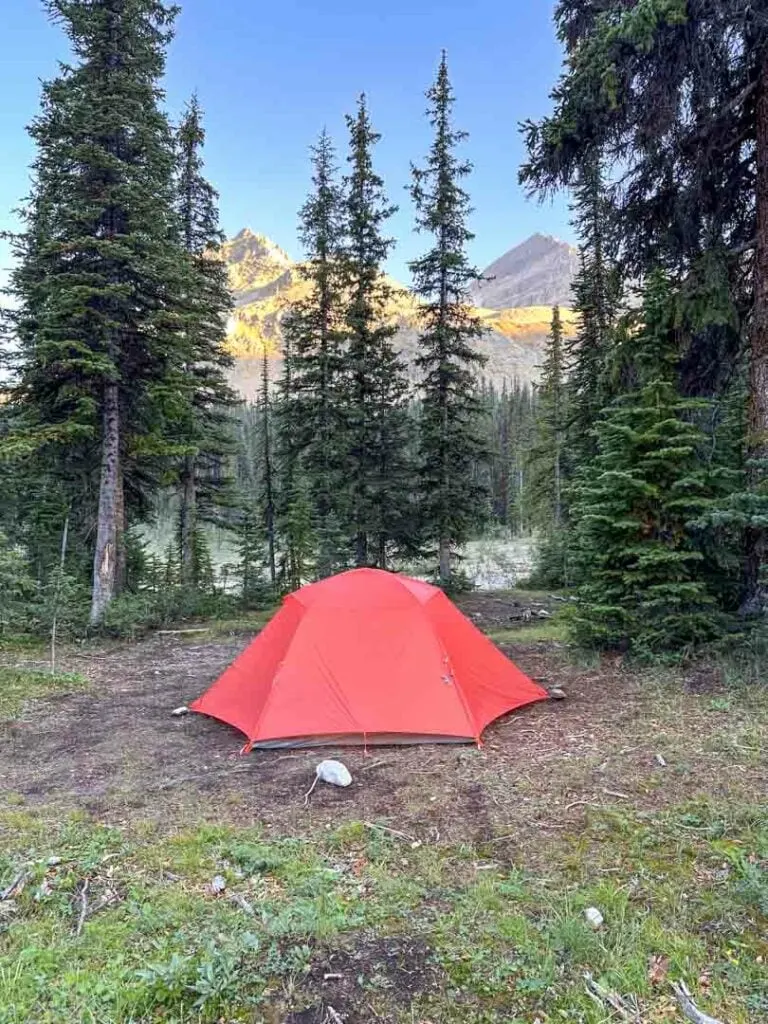
Twin Falls Camp
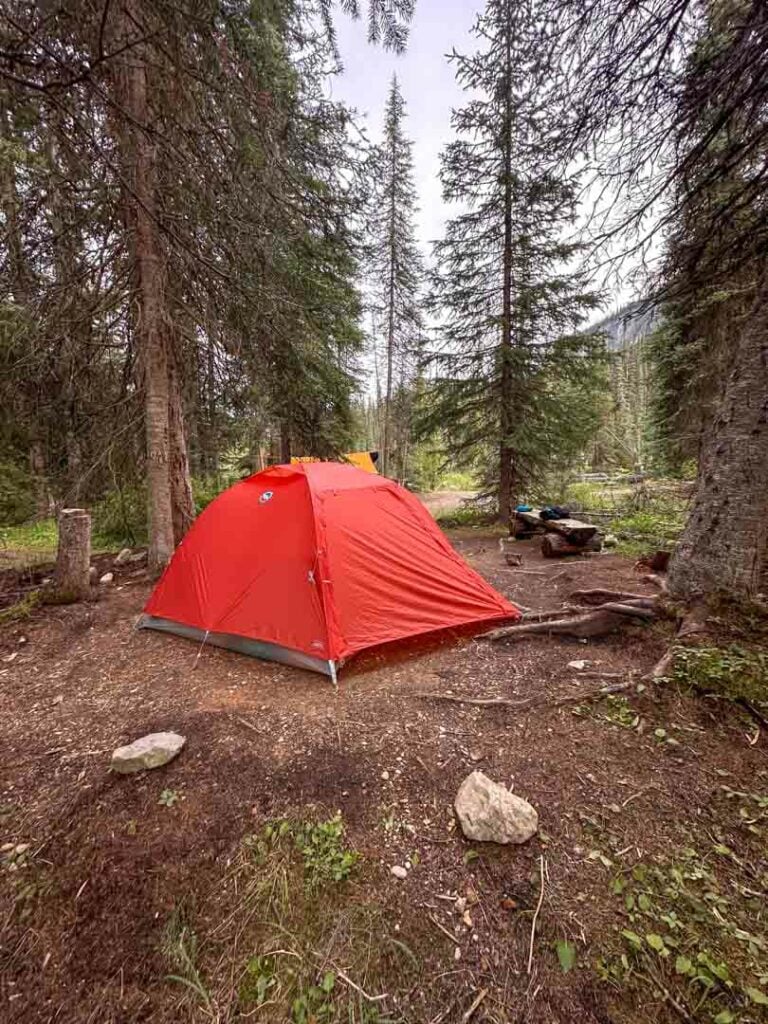
Twin Falls Camp is set on a gravel bar on the north side of Twin Falls Creek. The campsites are along a trail in the forest just back from the creek. There are no designated tent pads, but there are about half a dozen distinct clearings in the trees, most of which are quite flat and well-drained.
The outhouse is on the east side of the campground, just past the small bridge.
The cooking area is on the open gravel bar next to the creek. There are picnic tables and a food storage pole with pulleys. Collect water from Twin Falls Creek or from the unnamed creek on the east side of the campsite.

Twin Falls Camp to Laughing Falls Camp
Distance: 2.3 km
Time: 30 minutes to 1 hour
Elevation Gain: 37 m
Elevation Loss: 91 m
Head east out of the campground, following the trail past the outhouse and up a small hill. Ignore a junction with the Yoho Glacier Trail heading left. The trail swings around to the southeast and heads gradually downhill through subalpine forest. Twin Falls Creek is often nearby.

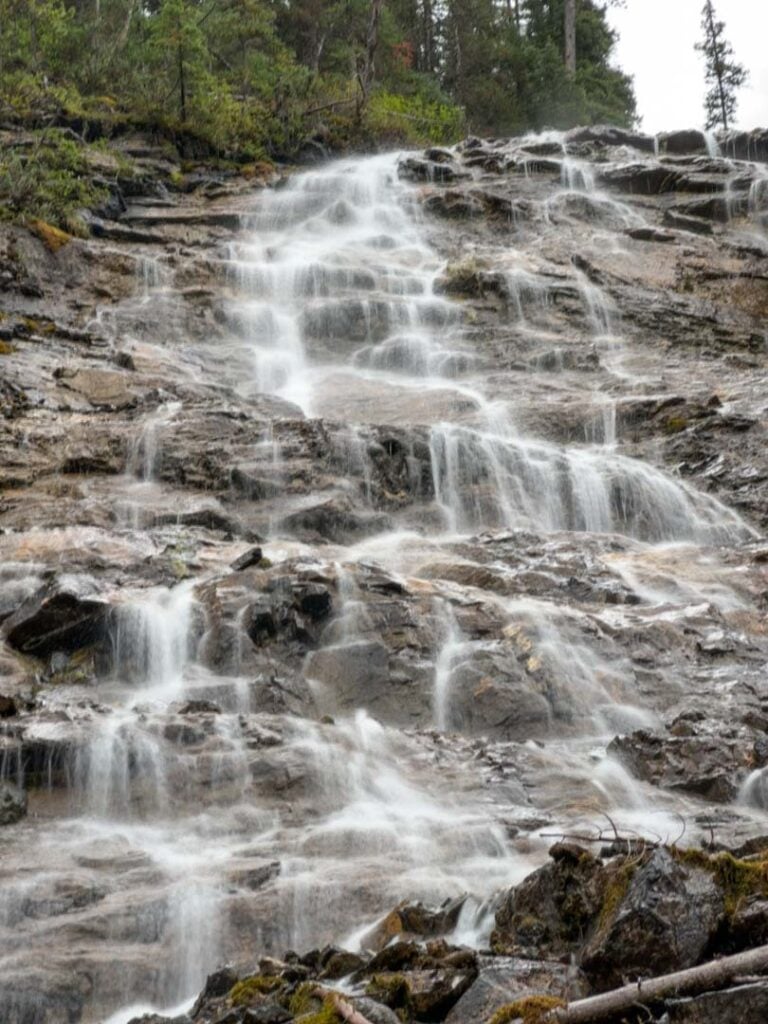
Cross the creek 24.4 km from the trailhead. A few minutes later, ignore a junction with the Little Yoho Valley coming in from the right. Immediately after that, follow a signed spur trail to the right to the base of Laughing Falls. The waters of the Little Yoho River spill over the 30-metre-tall falls.

Reach the Laughing Falls Camp at 25.1 km, just past the trail to the falls.
Laughing Falls Camp
Laughing Falls Camp is the nicest campground on the Yoho Valley Loop. It has designated dirt tent pads in a small loop where the Little Yoho River meets the Yoho River. Several of the sites are right on the river.
The cooking area is located in an open area with peek-a-boo views of Laughing Falls on one side and the Yoho River on the other. It has picnic tables and food storage poles with pulleys. Collect water from the Little Yoho River.
The outhouse is in a clump of trees near the cooking area.

Laughing Falls Camp to Takakkaw Falls Camp
Distance: 3.7 km
Time: 45 minutes to 1.5 hours
Elevation Gain: 50 m
Elevation Loss: 116 m
Leaving Laughing Falls Camp, cross the bridge over the Little Yoho River. Continue south on the Yoho Valley Trail, which soon swings away from the river. Reach a junction with the side trail to Duchesnay Lake at 25.7 km. The short trail leads to a shallow lake that dries up in late summer.
Continue along the trail through the forest to a 4-way intersection at 27 km. A short trail to the right (west) leads to Point Lace Falls, a small spread-out waterfall.

Another short trail to the left (east) leads to the edge of the Yoho River where you can look across to Angel’s Staircase Falls on the slopes above. It dries up in late summer and there wasn’t much to see on my late August trip.

Back on the main trail, head straight (south) to continue on the Yoho Valley Trail. Past the intersection, the trail widens and begins to look like an old road. It also flattens out as you trudge along beside the Yoho River.
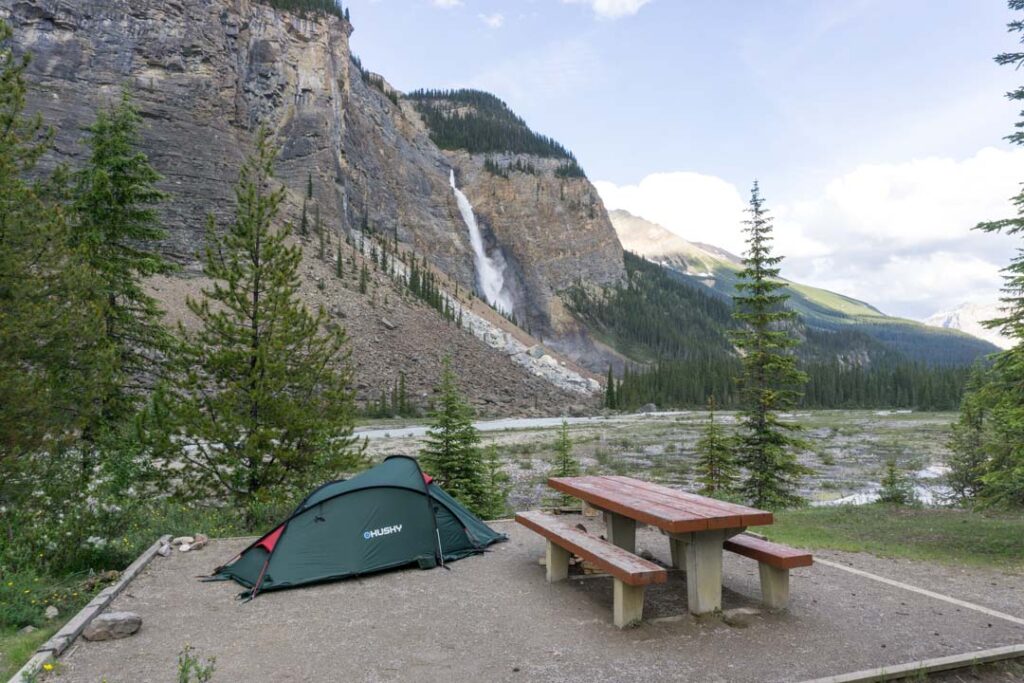
Cross a broad outwash plain littered with rocks and debris at 28.5 km. This area is the result of regular avalanches and floods from the glaciers on the Iceline Trail. At the end of the outwash plain, cross a bridge and arrive at the Takakkaw Falls Campground 28.7 km from the trailhead.

Takakkaw Falls Camp
The Takakkaw Falls Campground is classified as a frontcountry walk-in campground, not a backcountry campground, since it is such a short walk from the trailhead. It’s so short that Parks Canada actually provides wheelbarrows to make it easier to haul your stuff from the parking lot.
It has 35 crushed gravel sites. Most of the sites are fairly small by frontcountry standards and will fit only a 4-person tent. (They are big by bakcountry standards.)
Each site has a picnic table and there is also a covered communal cooking shelter with more picnic tables. You can store your food in bear-proof lockers at the centre of camp. There is also a food storage building with shelves that will fit coolers.
There is a washroom building with pit toilets. The campground also has a sink with potable water.

Takakkaw Falls Camp to Takakkaw Falls Parking Lot
Distance: 0.5 km
Time: 5 to 10 minutes
Elevation Gain: 0 m
Elevation Loss: 10 m
The walk from Takakkaw Falls Campground to Takakkaw Falls Parking Lot is an easy stroll on a wide gravel road.
Yoho Valley Loop Itineraries
A note for all of these itineraries: Since they are loops, you can do any of the itineraries in the reverse direction. However, that usually means a steeper descent (harder on the knees) and a gentler climb. I prefer to save my knees, which is why my itineraries have the climb first.
Classic 3-Day Yoho Valley Loop Itinerary
This is the itinerary described in this post. It’s the one that I used, and if I did this trip again, this is what I would choose to do because it hits all the highlights in the area.
While the distances on this itinerary are fairly short, the scenery is incredible and we spent a lot of time on the trail taking photos, snacking, and enjoying the views.
Day 1 – Takakkaw Falls to Little Yoho Valley Camp via the Iceline Trail – Distance: 11.4 km, Elevation Gain: 873 m, Elevation Loss: 295 m, Time: 5 to 7 hours
Day 2 – Little Yoho Valley Camp to Twin Falls Camp via the Whaleback Trail – Distance: 11.1km, Elevation Gain: 463 m, Elevation Loss: 870 m, Time: 4.5 to 7 hours
Day 3 – Twin Falls Camp to Takakkaw Falls – Distance: 6.5 km, Elevation Gain: 87 m, Elevation Loss: 217 m, Time: 1.5 to 2.5 hours
As an alternative, you could hike to Laughing Falls on Day 2 instead of Twin Falls Camp.
Quick 2-Day Yoho Valley Loop Itinerary
This itinerary uses the same route as the 3-day itinerary but compresses the last two days into one. This itinerary is good for strong hikers who don’t mind finishing late on day 2.
Day 1 – Takakkaw Falls to Little Yoho Valley Camp via the Iceline Trail – Distance: 11.4 km, Elevation Gain: 873 m, Elevation Loss: 295 m, Time: 5 to 7 hours
Day 2: Little Yoho Valley Camp to Takakkaw Falls via the Whaleback – Distance 17.6 km, Elevation Gain: 550 m, Elevation Loss: 1087 m, Time: 6 to 9.5 hours
Leisurely 4-Day Yoho Valley Loop Itinerary
If you want to split up the loop further, you can add on a night at Yoho Lake to make a 4-day trip.
Day 1 – Takkakaw Falls to Yoho Lake Camp – Distance: 4.6 km, Elevation Gain: 348 m, Elevation Loss: 52 m, Time: 1.5 to 2.5 hours.
Day 2 – Yoho Lake Camp to Little Yoho Valley Camp – 10.3 km, Elevation Gain: 597, Elevation Loss: 340 m; Time: 4 to 6 hours
Day 3 – Little Yoho Valley Camp to Twin Falls Camp via the Whaleback Trail – Distance: 11.1km, Elevation Gain: 463 m, Elevation Loss: 870 m, Time: 4.5 to 7 hours
Day 4 – Twin Falls Camp to Takakkaw Falls – Distance: 6.5 km, Elevation Gain: 87 m, Elevation Loss: 217 m, Time: 1.5 to 2.5 hours
As an alternative, you could hike to Laughing Falls on Day 3 instead of Twin Falls Camp.

Iceline Only 2-Day Yoho Valley Loop Itinerary
This itinerary gets you the full Iceline experience but skips Twin Falls and the Whaleback.
Day 1 – Takakkaw Falls to Little Yoho Valley Camp via the Iceline Trail – Distance: 11.4 km, Elevation Gain: 873 m, Elevation Loss: 295 m, Time: 5 to 7 hours
Day 2 – Little Yoho Valley Camp to Takakkaw Falls via the Little Yoho Valley Trail – Distance: 9.6 km; Elevation Gain: 58 m, Elevation Loss: 612 m, Time: 3-4 hours
Half Iceline 2-Day Yoho Valley Loop Itinerary
This itinerary skips Little Yoho Valley, which means you do half of the Iceline and skip the Whaleback. You still get to see most of the incredible scenery of the Iceline and to visit the base of Twin Falls.
Day 1: Takakkaw Falls to Twin Falls Camp via the Iceline and Celeste Lake Trails – Distance 15.1 km, Elevation Gain: 881 m; Elevation Loss: 737 m, Time: 6 to 8 hours
Day 2 – Twin Falls Camp to Takakkaw Falls – Distance: 6.5 km, Elevation Gain: 87 m, Elevation Loss: 217 m, Time: 1.5 to 2.5 hours
Laughing Falls 3-Day Basecamp Itinerary
If you’re up for some great day hikes but don’t want to carry your gear too far, base camp at Laughing Falls for a few days.
Day 1 – Part 1: Takakkaw Falls to Laughing Falls via the Yoho Valley Trail – Distance: 4.2 km, Elevation Gain: 126 m, Elevation Loss: 50 m, Time: 1 to 1.5 hours
Day 1 – Part 2: Day hike to the Whaleback and Twin Falls via the Little Yoho Valley, Whaleback, and Yoho Valley Trails – Distance: 11.7 km loop, Elevation Gain: 773 m, Elevation Loss: 773 m, Time: 5 to 7 hours
Day 2 – Day hike the Iceline via the Celeste Lake and Little Yoho Valley Trails – Distance: 15.5 km, Elevation Gain: 742 m, Elevation Loss: 742 m, Time: 7 to 9 hours
Day 3 – Laughing Falls to Takakkaw Falls via the Yoho Valley Trail – Distance: 4.2 km, Elevation Gain: 50 m, Elevation Loss: 126 m; Time: 1 to 1.5 hours.
Join the Backpacking in BC Facebook Group
Yoho Valley Loop Hiking Tips
Cooking Areas: Each campground has a communal cooking area with a few picnic tables. It was nice to have a place to sit down each evening! But don’t hog the tables – they are for everyone to share.
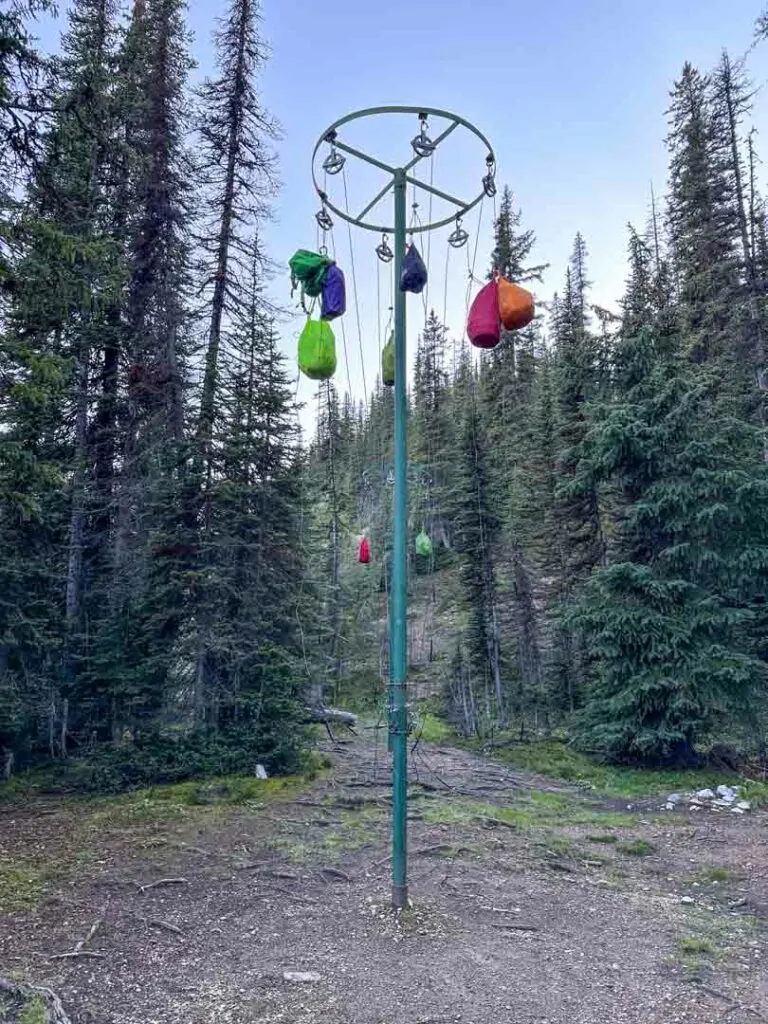
Food Storage: All campgrounds have a pole with pulleys for food storage. Bring a waterproof bag to store your food in case it rains overnight. I always keep my food in a lightweight dry bag. The pulleys have clips but some are broken – carry a carabiner as a backup.

Mosquitos: Bugs can be bad on the trail in July and early August. Bring bug spray and a head net.
Bears: This is black and grizzly bear country. Bring bear spray, make noise while hiking, and store your food securely. See my bear safety tips for more info.
Check the weather before you go: The high mountains are notorious for fickle weather. Rainstorms can blow in at any time. City weather forecasts are useless in the mountains. Use an algorithmic spot forecast for the Yoho Valley like Spotwx. (Read my guide to weather apps for hikers for more tips.)
Check trail conditions on the Yoho National Park website. This is especially important in early summer or fall when the trail can be icy or snowy. You’ll also want to make sure that the Whaleback Bridge is in place for the season.
Check Yoho Valley Road conditions on the Yoho National Park website. The road is closed due to avalanche hazard from mid-October to mid-June each year.
Final Thoughts
To be honest, I didn’t expect that much from the Yoho Valley – I knew it was going to be pretty because it’s in the Canadian Rockies. But I was blown away by how gorgeous this area is! It’s quickly become one of my favourite backpacking trips in the region (second to the Rockwall Trail I think).
Since the Yoho Valley isn’t as popular as some other Rockies backpacking trips, it also doesn’t feel as busy and is a bit easier to get reservations.
If you have questions about backpacking the Yoho Valley Loop and Iceline Trail, let me know in the comments – I’m happy to help.
READ NEXT:
- 11 Best Backpacking Trips in the Canadian Rockies
- 32 Best Backpacking Trips in BC
- Things to Do in Yoho National Park
- Rockwall Trail Guide: Everything You Need to Know
- Backpacking Checklist: Gear You Need To Go Backpacking
- Bear Safety for Hikers, Campers and Backpackers


- Grasslands National Park Travel Guide - February 4, 2026
- The Best (and Worst) Backpacking Meals Reviewed - December 16, 2025
- My Favourite Hiking Gear of 2025 - December 9, 2025
Paige
Wednesday 5th of March 2025
Hi there! We managed to snag one night at little yoho and I am debating what to do. We are moderate hikers but I am worried about doing the full whaleback and out in day 2, so we may opt for your "iceline only 2 day itinerary". Would it be possible/easier if we skipped the whaleback, did the shortcut to laughing falls, then turned left at laughing falls and did an out and back to the base of twin falls (before passing back through laughing falls and finish the hike at Takakkaw falls? Would this be just as long/difficult as taking the whaleback? My reasoning behind this idea being that we skip the huge ascent on day 2 and still see the beautiful falls from the bottom. Let me know what you think please :)
Taryn Eyton
Thursday 6th of March 2025
You've got lots of time to try to get a second night at twin falls - lots of people cancel or their plans change so reservations open up. Keep an eye on cancellations or sign up for a cancellation notification service. This post explains how they work The Best Camping Cancellation Apps: Campnab vs. Schnerp You can definitely skip the climb up the Whaleback and go directly to the base of twin falls - it's a much easier hike but you'll miss out on the incredible views of the whaleback.